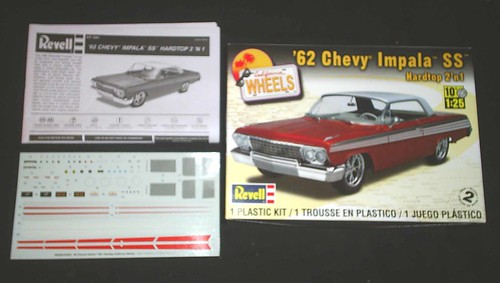
1962 Chevy Impala SS Hardtop Revell 1:25 85-4281 Review

RoR Step-by-Step Review 20110927* – 1962 Chevy Impala SS Hardtop 1:25 85-4281 Review
Revell 1/25 62 Chevy Impala SS 2N1<=Buy This Kit
Review and Photos by Stephanie & Marty Oberman  
Revell’s new 1962 Chevrolet Impala SS “2n1” kit (#85-4281) is a re-pop of its original release as a stock build. It allows the modeler to build it in one of two ways: as a factory stock replica or as a “California Wheels” version complete with custom wheels, low-profile tires, custom air cleaner and finned valve covers. It contains a whopping 149 parts, molded in pristine white plastic, clear glass/headlights, clear red taillights, chrome, and black rubber tires. A rather detailed decal sheet is included for engine, interior, and exterior applications.
First impression: I had been pining to build this kit for some time. I had a most enjoyable experience building Revell’s new ’66 Impala SS kit, and I fully expected this kit to be equal to it in terms of fit, finish, ease of build, and lack of building issues. The instruction sheet is clear, concise, and simple to follow. The parts are mostly flash-free and contact points on the trees are thick enough to hold parts in place while painting, but not so thick as to hinder removal of the parts. One nice thing I noticed is the thought Revell put into locating their tree contact points… for the most part, they are located in inconspicuous places on the part, making cleanup after removal much easier. Especially on the chrome tree. Kudos to Revell! I also like the minimal seams on the body. It made cleanup a snap. I only had one issue with the decal sheet: the hood and trunk emblem decals have the red/white outer portions, but the blue bow tie in the center is conspicuously missing. I’m not sure if this was faux pas on Revell’s part, but I was a bit dismayed by this, since I prefer using decals rather than chrome emblems. Luckily, I have clear red and blue paints at my disposal, so the chrome emblems will be used and detailed accordingly.
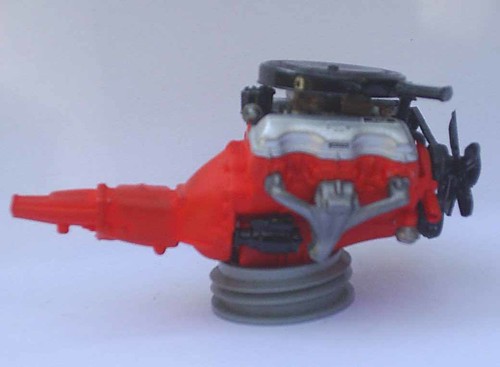
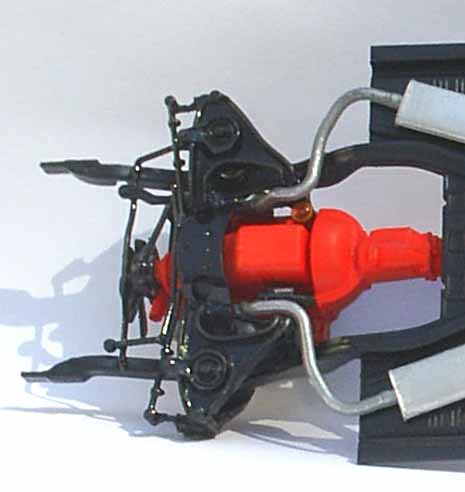
I began construction in my usual fashion…the engine and its components. For the most part the beautifully-detailed 409 engine assembled without issue. Contact points for parts are concise and well-fitting. I assembled the two-piece block/tranny, cylinder heads, water and fuel pumps, and oil pan as a unit before painting with Dupli-Color Chevrolet Engine Orange enamel. The instruction sheet shows the fuel pump painted aluminum. I deviated from this by including it with the block assembly when applying the engine orange color, then detailing the fuel pump bowl itself with aluminum. The stem remained orange, giving it a more detailed appearance. I painted the valve covers and intake manifold Testor’s Aluminum Plate buffing metallizer, which, according to photos of restored 1:1 ’62 Impala SS 409 engines, is correct. I painted the air cleaner, distributor, coil, generator, starter, oil filler tube, fan, and belt pulleys gloss black. The distributor base and vacuum bulb were detailed in silver. I detailed the belts with flat black paint. The fan clutch and carburetors were chrome-plated. I stripped the plating off both and painted the fan clutch gloss black and the carburetors gold. All of the above installed without a hitch…in fact, the generator has two brackets molded onto it. The hole on the generator and opposing tab on the fan belt pulley are keyed so it can only be installed in a certain position, allowing the brackets to align correctly on the engine block. That was a nice touch, and it took the guesswork out of aligning these two items properly. The engine decals were applied without incident and look great.
The only issues I encountered with this part of the build involved the exhaust manifolds and oil filter decal. The exhaust manifolds, which were finished in Testor’s Magnesium buffing metallizer, have horizontal rectangular tabs which supposedly fit into their corresponding openings on the heads. Test-fitting these parts revealed the tabs were longer than the openings. Carving 1/16″ off each end of the tabs and slightly enlarging the holes allowed the manifolds to seat properly on the heads, and allowed a bit of “wiggle room” to enable them to line up correctly.
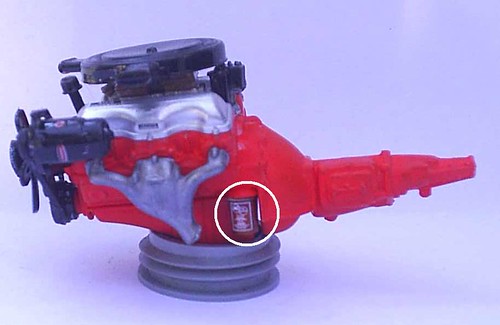
The instruction sheet calls for the oil filter to be painted white. Unfortunately, the oil filter decal is also white, making it disappear if applied to a white filter. I solved this by painting the oil filter a silver base, and then after it dried, coating it with Tamiya clear orange paint. This is a subtle “signature” of mine when I build. The decal stood out nicely when applied to this color filter.
Since I am building this car factory stock, I did not use the custom air filter or finned valve covers included for the “California Wheels” version. They will be destined for the parts box. The finished engine is indeed a beauty to behold. It is practically a model in itself, and despite the detail involved, builds up quite easily and looks great. Can’t wait to see it nestled in the engine bay!

After finishing the engine, I began the painting and assembly process for the chassis. Revell offers a one-piece chassis pan and separate interior floor for this kit, which makes painting both of them a lot easier since the modeler doesn’t have to worry about masking off a chassis pan that doubles as an interior floor. I painted the floor pan semi-gloss black and all the suspension components gloss black. I noticed that there were two one-piece front suspension assemblies. One is for the custom version, the other for stock. Also, there is a separate pair of coil springs for the custom front suspension, both for the “lowered” look. Since I’m building mine stock, I went with the stock setup. The custom parts are on their own tree, so mistaking one for the other is virtually impossible. Part numbers are also a dead giveaway. The instruction sheet points both out for builder reference.
Besides the lower front suspension, there are two upper A-arms, four coil springs, two rear shocks, a rear control arm, stabilizer bar, two-piece exhaust system,and driveshaft. In the interest of diversity, I painted the driveshaft stainless steel instead of black. The coil springs were painted black as well, but…to provide a sense of depth and distinction to them, after the paint dried I ran a silver Sharpie across the raised ribs of the springs. It makes them look more realistic, as I remember when coil springs were actually colored steel! The coil spring detail can be seen in this pic of the completed chassis with engine installed.
I started out this process by installing the engine, which fit nicely in place. Contact points were concise and left the engine sitting level when glued in. I then installed the exhaust system, which I painted stainless steel with aluminum plate mufflers, both Testor’s buffing metallizers. Although the exhaust system contact points lined up well on the chassis pan, the passenger side exhaust pipe did not line up with the exhaust manifold without using pressure to hold it in place. After numerous attempts to coerce it to stay on the exhaust manifold, I resorted to the “big guns”. Ambroid pro-weld did what my CA glue couldn’t. Issue resolved. ;c) The instructions then called for the upper A-arms to be installed next. The only problem is, the contact points with the frame were rather vague, since they not only needed to align with the frame but with the notches on the lower suspension as well. I deviated from the instruction sheet by installing the lower suspension first, then after it dried, aligned the upper A-arms with the notch for them in the lower suspension, and worked them around until they seated properly on the frame. It was a bit tricky to do, but it was a success. The front coil springs did not offer much resistance, but I still wish they had more concise mounting points.
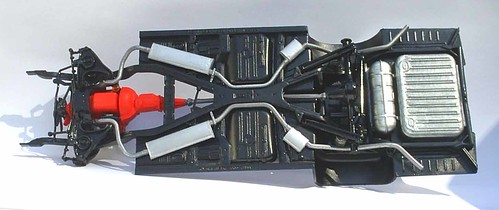
Moving on to the rear suspension, I glued the differential to the rear axle before painting. I tend to do this whenever possible: glue parts painted the same color together before painting, yet allowing them to remain on the tree. I believe it gives all parts a more uniform look, and the paint tends to fill in any gaps between the mated parts. First I glued the rear coil springs into the chassis pan, and before they could dry, applied glue to the contact points on the rear axle. I then guided the driveshaft through the chassis pan opening and inserted the front end into the locator hole on the engine/tranny without glue. I lifted the rear of the driveshaft, inserted it into the axle’s locating hole, then guided the rear axle into place on the chassis. A smooth process, especially considering I had to line the coil springs up with the axle to set completely in place. Another deviation from the instruction sheet is that I installed the rear control arm before the stabilizer bar. The control arm locates through a hole in the chassis pan and attaches to the underside of the rear axle. It was easier to perform this task without having the stabilizer bar interfere with the process. After the control arm was installed, the stabilizer bar was a breeze. The rear shocks were no issue to install. The instruction sheet mentions clearly where they are located, and I had no problems installing them. The chassis, despite the one-piece front suspension (which is actually nicely-detailed), looks very believable when finished.
I turned my attention to the interior assembly after the chassis was complete. At this stage of the building process I discovered that there were no “SS” designations for the car on the decal sheet, even though the box describes it as an “SS”. The Impala scripts simply show “Impala” with the Impala logo. That changed my whole thinking about how to proceed with the build. I decided then and there to build it as a “base” Impala with maybe some factory extras. This change in my approach began with the interior assembly.
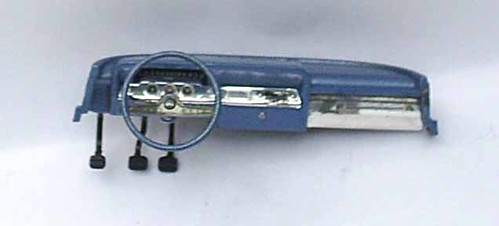
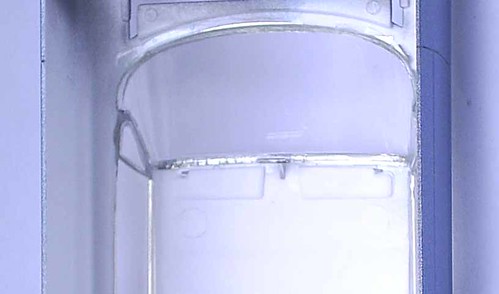
The interior consists of a separate floor pan with the package shelf and inner fenders molded onto it. The side interior door panels are two separate pieces. The dashboard contains molded-on brake, clutch, and emergency brake pedals. The gas pedal is molded into the floor pan. There are chrome inserts for the instrument gauge and dash panel. A separate grab handle secures to the dash panel. The steering wheel and steering column are separate, the column containing the turn signal stalk. Front seats are two-piece affairs, and a separate rear seat with chrome speaker, mount to the interior. A center console and chrome-plated shifter and shifter plate round out the interior.
Starting out, I masked off the interior part of the pan and painted the inner fenders semi-gloss black. Then, when dry, I masked off the inner fenders and painted the floor pan, package shelf, dash, steering wheel and column the body color (GM Light Blue metallic). I clearcoated the dash and steering wheel/column, and applied a flat clearcoat to the floor and package shelf. I left the seats, door panels, grab handle, and console white. I applied the gray seat insert decals to the seats, front and rear. The front seat decals are one-piece, and were a bit tricky getting them to tuck into the crevice between the seat bench and seat back, but with a little coaxing, managed to tuck into place. The rear seat decals are two-piece affairs for each side, and were a bit more difficult to line up properly. This modeler suggests cutting the decals close to the bottom of both the seat and seatback where they meet in order to obtain a more snug fit, since the decal “overlay” between the two prevent them from contacting each other properly.
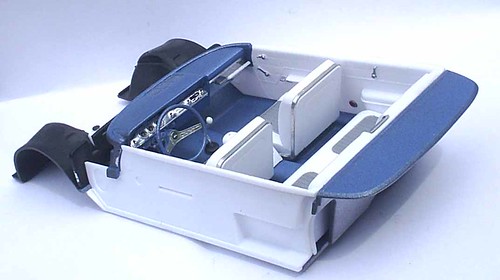
Other decals include stock and custom speedometer gauges, accessory gauges, insignia for the rear speaker, steering wheel insignia, tach face (if used), lower door panel “red” lights, and shifter pattern. Since the shifter ball was considerably smaller than the decal, I deleted it. I also deleted the tach and chrome floor shifter plate, instead opting to paint the molded-in shifter “boot” flat black since I was going with a non-SS Impala at this point. I did, however, include the center console, since it rests on tabs on the floor pan, and I didn’t want to spend unnecessary time attempting to cut them out and sand them off. Call me lazy. ;c) I detail-painted the door/window handles silver. The decals for the instruments, door panels, steering wheel, and rear speaker were applied with no issues at all. I applied chrome foil to the front seat surrounds to make them look more appealing. I painted the pedal stems gloss black, and the pedals themselves flat black.
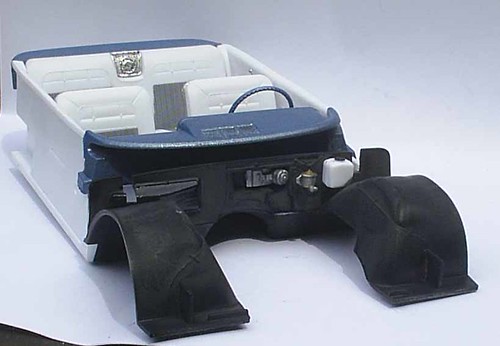
The firewall attaches to the interior pan, and contains a master brake cylinder, washer bottle, and chrome-plated wiper motor. I stripped the chrome plating off the wiper motor and painted it Magnesium buffable metallizer. I wish the washer bottle were a clear part instead of white plastic…one of my favorite detailing techniques is to paint the inside of a clear washer bottle (which normally is open in the back where it attaches to the firewall) Tamiya clear blue, giving it the illusion of being full of washer fluid, and making it look like the fluid is on the inside of the bottle. Despite this, I painted the washer bottle cap flat black and left the bottle white.
The interior components, firewall and its components assembled without any issues. In fact, I didn’t have to use clamps to hold parts in place while they dried! That for me is a very rare but welcome occurrence, and is quite a testament to Revell’s designers and engineers for their attention to detail.
I then attached the interior to the chassis floor pan. There are pins in the floor pan that line up perfectly with the chassis pan, making installation a no-brainer.

In the meantime, I assembled and installed the stock tires/wheels. I must admit, I was disappointed to discover that, although the box art stock build depicts whitewall tires on it, there were neither whitewall decals nor plastic inserts for whitewalls with the stock tires. This modeler is a huge fan of whitewall tires, and would probably install them on a top-fuel dragster if he could. ;c) Luckily, I had built the Revell ’66 Impala kit which contains decals for the whitewalls on the stock tires. I applied them, but wasn’t thrilled with the result, so I decided to go with a set of redlines from the parts box for it. I found the whitewalls, and discovered the wheels and wheelbacks for the ’62 Impala fit them perfectly! The chrome stock wheels include optional spinners for the SS version, but since this model will be built and finished as a regular Impala, I decided to forgo the spinners. There are blue decals containing tiny “bowtie” symbols for the centers of the hubcaps in case the builder wishes to not use the spinners. I decided to paint the centers of the hubcaps Tamiya clear blue and disregard the decals completely. The hubcaps also contain small recesses on the outer parts of the rims which I applied a black “wash” to in order to detail them.
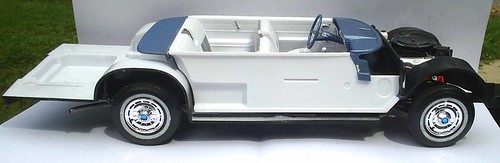
Revell has changed their method of wheel attachment, at least as far as this kit is concerned. Instead of the flanged pins sticking out of the axle assemblies, they’ve gone to a metal pin inserted into the wheelback, and protruding into the axle assembly. This modeler prefers this method over the former, since there is less chance of accidentally snapping the flange off the axle while attempting to install the wheels, especially when both the axles and wheelbacks have already been painted. Tolerances tend to decrease unless time is spent removing paint from both. Although three of the four wheel assemblies were loose after installation, it is only because I reamed out the holes a bit on those particular three anticipating a tight fit. I should have left well enough alone. here).”
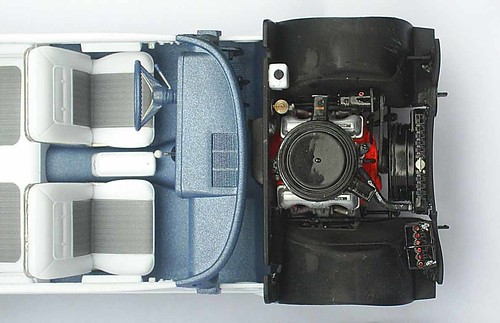
My next task was to paint and assemble the radiator wall to the chassis. The wall contains a two-piece fan shroud ring, fan shroud, radiator, and battery. I first assembled the fan shroud ring, leaving one part still on the tree. When dry, I attached it to the fan shroud itself, while the shroud was still attached to the tree, since both items were to be painted gloss black. I painted this assembly, the radiator, and the battery gloss black. When dry, I painted the radiator “fins” flat black on both sides, and the radiator cap silver. I detailed the battery terminals and caps silver as well. Once dry, I painted the caps Tamiya clear red. Assembling and installing all these components was easy and there were no fit problems.
Earlier I had painted the upper radiator hose flat black, and the thermostat housing aluminum plate, to match the color of the intake manifold it attached to. I also applied the decal to the upper hose. However, attempting to install the hose was extremely difficult, since the air cleaner interfered with the installation. I was forced to remove the air cleaner in order to properly install the hose. It would greatly benefit the modeler to leave the air cleaner off the engine until the hose is installed. This modeler believes the instruction sheet should have directed the builder to do so. I did not even attempt to install the bottom radiator hose, since most of the time it’s impossible once the engine is installed into the chassis.
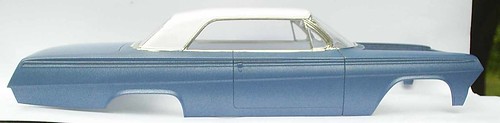
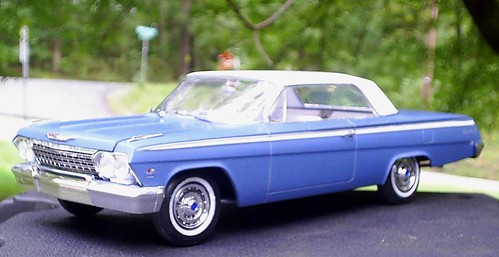
I painted my Impala Dupli-Color GM Light Blue metallic acrylic lacquer. Before doing so, I masked off the roof and left it bare plastic white. The roof interior was also left white. After the paint/clearcoat process had dried, I polished the body out and applied chrome Bare-Metal foil around the windows. I also polished out the roof with Novus #2 to get rid of any tape residue left over from the masking. I then waxed the windshield, rear window, and vent windows with automotive wax, then installed them using Elmer’s School Glue clear blue gel. They snuggled into their respective recesses nicely. I like using the Elmer’s because if any glue accidentally finds its way onto the glass, it can easily be removed, where CA and other glues can’t. Plus, it doesn’t fog the windows when applied. Granted, the strength of the bond is weaker than with other glue types, but with careful handling it stays in place.
After the glue dried on the glass, I installed the rear-view mirror, sun visors, and chrome interior side dome lights. All had their respective “hollowed out” niches for easy and precise installation. However, the recess for the rear-view mirror left a sink mark on the exterior of the roof. The modeler may wish to fill this in and sand it before painting the roof. Also, the “outlines” for the sun visors seemed backward: while the visor hinges should have pointed inward towards the mirror, the outlines for them seemed to point in the opposite direction. The back of the visors themselves had mold ejection pin marks on them, so I knew they shouldn’t be installed face up with them showing. The modeler may wish to sand these marks down if installing the visors in this fashion.
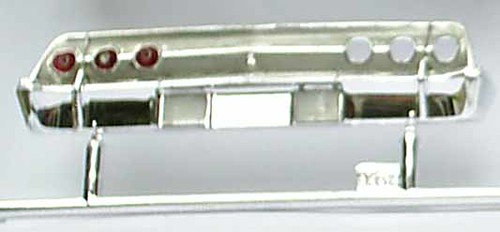
It was now time to assemble the body to the chassis, install the exterior components to it, and finish her. I began by test-fitting the body to the interior/chassis. This was easily accomplished by slipping the front end over the engine bay, then gently coaxing the rear fenders over the rear inner fender wells. I checked for contact points, removed the body, applied glue to the contact points, then easily installed the body using the aforementioned process. While this assembly dried, I detailed the front grille/headlight piece and the front bumper. I gave the grille a flat black wash for depth and realism, and used Elmer’s School Glue Gel to install the clear headlight lenses. Having a slight blue tint to the Elmer’s glue, it gives the headlights a more realistic look than using white glue, at least in this modeler’s opinion. Next I painted the “grille” on the bumper aluminum using a silver Sharpie.
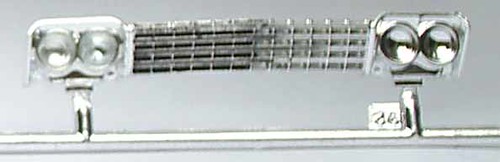
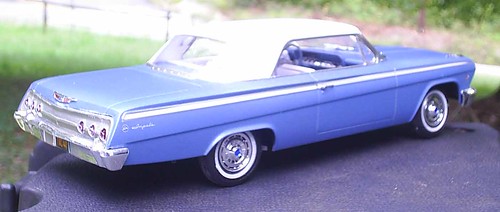
At the same time, I wanted to detail the rear taillight panel in other than the chrome plate it came in. The Impala’s taillight panel was actually an aluminum color, with the surrounding trim and horizontal strip between and around the taillights remaining chrome. It was a tricky procedure, but the old reliable silver Sharpie did the trick. Any excess silver paint on chrome trim easily wiped off and the look is credible. I also detailed the split “grilles” on the rear bumper in the same fashion. Installing the taillights was a bit fiddly, since the recesses in the back of the taillight panel were larger than the red taillight piece. Judicious use of glue and moving the taillight lens around to center it up with the opening assured a proper fit. This picture shows the “before/after” of the detail work on both front and rear pieces.
The front headlight/grille assembly was error-free. Revell wisely saw fit to include a separate body-colored filler panel between the grille and bumper, which is correct. The instruction sheet directs that all three pieces should be assembled before mounting to the body. I deviated from this by installing the grille piece onto the body first, installing the filler panel onto the bumper, then mounting the bumper/filler panel onto the body/grille. The locating tabs for these pieces were on the money, but this modeler didn’t take any chances, ergo the deviation. The rear taillight/bumper piece mounted to the body without any issue.
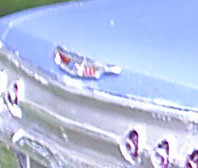
Because the decal sheet lacked a blue “bowtie” for the front and rear hood and trunk emblems, I was forced to use the chrome pieces instead. They mounted well onto their respective parts, and I used Tamiya clear red and blue paints using a toothpick (this modeler’s favorite and most-used tool) to pick out the correct colors on the emblems. They both looked good when finished.
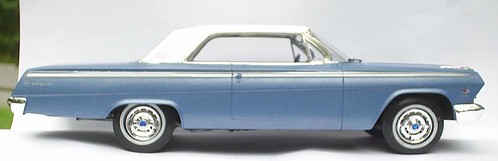
I then applied the chrome/white side stripe decals to the body. Revell offers a choice between white and red inserts on these decals, and since my color scheme on the car is blue and white, well…naturally I chose the white insert. They are two-piece affairs for each side, divided at the rear of the door. After they dried, I used my Exacto knife to slice a “gap” where they passed through the front of the door. I then applied the “Impala” script/logo decals on the rear fenders, and the “twin flags/409” emblems on the front fenders. All decals went on without a hitch and look quite presentable.
To wrap things up I installed the chrome door handles and the fender ornaments. The door handles mounted without issue, and look quite in scale. The fender ornaments also look in scale, however…they are VERY delicate and the modeler must use extreme care when removing them from the tree. This modeler found out the hard way, when the trailing edge of one ornament broke and flew off into the “wild gray yonder” (my carpeting) during removal. Luckily I found it amongst the debris that unfortunately litters the carpeting of my “workshop”, and was able to re-attach it to the remainder of the ornament after it was glued to the body…whew!! Unfortunately I wasn’t so lucky with the outside mirror, whose attachment point on the stem not only broke off, but the mirror itself snapped out of the grasp of my tweezers, never to be heard from again. There are definitely pluses and minuses in attempting to make model parts look scale-correct. This modeler tends to make these decisions unwise. ;c)
Revell includes a set of chrome finned rocker panel trims for this car, but since I was going for more of the “plain-Jane” base/standard Impala look I decided not to install them. Personally, I like the looks of the results.
Final overall impressions: This modeler will start using a “5-star” rating from now on in his assessment of a model he reviews…1 star being poor, 5 stars being excellent. The Revell ’62 Impala “SS” kit gets 4 stars from me. Such things as overall build quality fit and finish, instruction sheet directions, and parts tree attachment points were excellent. There are too many good qualities about this kit to list. It’s easier, and makes for a shorter list, to point out the deficiencies: the obvious decal omissions, box art/kit discrepancies with whitewalls, exhaust manifold, upper radiator hose, and upper A-arm fit issues are the only things that come to mind. When this modeler spends most of his time on a kit review explaining the different detailing techniques he uses during assembly rather than pointing out the kit’s deficits, that’s a good indication that it’s a winner. And to this modeler, it is. Possibilities are endless with various aftermarket parts to actually create anything from a top-of-the-line Impala SS to a baseline Biscayne. I chose the middle of the road. The custom accessories also allow the builder to personalize his or her own build.
Would I buy this kit and build it again? Absolutely, but if I did I’d make sure I was prepared to tackle the minor issues that I encountered on the initial build, especially if I intended it to be a contest entry. Forewarned is forearmed.”
Â
*All Registered trademarks are the property of their respective brands.
Â
Â
