Sample Review

The review below is a sample of the kind of information and tips you get in every Premium Quality Model Kit Review from Right On! Replicas, LLC. We’re so confident that you’ll love these info-packed full color Step-by-Step reviews – we guarantee your satisfaction! If for any reason you don’t feel you aren’t getting your money’s worth, just let us know and we’ll make it right. Email righton@rightonreplicas.com with any issue.
RoR Step-by-Step Review 20110922* – ’32 Ford Street Rod Monogram 1:25 85-0882 ReviewÂ
Revell 1:25 32 Ford Street RodBuy This Kit
Â
Review and photos by Doug Cole 
For the modeler – As good as this kit is straight out of the box, there are a few things you’ll need to know if you’re going to take this awesome ride to the local model contest. A couple pin mark locations and a design consideration will need to be addressed to make this a knockout showpiece. The decals – although they are top notch also need a little coaxing. See the Step-by-Step review for all the details.
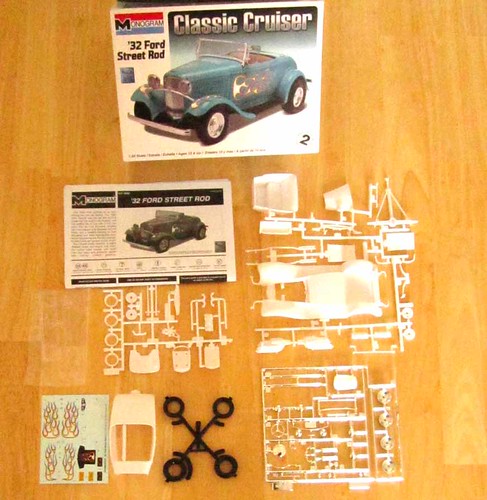
Fig 001 – This kit features 75 pieces molded in white with excellent flame graphics and decals with soft black “fatties†and generous chrome parts.
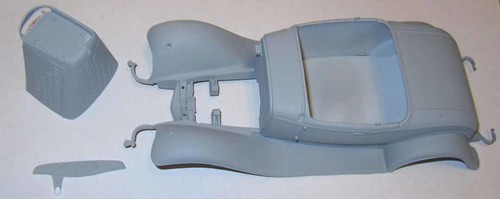
Fig 002 – Most kits, including this one, start out with engine assembly but this build started out with body prep and paint because it took the most time and the other steps could be built while waiting for the paint to dry. Start by sanding all the body seams and minor flash and then paint all the parts that will be the body color with primer coats in thin layers until you get good coverage. DupliColor Filler Primer was used here. After it dries give it a light sanding and then a coat of DupliColor Primer Sealer. Set aside overnight to dry.
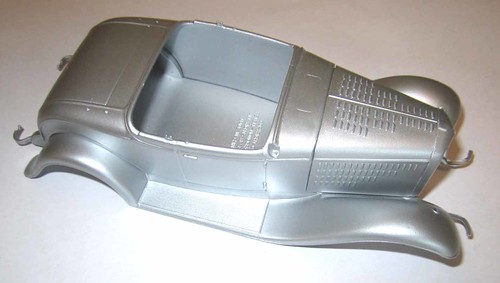
Fig 003 – Spray the body with a light base coat if you’re using a candy or metallic finish coat and let that dry thoroughly. Testor’s 1246 Silver Metallic spray was used here.

Fig 004 – With a silver base for reflectivity this “Deuce†is a knockout wearing four thin layers of Testor’s 1631 Burgundy Purple Metallic. This really shows off the contrasting flame graphics. Put this aside for a few days to dry thoroughly.
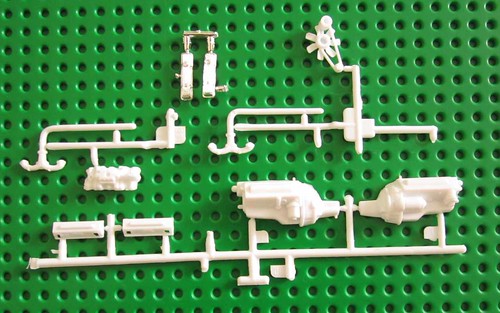
Fig 005 Gather the engine pieces to begin assembly. Note that there is no separate oil pan so the bottom of the engine will show that seam splitting the oil pan in half longitudinally. If you’re going to make this a contest model, you’ll have to fill that seam before painting.
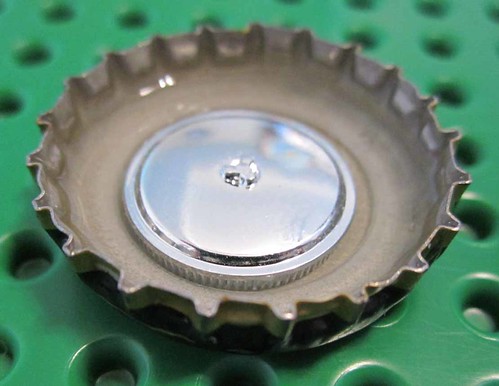
Fig 006 – From the chrome tree I finished off the valve covers with a little black wash to accentuate the ribs and placed the air cleaner in a bottle cap after trimming down the mounting stem (you’ll have to replace this later with a little section of sprue or plastic rod to get the mounting height you desire). Fill the bottle cap carefully around the edge with bleach using a medicine dropper to raise the level up to the top of the filter section just below the chrome top. After about 30 minutes the bleach will remove the chrome plating from the paper filter portion. Place the bottle cap with the air cleaner and bleach still in it under a faucet then hold the air cleaner in with you finger. Turn on the water and flush the bleach out quickly

Fig 007 – This is the result of the bleaching. Go around the top rim with a silver Sharpie pen to finish it up.

Fig 008 – After painting the engine and transmission add a little black wash for realism.
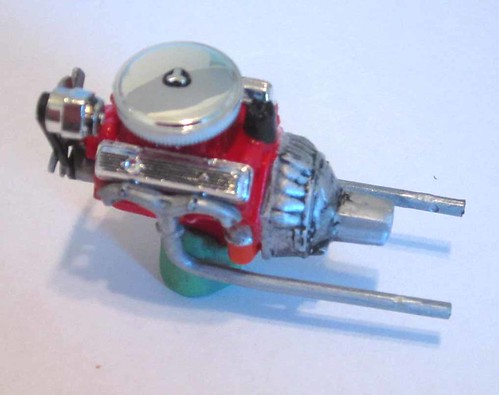
Fig 009 – The completed engine assembly is really nice and clean.
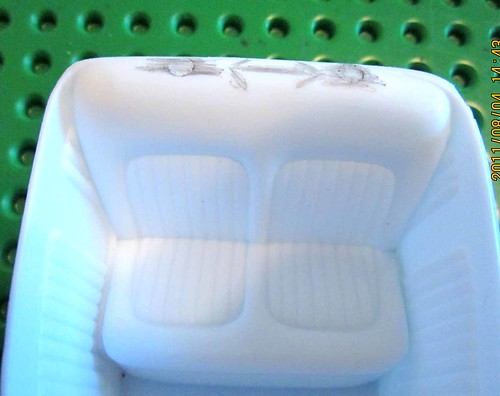
Fig 010 – Before you finish off the interior bucket, note that there are two ejector pin marks on the top of the seats that should be filled prior to painting. I primed after filling them and finished this off in a satin saddle color. That is when I noticed that down on the floorboard there are three ejector pin marks in the carpet. Because this area is textured to emulate carpeting I suggest that flocking be used there to hide the pin marks for contest bound builds.
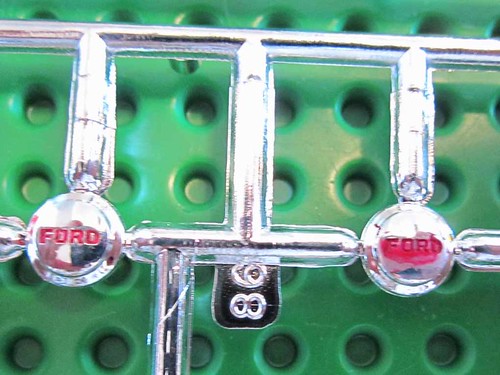
Fig 011 – Use a red colored wash here to highlight the Ford script on the hub caps. This can be made from a drop each of red acrylic paint, warm water and dish soap. Mix thoroughly and brush it on. After it dries (see the one on the left above) lightly rub off the hub cap leaving the wash in the script.

Fig 012 – Gather the pieces for the wheel/tire and assemble per the directions. Sand the tread off evenly for a more realistic look.
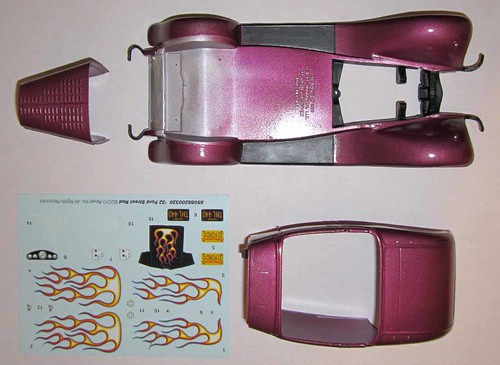
Fig 013 – Paint the running board treads flat black with a steady brush or mask it off and spray. Assemble the body parts for a mock-up to apply the decals.Â

Fig 015 – This is probably the most difficult part of the entire kit. Although the kit is rated a #2 skill level I think the fender flames are why. The rest of the kit is a breeze but you’ll need some help getting these flames to flatten out to the contour of these fender surfaces. Four applications of Micro Sol were used to get them to lay down flat. After each application watch the decal and smooth it down as it dries with a soft cloth or cotton swab/cue tip.
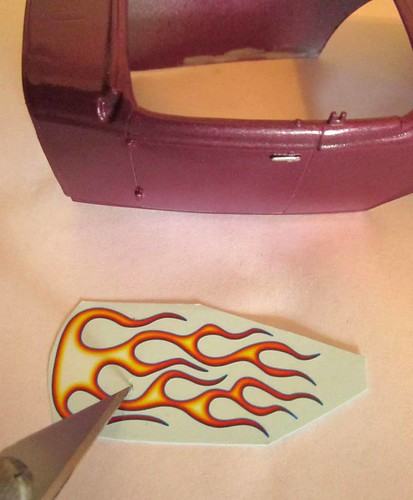
Fig 016 – Place the door flames on their locations and note where the lower door hinge interferes with the decal. Use a sharp hobby knife to make a small vertical slit in the decal at that point to fit over the door hinge when you apply it to the door.
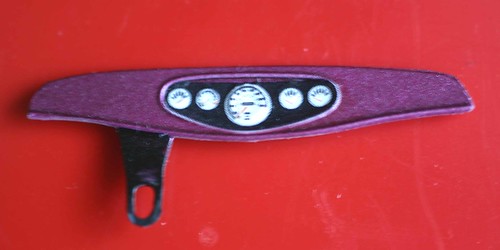
Fig 016a – Apply the realistic instrument panel decal to the dashboard.
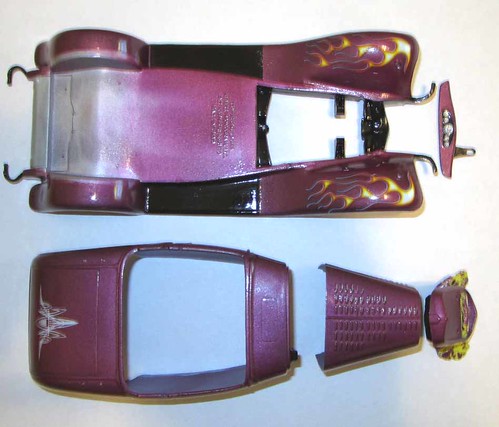
Fig 017 – Give the model a good clear coat to seal all the decals. I used three coats of DupliColor Engine Enamel to bring out the shine. Note that you’ll have to go back over the running boards with a clear flat coat after this.
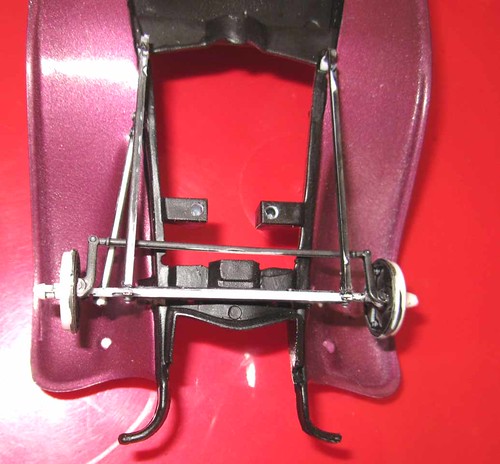
Fig 018 – Turn your attention to the chassis while the body and decals are drying and assemble the front end according to the instructions. It’s really straight-forward but remember to remove paint where the surfaces are to be glued together. You can touch these areas up later with a brush.
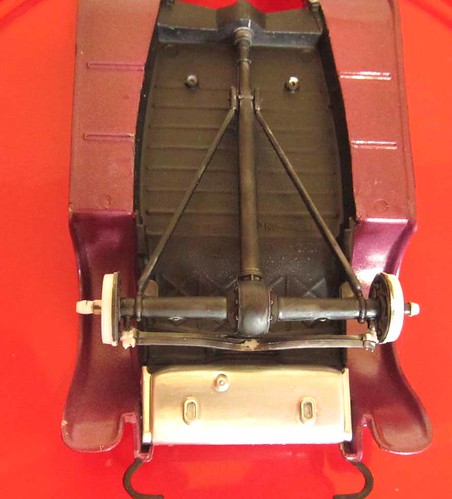
Fig 019 – Do the same thing at the rear to assemble that portion of the suspension.
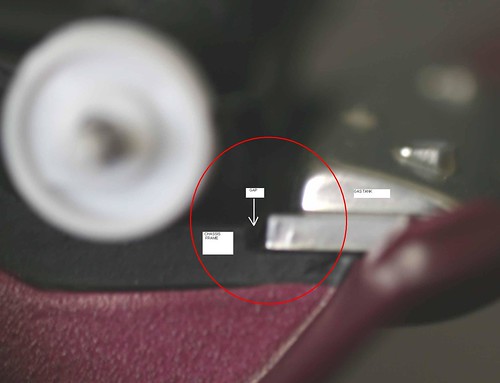
Fig 019a – One tricky little item in this kit is the gas tank/frame section. The gas tank is split in half and the top is part of the body while the bottom is part of the chassis. For a contest model these would have to be assembled leaving the gas tank unpainted after the frame and chassis are done. That way you could finish off the seam and paint the tank properly. The other quirk is that the part of the frame attached to the lower gas tank should be finished off in black like the frame. These two sections don’t mate up well either. For the perfect model, the frame portion shown here in silver should be sanded down to match the chassis frame height, painted black and the gap should be filled where they are supposed to meet up.
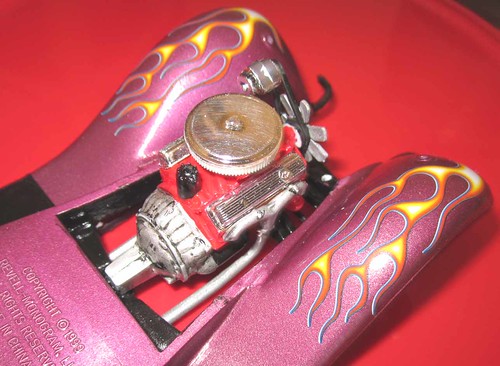
Fig 020 – Drop the engine into the engine bay using some cement to align it.
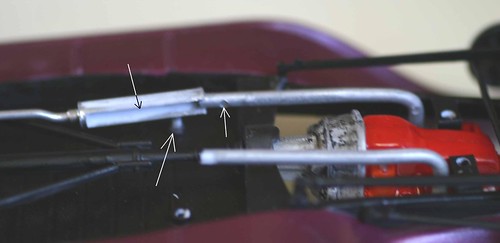
Fig 021 – Add the exhaust using the mounting stems that go into the chassis. They are unpainted here so they will adhere but they can be touched up later with some flat black. The mufflers are molded with open sides which would need to be filled along with the ejector pin marks on the inside of the engine exhaust pipes for contest entries.
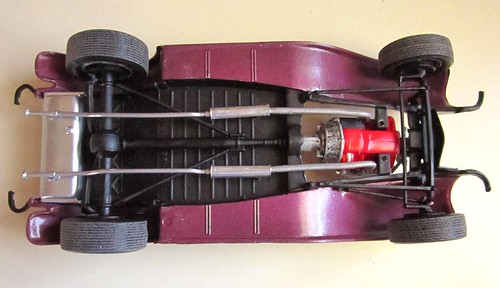
Fig 022 – The completed chassis has a nice clean look to it.
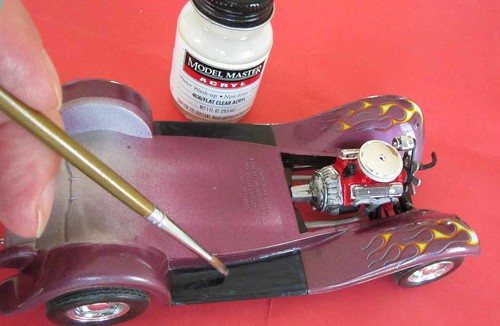
Fig 023 – a little Model Master Acrylic flat was used to return the flat finish to the running boards.
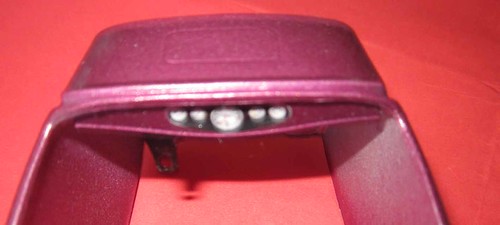
Fig 024 – Place and glue the dashboard to the inside of the body at a slight upward angle.

Fig 025 – Finish off the interior tub by adding the steering wheel and shifter then glue it the into the body using the small pegs toward the rear as positive stops.
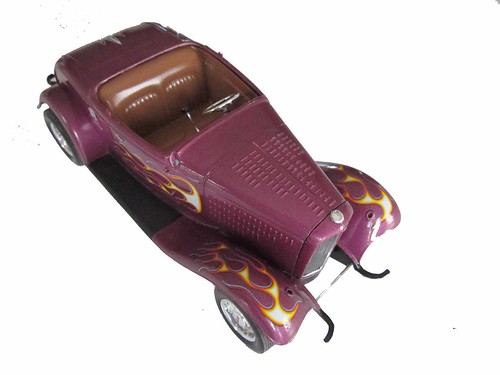
Fig 026 – Glue the body and radiator shell into place and then add the spreader bar, grill and radiator cap to the front end.

Fig 027 – scrape the chrome from the windshield mounting points and use a little white glue to assemble the windshield to the frame.

Fig 028 – Here is the assembly with the Maltese cross emblems on the side glass. It compliments the etching on those panels nicely.
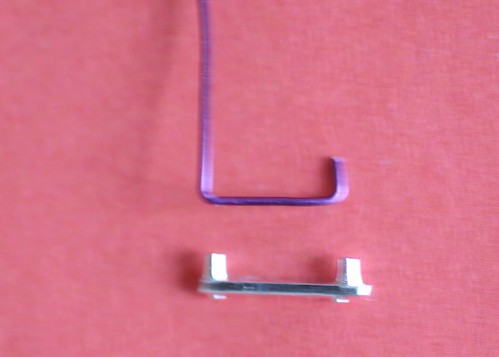
Fig 029 – The chrome grab handles that come with the kit are a nice touch but I decided to use some purple anodized beading wire (available at most craft stores) to fabricate a replacement for this build. Secure them with a tiny amount of slow setting glue like Testor’s tube glue.
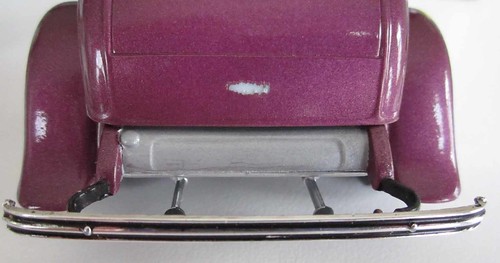
Fig 030 – Although it hurts, you’ll have to scratch off some of that paint (there’s eleven coats) to have a place to secure the license plate and frame. Add the license plate frame and bumpers at this step to the front and rear.
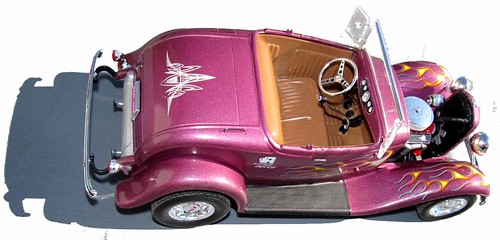
Fig 031 –Add the headlights and taillights and you’ve got a real showpiece to put on the shelf.
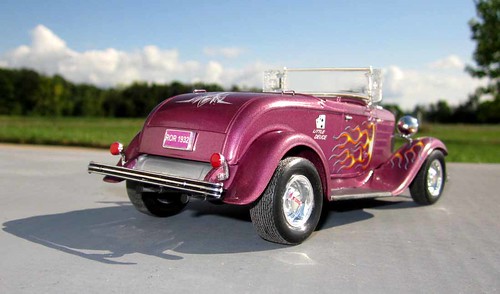
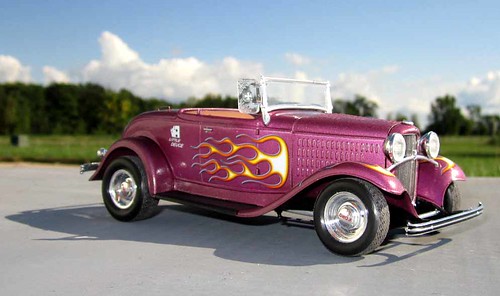
Fig 999 Ready, set, go for pure fun!
Â
*All Registered trademarks are the property of their respective brands.
Â
Google Script
