F-80 Shooting Star 1:48 Monogram #85-5311 Review

RoR Step-by-Step Review 20110930* – F-80 Shooting Star 1:48 Monogram #85-5311 Review Click Here to Buy This Kit
Â
Review and Photos by Stephanie & Marty Oberman 
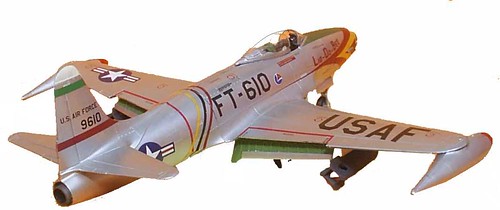
The Monogram 1/48 scale F-80 Shooting Star (kit #85-5311), originally issued in 1977 and re-released in 2010, is a replica of the first turbojet fighter accepted to serve in operational strength with the US Air Force. It’s Allison J-33 gas turbine engine made it capable of reaching speeds in excess of 550 mph.
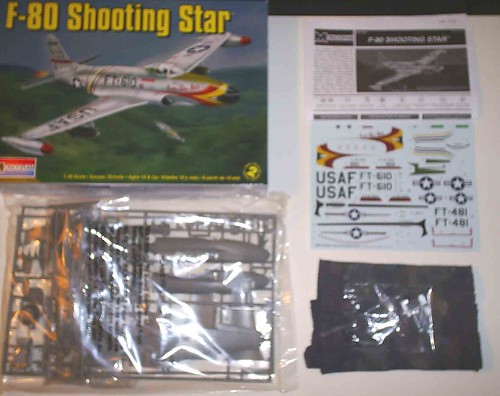
001) This kit, consisting of 79 pieces molded in gray and clear plastic, seemed like a real nice kit to build. Initial impressions were good; relatively little flash on the parts, straightforward instructions, and a decal sheet that allows the modeler to build this aircraft in one of two available versions: the “Lid-Do-Bee” flown by Lt. Col. Oliver Cellini in October 1950, or the Acrojets Demonstration Team version based out of Williams AFB in Arizona. I chose the former version to build.
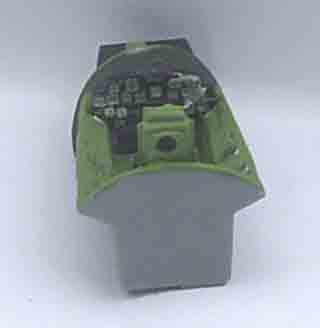
006) I started out painting and assembling the cockpit, which consists of a “tub-style” interior, separate instrument panel with decal, control stick, seat (with molded-in seat belt detail), seat back, and fuselage bulkhead. The cockpit interior, control stick, bulkhead, seat/seat back were painted zinc chromate green. The instrument panel was painted flat black. I detail-painted the communications equipment boxes molded onto the bulkhead flat black as well as the control stick handle. The seat back cushion was painted earth brown. The seat belts were painted red with silver buckles. Everything fit together well, and I detailed the instruments/buttons on the sides of the cockpit with silver and flat black paint.
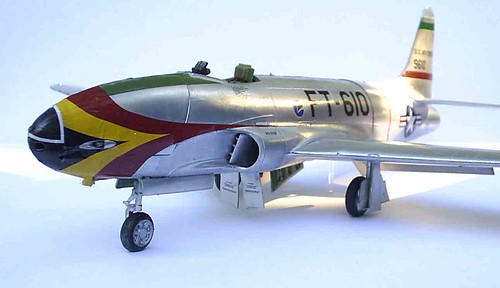
007) I then turned my attention to the forward fuselage halves. I painted the exterior parts Testor’s aluminum plate buffing metallizer (all exterior parts are painted in this scheme for future reference), masked off the nose section, and painted that gloss black. I painted the intake ducts aluminum and installed them with no problems. The gun compartment is molded into the left fuselage with a separate opening door. The compartment was painted chromate green. The gun barrels, painted steel, installed without a hitch. At first, the cockpit and nose gear well (painted zinc chromate on the inside) lined up without issues.
008) It wasn’t until I attempted to mate the left and right fuselage halves together that I discovered the outer sides of the cockpit and nose gear well prevented the two fuselage halves from joining together properly. As a result, I was left with a noticeable gap between the two halves, and by then it was too late to rectify the problem. My advice to the modeler is to shave down the outer edges of both the cockpit and nose gear well in order for the fuselage halves to properly mate. Although this may result in both components being slightly “off” when installed, at least the fuselage halves will mate properly without a gap if this is done. If this cannot be accomplished, the modeler should fill the gap with slow-curing CA glue or putty, then sand when dry.
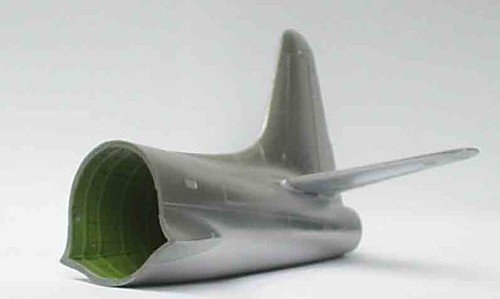
010) I painted the interior of the rear fuselage halves chromate green and assembled them together. The horizontal stabilizers needed a bit of shaving where the mold lines were evident at the contact points to the fuselage. Once this was performed, the stabilizers snuggled in nicely without issues. The starboard horizontal stabilizer contains company copyright information which should be sanded off before installation.
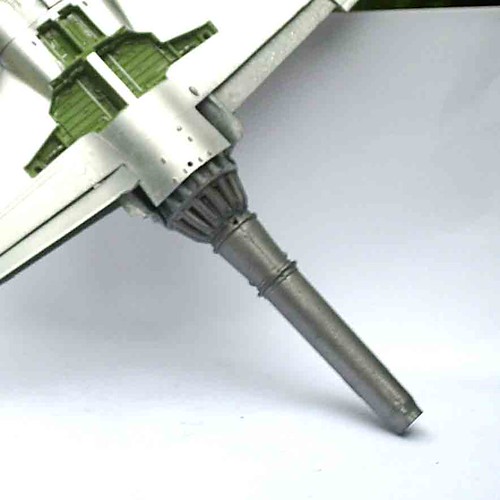
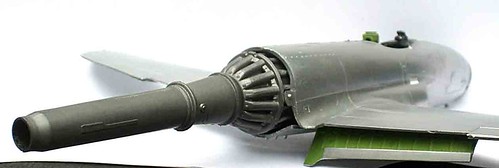
011) Next I glued the left and right wing tips onto the wing bottom without issues, using clamps for a secure fit and hold. Since I planned to display the flaps in the downward position I left them off the assembly. The assembly glued onto the bottom of the fuselage nicely. Once dry, I installed the engine and exhaust in the rear fuselage opening.
012) Installing the wing flaps after the wings were completed proved tricky. There are two tabs on each flap which slip into corresponding slots in each wing. I discovered an obstruction on the fuselage which prevented the inboard tabs from being inserted fully.
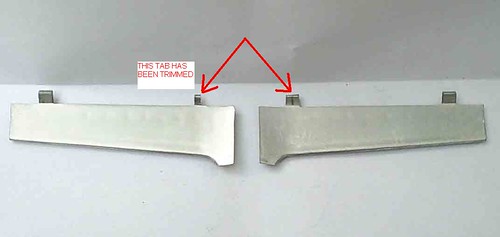
017) I sliced off fully half the tab on the inboard flap to get the flaps to insert and align properly. Pic #17 depicts the flaps before and after surgery.
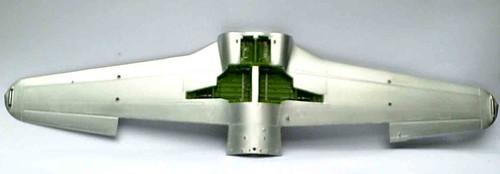
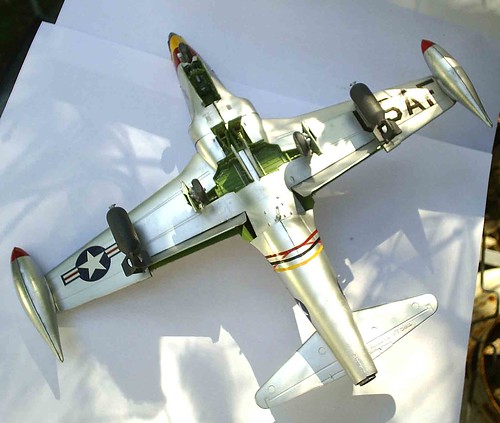
009) I painted the insides of all landing gear and brake wells chromate green.
013) The undersides of all landing gear and brake doors were painted chromate green as well. I assembled the landing gear and doors onto the fuselage. The nose gear, doors, and actuator assembled without issues.

014) However, the left and right main gear components contained two outside doors and one inside door. The instruction sheet was a bit confusing in how these doors should be installed. I ended up referencing box art photos in order to get the sequence and appearance correct. The mounting points for the main gear doors are rather vague, so I was forced to “wing it” (pun intended).
015) I began to apply decals at this point to the forward wings and fuselage. The “Lid-Do-Bee” stripes do not conform well to the shape of the fuselage, and the placement of many of these decals is vague at best on the instruction sheet. I laid down the stripes across the front of the fuselage as best I could, and used setting solution to try and force them to snug down. Before applying the front port side stripe, I installed the ammunition racks into the gun compartment and temporarily secured the door in place. Using a sharp Exacto knife, the decal can be cut away from the door, and the door removed, after the decal is completely dry.
020) Before installing the wheels onto the landing gear, I borrowed a trick from more experienced aircraft modelers. I sanded down one small part of the wheels, effectively flattening them, and made sure to mount them flat-side down. This gives the perception of weight on the tires while the aircraft is at a standstill. Many aftermarket companies, namely Squadron (www.squadron.com), sell resin pre-flattened, pre-bulged tires to accomplish this look. I did it the cheap way!
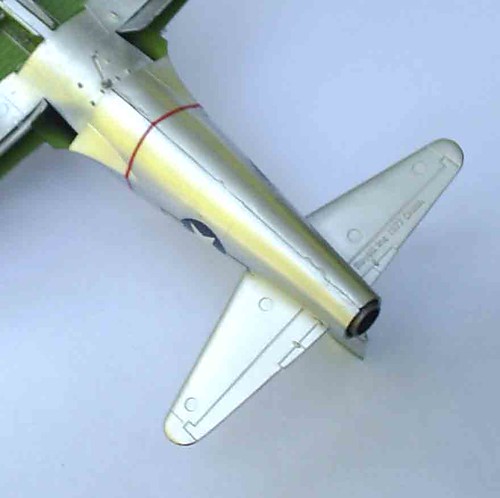
019) I began the “homestretch” of this kit by installing the rear fuselage onto the aircraft, then applying the decals to it. The rear black/red/yellow stripes overlap the red stripe that wraps around the rear of the fuselage, which is a common stencil for all F-80s. Since I believe the added “Lid-Do-Bee” designations would be added after the fact, I installed the common red stripe to the rear fuselage, then applied the applicable stripes for this particular version. These stripes, for the most part, conform well to the body shape, but I found the yellow stripe left a gap where it meets the base of the rear vertical stabilizer. I left it alone since the rest of the stripe placement lined up almost perfectly. I then applied the remainder of the common stencils. These applied with no issues. The top of the vertical stabilizer was painted gloss white according to the instructions.
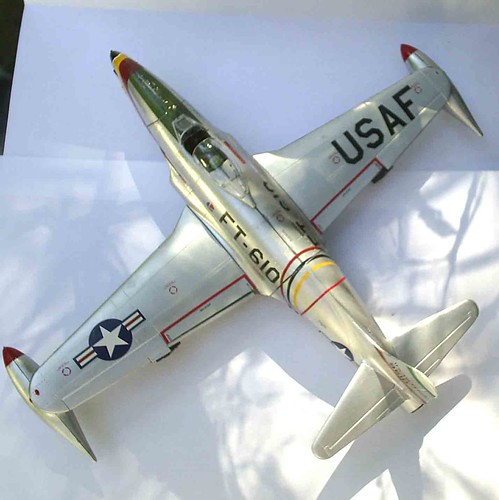
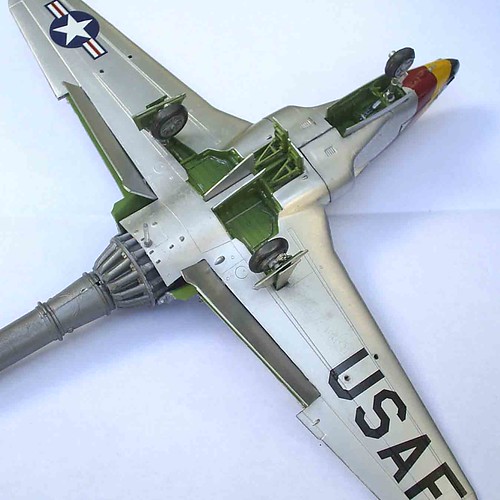
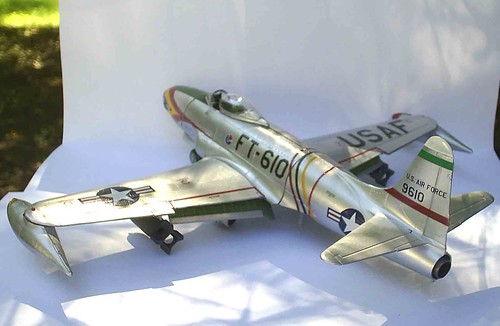
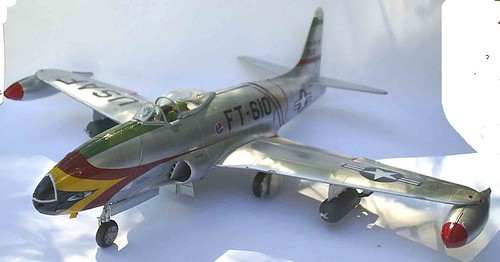
022) My next task was to assemble, paint, and install the tip tanks and 1,000 pound bombs under the wings. The “Lid-Do-Bee” version calls for this setup, although wing tanks and napalm tanks are provided for the modeler to mix and match under-wing armament. After assembling the tip tanks, I hand-painted the tips of them Testor’s Engine Red enamel to match the box art.
023) The bombs should be painted olive drab with white spinners, but since I didn’t have olive drab paint, I went with Dupli-Color Hot Rod Gray primer instead. I don’t think bombs really care what color they’re painted when deployed, so I didn’t worry about the discrepancy. ;c) I attached the tip tanks to the edges of the wings, installed the pylons for the bombs, then attached the bombs themselves onto the pylons. This was a hassle-free installation. I then painted the wing tip lights Tamiya clear red on the port side and zinc chromate green on the starboard side, only because I don’t have Tamiya clear green paint. That is on my “paint list”.
I then installed the clear windshield, whose frame was paint-detailed with a silver Sharpie. The locator points are rather vague, so I had to maneuver it into place using Elmer’s clear School Glue Gel. I glued the canopy frame into the fuselage in the open position, and then used the Elmer’s glue to attach the clear canopy. This operation was seamless.
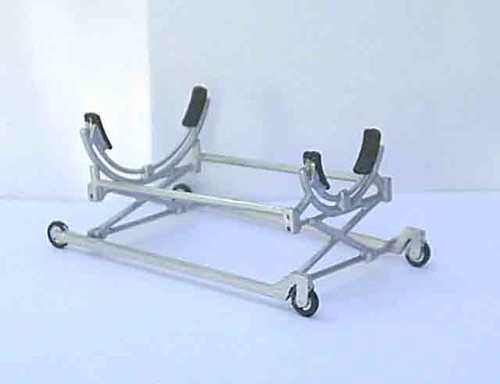
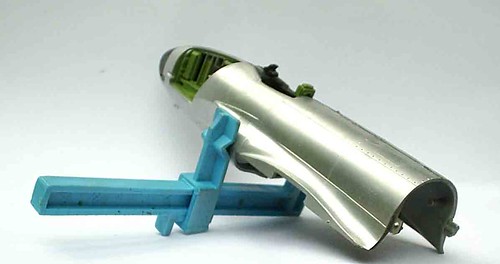
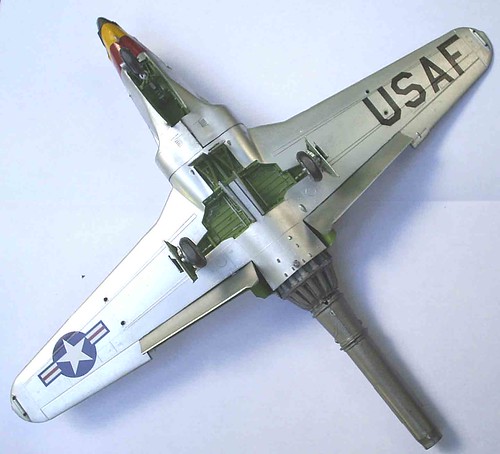
026) Since this particular kit provides a separate rear fuselage, which can be removed to display the engine/exhaust, Revell provides a six-piece “cradle” on wheels which supports the rear fuselage upon disengagement from the main craft. The instructions call for it to be painted yellow with flat black wheels and cradle “pads”. I painted mine aluminum, since I had no yellow spray paint available, and detailed the wheels/pads accordingly.
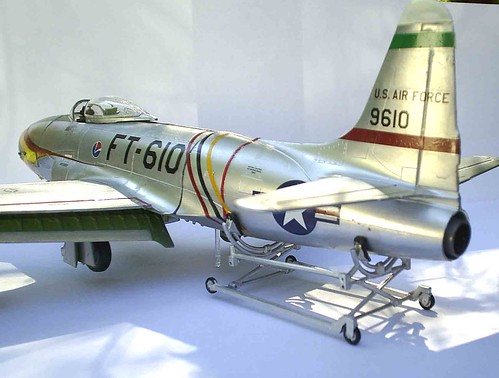
027) I mocked up the cradle being attached to the rear fuselage ready for detachment.
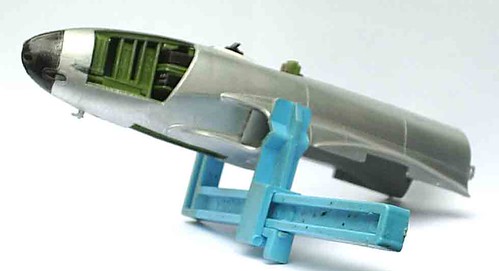
025) Revell also provides a clear post which attaches to the rear of the forward fuselage in order to prevent the model from “tail-dragging”. Many aircraft models tend to be tail-heavy, and thus will not display correctly on their respective landing gear. Kudos to Revell for this thoughtful addition. Most experienced aircraft modelers are aware of this problem when displaying their planes, and counter the issue by gluing small pieces of lead into the cavities of the nose of the aircraft, thereby providing enough weight up front to prevent the plane from tipping backward when complete and displayed with landing gear down. Since my fishing weights are invaluable to me, I opted for the kit-provided support post. As a result, the completed aircraft sits properly and looks realistic.
Final impressions: Initially I was rather hesitant to take on a different genre of subject matter when it came to building and reviewing a kit; my “comfort zone” is automotive subjects. However, I have built aircraft successfully in the past, just not for the “spotlight”, as it were. My overall impression of this particular kit is lukewarm. Fit and finish issues, decals, and vague instructions contributed to my assessment. In all fairness, however, since I am not an experienced aircraft modeler, my opinions are rather skewed. I will say though that I like the options the modeler has available when building this kit. It’s not too bad for a 1977 tooling. Flash wasn’t even an issue here…it was completely absent. This kit is excellent for a shelf/display model, but falls short if one expects to build it for a contest entry, especially if entering it with the exposed engine. The engine lacks much in detail. Lots of aftermarket parts (if they’re even available for this kit) would be needed to qualify it for serious contention in a contest, especially IPMS. Besides, despite its important history in US military aviation, it’s not one of my favorite US military aircraft subjects; that distinction goes to the A-4 E/F (and later) Skyhawks and the A-7 Corsairs. But then…that’s just me.”
*All Registered trademarks are the property of their respective brands.
