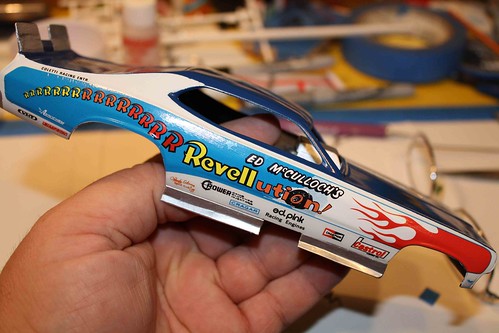
Revellution Funny Car Revell1:25 Kit # 85-7355 Review

RoR Step-by-Step Review 20111201* – Revellution Funny Car Monogram Kit # 85-7355 Review
Review and Photos by Tony & Martha Gibson 
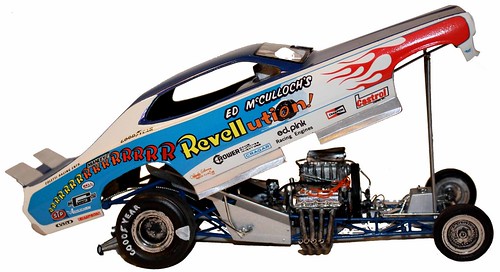
Back in the early 70s, drag racing was at it’s best with new technologies and factory backing, and some of the biggest names in auto racing. Ed McCulloch was with no doubt one of the kings of funny car. Even after retirement, his name lives on in record books and with fans. He gained the nickname Ed “the Ace†McCulloch. Model car and toy companies entered sponsorships with motorsport, and drag racing was one of their biggest supporters.
I was truly happy to get this kit and build a bit of history in the drag racing world. I wanted to do this kit justice and not just build it straight out of the box. These kits needed a lot of attention to build, even box stock. The chassis had twists in the dies and a lot of fit issues, and the body didn’t set right out of the box. Addressing these issues will take time and patience.
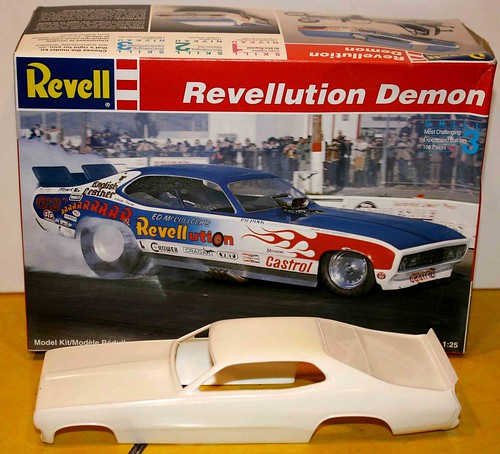
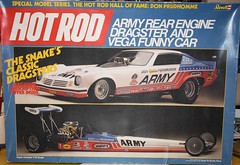
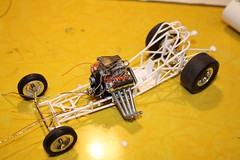
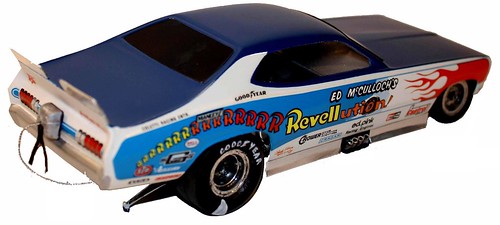
1) – Revell 1/25 scale Revellution Demon Funny Car Dragster. Measures 8†in length, 107 parts molded in white, clear and chrome. Goodyear 2 piece vinyl drag slicks and 2 piece Goodyear Front runners. Great looking, vibrant decals. This version was from the 3rd release from the 90s.
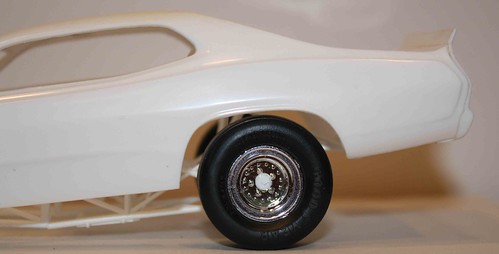
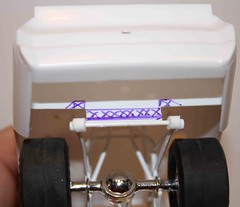
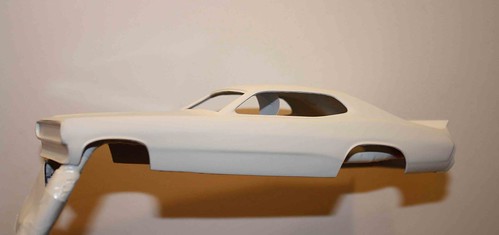
5) – There was an article in Scale Auto Magazine about lowering the body to the chassis for a better stance. Unfortunately, that issue couldn’t be found in time for this review, but it’s out there if you want to look. Straight out of the box, the body sat too high.
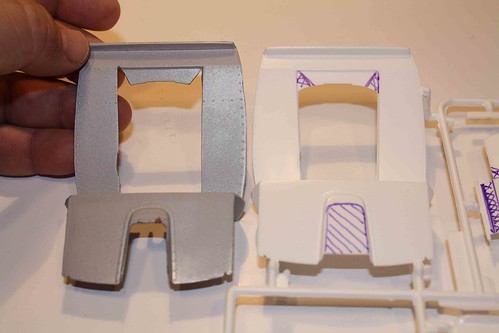
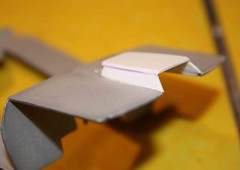
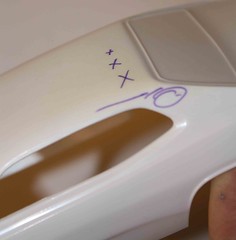
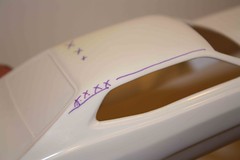
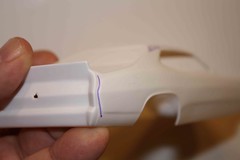
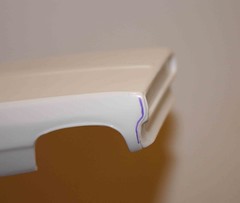
3) – Part B2, rear bulkhead, is the most important. This is where the drop is seen the most. Less than ¼ inch of material was removed from the bottom (xxxx area).
Â
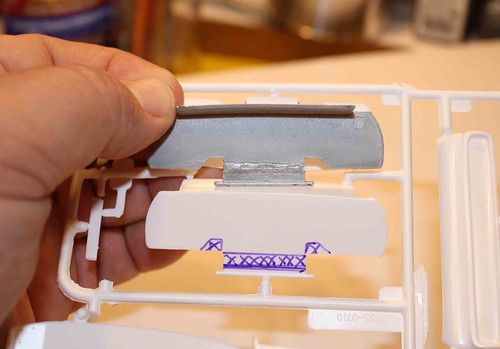
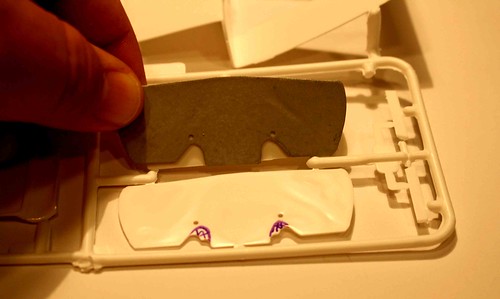
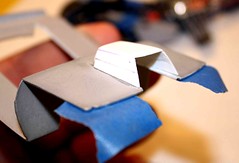
6 & 8) – Evergreenâ„¢ was glued along the back side of the reattached pieces to strengthen the rejoined parts. Use a sharp X-actoâ„¢ knife to trim out the small sections, working a little at a time.
4) – The front bulkhead, B8, needs to be trimmed and material removed to drop the body along the rails. Use a sharp blade here also to trim away the unneeded plastic.
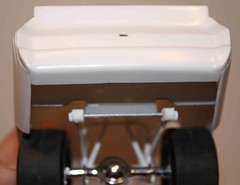
7) – When done, the body should sit lower on the chassis and look more realistic. It might not look like a lot while you’re trimming the parts, but once you’re done you’ll notice the difference.
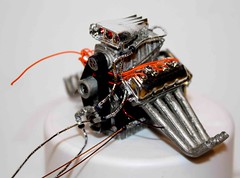
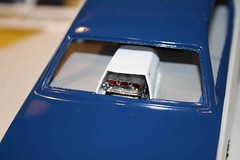
9) – When looking at the engine on the box art, there is a blower. The actual kit does not offer the blower. So, to stay true to the car, you must go parts shopping in another kit. This is the builders choice. If you go with the stock kit, you can skip this part.  No matter which way you’ve chosen to build this motor, the directions are pretty straight forward. There are a lot of fit issues, so clean the parts up very well and test fit everything before gluing.
Â
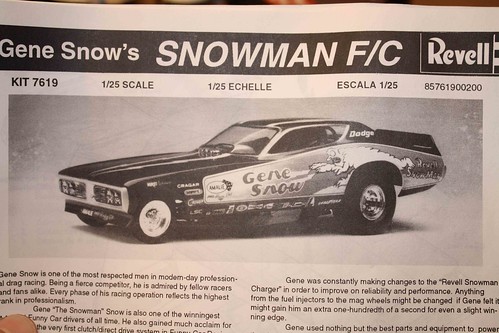
11) -Â For this build, the blower parts were taken from the Revell Gene Snow drag racing kit.Â
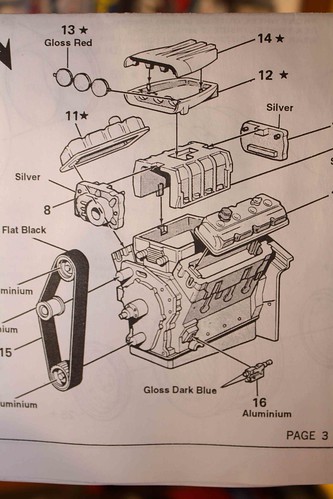
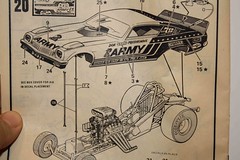
12) – The direction sheet from the Snow kit shows the parts that are needed, #12, 13, 14. The engine from this kit is identical to the Revellution.
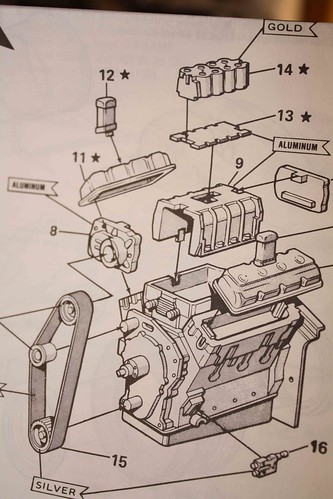
10) – From the Revellution kit, you will eliminate parts 13 and 14 and replace them with the blower assembly from the donor kit. It can be confusing when going between two sets of directions since parts are numbered differently. Keep your parts organized and the assembly will go together easily.Â
2) – If you are going to use a blower, material will have to be removed from the upper interior panel. Some material will also have to be removed from the rear of this panel to accommodate the roll cage for the rear bulkhead. If you did not drop the body you do not have remove these areas. If you do not lower the car AND you do not use a blower, you can skip this step altogether.
Â
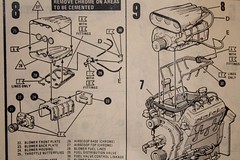
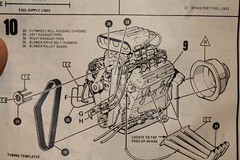
13, 17) –  This kit was destined to be very detailed. To do this, a lot of research needs to be done. There are quite a few websites on vintage drag racing that are great resources. If you have access to an old Revell Don Prudhomme 1/16 kit, you’ll have a great set of directions
Â

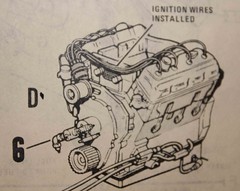
18, 19) - These kit instruction show where lines, hoses and wires connect. The motors are basically the same, regardless of the scale, and should lead you in the right direction.
Â
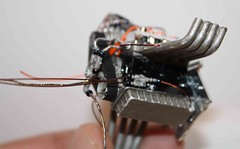
14, 15,) – Using the direction sheet makes line, hose and wire placement easier. They will not only let you know where they go on the engine, but where they end up on other parts of the car.Â
Â
37, 38) – It’s time consuming and can be frustrating when working with these small pieces and parts. Be patient and you’ll be rewarded.
Â
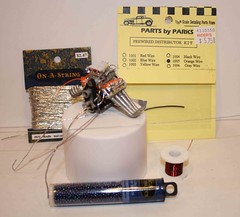
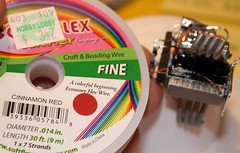
16, 23) – The detailing items used were easy to get and inexpensive. Most items were found at Hobby Lobby in the jewelry section. If you have one of these stores near you, watch their sales and you’ll get a good deal. The most expensive part was the distributor kit which was an aftermarket product.Â
Â
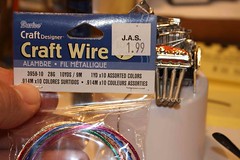
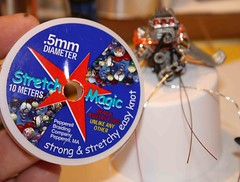
24, 25) – You can drill the kit distributor out and use the stretch jewelry cord, which comes in lots of colors. The local modeling hobby shops and aftermarket parts companies are great and they have fantastic products that are very hard to reproduce. However, if you build on a budget, there are other places to get the bits and pieces you’ll need.
Â
20, 21) – The 1/16 kit came with fuel lines to the blower, but the Revellution kit didn’t. These were built out of stainless steel wire, .5mm gage. This was bent using tweezers and pliers.Â
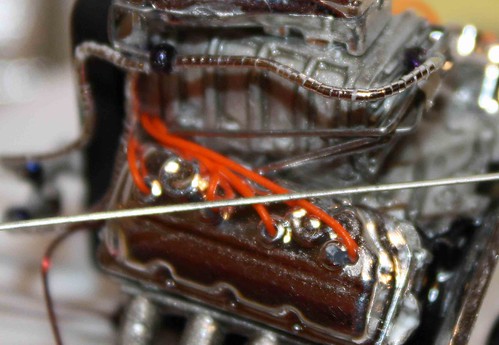
22) – Again, this is time consuming and requires a lot of patience, but the end effect is great. Â Once completed, they were set into place with Gorillaâ„¢ glue.
Â
34, 35) – If you go with the stock build you can skip this step. If you put the blower in, the upper interior panel has to be rebuilt.
Â
43, 40) – The short hood scoop was removed and a new scoop was built from Evergreenâ„¢ sheet plastic to house the blower. On this build it had to be done a couple times until the fit was right. Once it was right, an emery board was used to smooth everything out and get it ready for paint.
Â
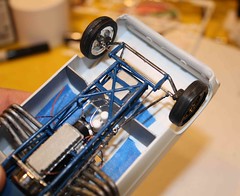
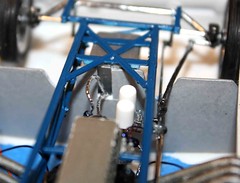
31, 32) – Â Before paint, a mock up should be done to get the fit and look for twists in the frame.Â
Â
43, 40) – Any issues can be addressed at this point without messing up the paint.Â
Â
26, 27) – Two of the things you’ll notice about older kits are the amount of flashing on the parts and the die lines on the body. This kit was released 3 times. The flashing got worse and the die marks got worse. Some clean up is definitely needed. The die marks were cleaned up with 600 and 1000 grit sandpaper.Â
29, 30) – Some body putty will be needed at the front and rear panels, where they are connected to the body. A mixture of baking soda and super glue can be used as filler (Gorillaâ„¢ glue was used here). Put a light coat of the glue on the side you’ll see, then sprinkle baking soda onto the glued area. After everything dries and cures (at least an hour) you can use 600 and 1000 grit sand paper and a light emery board to smooth out the finish. You have to take your time and be very careful when sanding, it’s easy to go too far and ruin your work. Remove a little at a time.
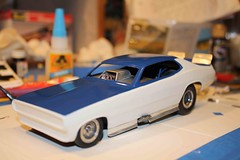
36) – Once the body was done, it was washed with mild dish soap and water and dried completely. A coat of sandable primer was applied to the whole body and allowed to dry overnight. At this point, you will be able to see any sand marks left from the body work. If any defects still show wet sand with 1000-1200 grit paper. Repeat clean up and priming until everything looks good. Three light coats of Duplicolorâ„¢ bright white were applied with 1 hour between coats. The car was allowed to dry and cure for several days.
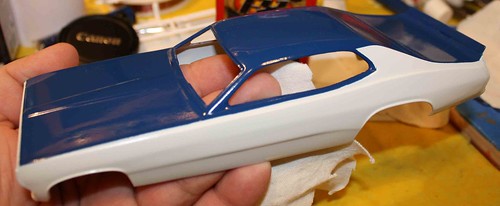
46) – After the white paint was applied, it sat for 4 days.   Before the car was painted, it was all tested on the back of a plastic spoon to make sure the different brands wouldn’t cause lifting. Luckily there were not issues. Blue Finish Line pinstripe tape was used to mask off the fine lines between the white and blue. Blue painters tape was used to cover the rest of the bottom half. For the blue, Krylonâ„¢ medium blue was used. Three light, even coats were applied with 90 minutes between coats. The extra dry time between coats was for extra insurance against lifting. Everything sat overnight before all the tape was removed. The body sat for 4 more days to make sure everything was dry and hard.Â

47) – No clear coat was applied. Once the paint was dry it was polished Mothersâ„¢ Fx Synwax using a bit of T-shirt material and a very light touch.
The underside of the body was brush painted with flat black paint and allowed to dry completely.
Â
48, 50) – On the box art, you’ll see aluminum lower body valances and rear spoiler extensions. These are not supplied, so if you want them you’ll have to make them yourself.Â

49) – The parts were made from thin Evergreenâ„¢ sheet plastic. There’s a lot of measuring and cutting, but it’s well worth it.
Â
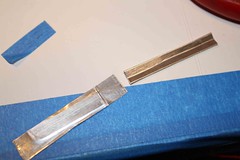
51, 52) – The parts were covered with aluminum tape. This tape is used for furnace duct work and can be found at home centers (this tape was found at Walmart) and cost about $5. A roll will last forever. Cut the tape to approximate size, apply and rub with a hard, smooth plastic surface (the lid of a Sharpieâ„¢ works very well). Then trim to size and glue into place. For this build, regular Testorsâ„¢ glue was used to prevent clouding on the painted surface. If a shinier finish is wanted, the tape can be polished before being glued into place.
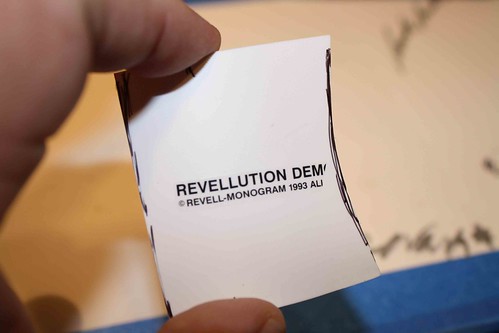
53) – Decals from older kits like this one can be very dry and brittle. If this is the case, a very light coat of clear can be applied (this builder prefers Duplicolorâ„¢ Crystal Clear) to the right side of the decals. This will strengthen them a bit. Using clear coat also makes the decals thicker and stiffer, and this can cause them to be harder to lay down on curved or irregularly shaped areas.  These decals were tested before anything else was done. The bottom edge of the decal sheet had a section that told what kit they were for. This was cut off and applied to a spare piece of plastic. Fortunately, these decals were in good shape and did not need a clear coat.
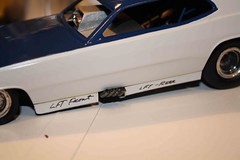
54) – The decals were allowed to soak for 20-30 seconds, then allowed to set out of the water for about another minute to make sure they were loose from the paper. A bit of Micro-Sol was applied to the feature lines (for example, the lip around the rear wheel well) before the decal was slid slowly and carefully onto the body. Micro-sol was brushed over the top of the decal, then the decal was smoothed with a piece of damp paper towel. These long decals can be challenging, so make sure they are allowed to soak and set long enough. The decals for this kit took a very long time, approximately 10 hours to get them all done.
After the decals dried overnight, they were given a coat with a spray on wax, applied like it would be to a regular car, though with a lighter touch.
Some of the sponsor decals were not included with the kit. These were taken from other decal kits.
Â
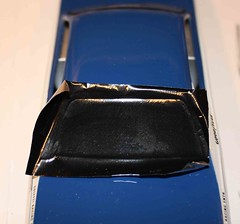
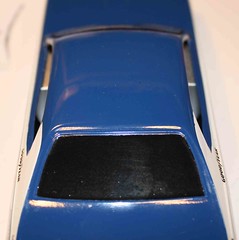
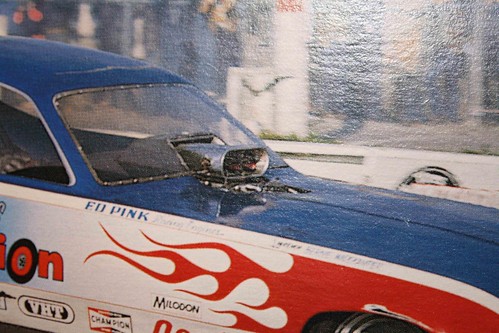
55, 56) – Black Bare Metal Foilâ„¢ was used for the rear window. The foil was placed, trimmed with a sharp blade, the smoothed carefully.
Assembly was completed per directions and went fairly smoothly. Once again, everything needs to be mocked up, there will be a lot of fit issues.
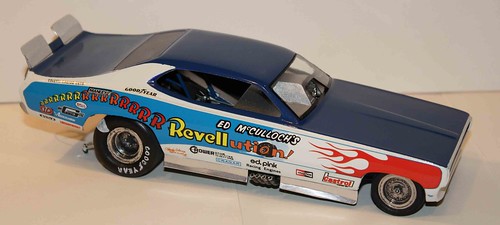
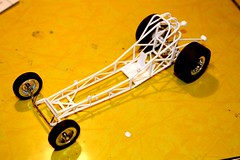
57) – This kit took a long time to build and gave me a lot of headaches. There was a lot of twisting and some of the parts were very small and brittle. This car took over 350 hours to build, spread out over several months. If built box stock and correctly, I could have finished in about 50 hours.
It would be a shame just to “throw one of these togetherâ€. They are awesome kits and will add a lot to your collection if given a little time, patience and detail. These kits can usually be found at a model car swap meet and might be a little pricey, so look around. Some experience is needed to put it together correctly so it’s not a great starter kit for kids.
999)Â – Drag Racing Rocks!
Keep the glue off the windshield
Tony
Â
Donations Humbly Accepted
*All Registered trademarks are the property of their respective brands.
Â
