P-51 P-40 Combo AM 1/72 kit #1020-0100

RoR Step-by-Step Review 20120418 – P-51 P-40 Combo AM 1/72 kit #1020-0100
Click Here to Buy This Kit
  Â
A Step-by-Step Review by Kevin Lawton  

This is the Accurate Miniatures Air Combat Legends series kit and parts.
Â
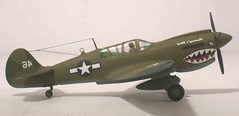
P-40N Review
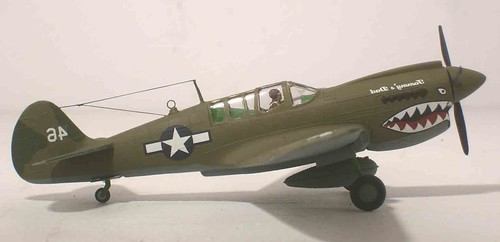
The P-40 Warhawk first flew in 1938 and when production ceased in Nov. 1944 13,738 had been built. Anyone familiar with the ‘Flying Tigers’ or who has seen a movie about Pearl Harbor is familiar with the P-40. The P-40’s flown by the Flying Tigers with their distinctive shark’s mouth are perhaps one of the most iconic American fighters of World War II.
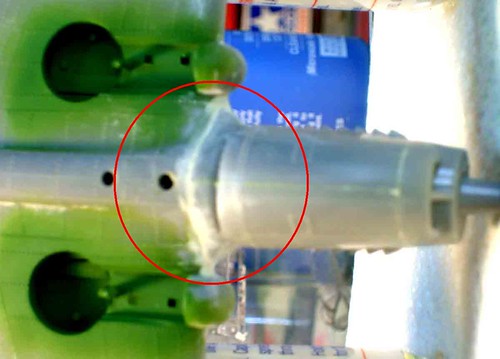
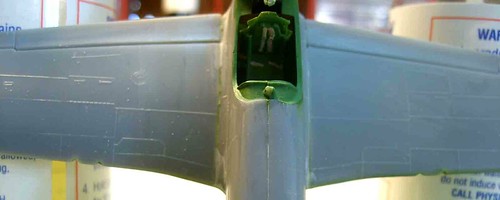
(Photo STP64205 – actually the P-51 wing) This kit is part of a two kit boxing (#1020) offered by Accurate Miniatures that includes both the P-40N Warhawk and the P-51B Mustang. While the boxing is by Accurate Miniatures the molds are actually 1960’s vintage Monogram. When reviewing this kit it is important that we keep in mind two things: first, its age, and second, that this kit is aimed squarely at the first time model builder. As such ease of construction and price are prime considerations. A brief internet search turned up prices for this boxing between $12.00 and $22.00. More than the price of a the basic Academy kit or any of the new Airfix 1/72 scale offerings BUT,  you get two kits!
The kit contains 25 pieces (24 gray plastic, 1 clear, and a set of decals) – perfect for that first time model builder. The detail is all raised with rows of rivets a la vintage Monogram. The canopy was surprisingly clear, especially after a dip in Future® Floor Polish.Â
The interior consists of nothing more than a pilot. There is a hollow post on the starboard fuselage wall and the pilot has a peg molded to his right side. I painted pilot using khaki, flesh, white, dark brown and silver. The interior fuselage sides were then air brushed ‘Green Zinc Chromate’ along with the wheel wells, interiors of the landing gear doors, and landing gear. The pilot was then glued to the fuselage side and the interior was complete.
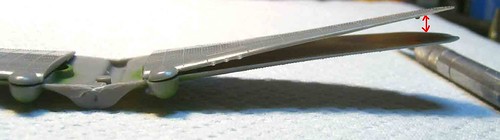
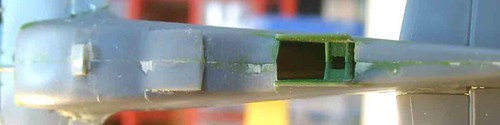
(Photo STP64207) Once the interior was completed the fuselage was closed up with very minimal filler needed to seal the seam on top and bottom. I doubt very much the first time builder will be worried about the seam, and if left alone will not give too bad a result. In gluing the wings together I encountered the first serious issue. The port upper wing half was badly warped and slightly twisted. In the Photo you can also see a pretty significant gap in the starboard wing as well. The warped wing half was dipped in very hot (not boiling) water and taped to a flat 3†X 3†kitchen tile and allowed to cool. I did this three times before the wing was as straight as I was going to get it. The warped wing might just be a issue with my particular kit.
Â
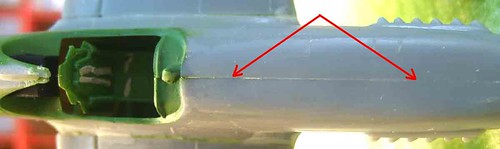
(Photo STP64213) Once the one-piece lower wing and the top halves were joined, the seam was cleaned up a bit (again if left alone it will not be all that bad), and the wing assembly was offered up to the fuselage. Now I encountered the second issue (two actually). First, there was a large gap under the fuselage at the front and the back of the wing. Second, there was a significant ‘step’ between the wing leading edge and the wing root on the fuselage.Â
Â
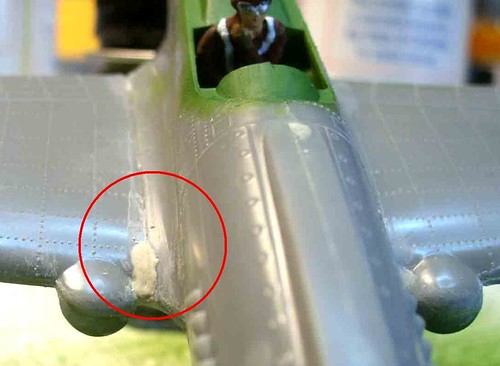
(Photo STP64215) Both areas required significant amounts of filler and sanding.   I tried, I really did, to assemble this kit as a beginner and not worry too much about fit, but I just couldn’t let these go as they were.
Â
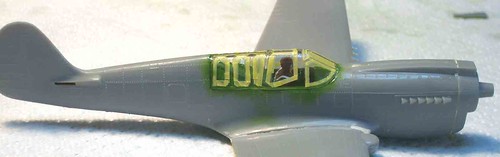
(Photo STP64220) After the wing to fuselage seam was cleaned up, I taped the canopy framing with thin strips of Tamiya masking tape and the filled the areas inside the strips with MicroScale liquid mask. The canopy was then glued to the fuselage followed by the horizontal stabilizers and the P-40 was ready for paint. The upper surfaces were then airbrushed using ‘Olive Drab’ and the under surfaces ‘Light Sea Grey’. The camouflage along the wing leading edge, leading edges of the horizontal stabilizers, and the tail was brush painted using ‘Dark Green’.
(Photo STP64239) Once the paint was dry both the upper and lower surfaces were sprayed using Future in preparation for decals. The decals in the kit are printed by Cartograph of Italy and are absolutely beautiful. They are well printed, in perfect register with good color density. I applied the decals using MicroScale Microset and Microsol. The decals settled down beautifully over the raised rivets and panel lines.Â
Â
Â

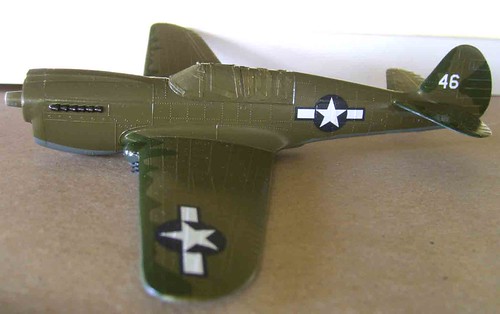
(Photo STP64233) The prop and spinner presented one last issue that I could not leave alone, try as I might. The back side of each propeller blade was marred by a very deep and prominent ejector pin mark. I filled each pin mark and sanded them smooth before painting the prop blades ‘Flat Black’ and the spinner ‘Olive Drab’. My few references (Squadron Signal ‘P-40 In Action’ and ‘P-40 Walk Around’) both show some in service P-40’s with all black prop blades and others with yellow tips. I keeping with the ‘first time builder’ idea I decided not to paint the tips yellow, although the beginner could easily do so with a brush.
Once all of the decals were on I sprayed another coat of Future to blend everything together before adding the auxiliary fuel belly tank, landing gear doors, landing gear, and wheels. I looking at the box art, I saw that the P-40N shown had a radio antennae and a DF (direction finding) loop. There was no antenna included in the kit so one was fashioned from plastic card. The kit also did not include the DF loop and I added this from a piece of sprue and fine wire. It was at this point that I also noticed that none of my references showed a DF loop mounted on a P-40. So I am not absolutely sure that it really belongs there. The antennae wire was made using Aeroclub elastic thread.
 Â
(Photo STP64311) Once all of the ‘fiddley’ bits were attached I sprayed the entire model with Testors ‘Clear Flat’ and the model was completed.
Â
I enjoyed building this kit. Assembly was not too difficult and the decals were wonderful. My only real criticism of this kit is the instructions – they consist of a series of too-often photo-copied black and white pictures of parts being fitted to the model making parts locations somewhat uncertain – especially for the beginner. In the end I would highly recommend this kit to any young or not so young beginner. Although I spent time filling seams and masking to use an air brush, a beginner with some supervision (especially to fix the warped wing) could forget about the seams, paint the model with a brush, and wind up with a nice looking shark mouth P-40.
Â
 Â
Â
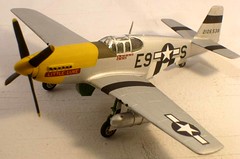
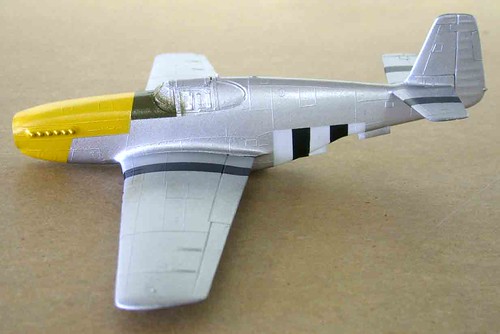
P—51D Review
The North American P-51D is perhaps the most recognized and famous of all Allied aircraft from World War II. The P-51 became the iconic aircraft we know today when the British suggested replacing its original Allison V-1710-87 engine with the more powerful Rolls-Royce Merlin engine. The Packard V-1650 engine (a license built version of the Merlin) powered over 10,000 P-51’s, of which 8,156 were model D’s. The P-51 finally gave the Allies a fighter that could escort bombers into Germany and back again.
 Â
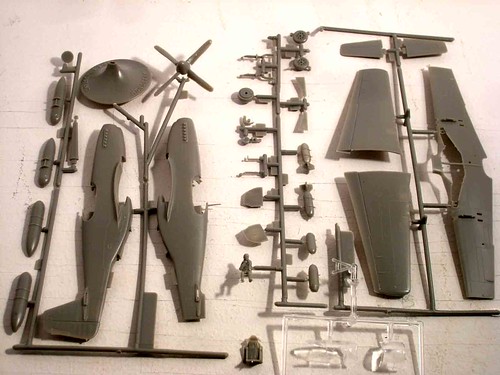
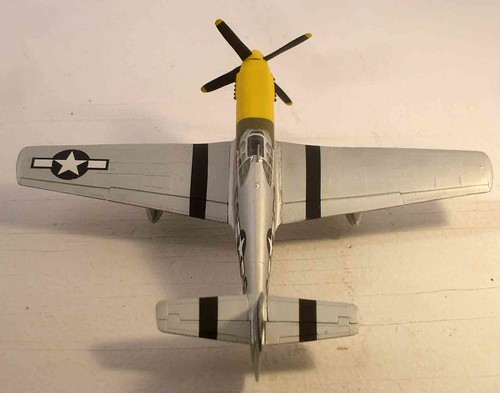
(Photo STP64202) This model kit is part of a two kit boxing from Accurate Miniatures that includes a P-40N Warhawk (kit #1020). The P-51 consists of 33 pieces, 30 in grey plastic and 3 clear plastic. Two pieces make up a stand if the builder chooses to display the model ‘in-flight’. The mold is actually a 1960’s vintage Monogram release, but that said, there was very little flash on the kit parts. The only thing that really belies the kits age is the raised panel lines and overly simplified detail.
This model is aimed squarely at the beginner and as such the simplified detail means fewer parts and faster assembly – sure to appeal to the beginner. The beginner is also probably not going to be too concerned with the raised panel lines.
Â
(Photo STP64216) The interior of this kit consists of a seat and a pilot. No cockpit floor, sidewalls, control stick, or rudder pedals are included. Again this will appeal to the beginner and any more experienced models can add all the scratch built items they might choose. I painted the interior green zinc chromate and picked out the seatbelt harnesses using a mixture of brown and white to produce a close approximation of khaki. Once the seat was mounted to the fuselage side I closed up the fuselage choosing not to mount the tail wheel at this point knowing that I would probably break through subsequent handling. The fuselage seam was much better than expected and only a minimum of filler was need to clean up bottom seam.Â
Â
(Photo STP64217) Careful gluing resulted in no filler being need for the top fuselage seam.
Â
(Photo STP64218) Next I glued up the one piece bottom wing and the two top wing halves. Here I found the only significant issue with this kit. When I glued the wing to the fuselage the starboard wing tip was almost 3/8 of an inch higher than the port wing tip. With the wing and fuselage glued together my only option was to dip the warped wing half into very hot (but not boiling) water and then quickly tape the wing tips down tightly to a 4†x 4†kitchen type tile. After doing this four times, the starboard wing tip finally stayed down level with the port wingtip. The starboard wing root to fuselage joint did open a bit during this operation, so a little filler was needed to correct the fit. I don’t know if this warped and slightly twisted wing is a issue with the kit as a whole or just this example.
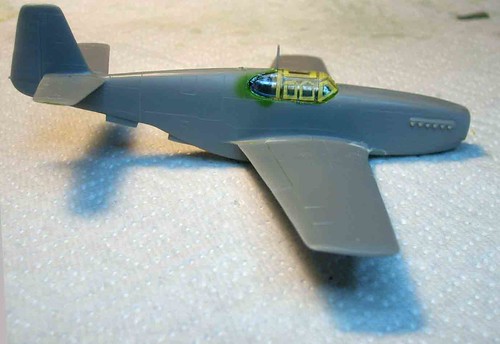
Once the wing situation was straightened out I attached the tail surfaces and the canopy. Prior to attaching the canopy I dipped it in Future floor polish, allowed it to dry for 48 hours and then taped the canopy frames. I filled in the middle areas between the canopy frames with liquid mask. One note here: Included in the kit is a clear part for the canopy representing the ‘Malcom’ type or blown canopy. Using this part requires cutting the canopy in order to fit the ‘blown’ center section. I chose not to use this part as I felt cutting open the canopy was probably beyond the skills of the beginning modeler. Cutting open canopies still makes me nervous after 40 years of building!
Â
(Photo STP64227) Once the canopy and tail surfaces are added the model is ready for paint. I painted the airframe overall with Tamiya chrome silver (X-11). I then taped the engine cowl and fuselage side for the yellow paint.Â
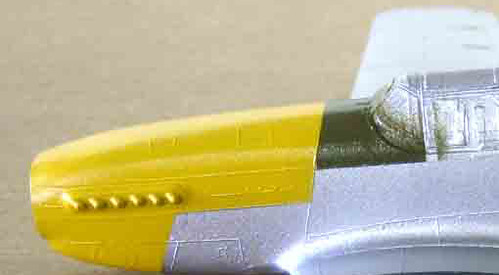
(Photo STP64229) For the yellow I used ‘White Ensign’ Japanese ID yellow as I thought Tamiya yellow (XF-3) was much too bright. Next I masked off the area in front of the cockpit that remained olive drab and painted this using Testors Model Master olive drab.Â
Â
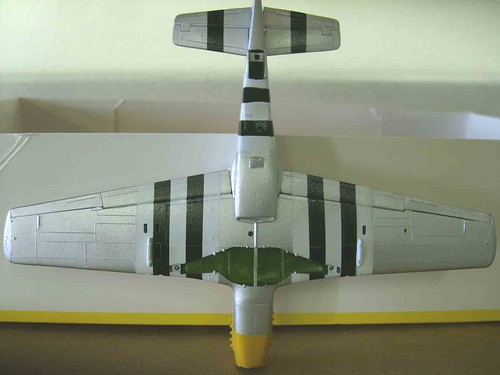
(Photo STP64235) After the fuselage paint had dried I outlined the areas under the wing and lower fuselage for the white and black invasion stripes. In actual practice the invasion stripes were to be 18 inches wide on single engine aircraft. Once the area was masked off and the white sprayed, I alternated stripes of tape to get the spacing for the black stripes, pulling up the tape where the 2 stripes were black and leaving the tape in place for the 3 white stripes.Â
Â
(Photo STP64234) Once the lower surfaces were painted I applied tape to the top surface of the wing carefully matching the single black stripe on the upper wing surface with one of those on the lower wing surface. I ‘eyeballed’ the black stripes of the upper and lower surfaces of the horizontal stabilizer and on both sides of the tail.
After all of the painting was done that required masking I painted the exhaust area using Testors Model Master ‘Burnt Iron’. I then added the landing gear, landing gear doors, wheels, and drop tanks (all of which had been painted their respective colors while I was waiting on the main airframe paints to dry). Once everything was attached the entire model was sprayed with a coat of Future giving a nice smooth surface for the decals.
Â
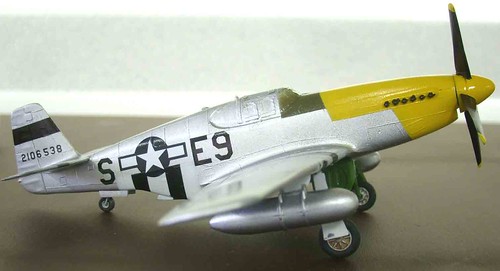
(Photo STP64271) The decals for the Accurate Miniatures offering are printed by Cartograf of Italy and are in one word – superb! They went down flawlessly with very little decal setting solution. They settled down very nicely over the raised panel lines with no silvering. It is relatively easy to ensure a minimum of silvering by making sure you have a nice smooth and glossy surface on which to apply decals.
(Photos STP64331) Once the decals were added I sprayed another light coat of Future, allowed this to dry and then added the last of the fiddley bits, the pitot tube and antenna (which I had broken off earlier).  The final step was a coat of Testors ‘Dulcoat’ to flatten down the finish a bit.
Except for the issue with the wing (which may only be my sample) this is a very easy kit to assemble. Painting this kit using a airbrush requires a significant investment of time, however a beginner using a brush could eliminate most, if not all of the masking. I would certainly recommend this kit to any beginner. A bit of adult supervision might be necessary for the painting, but over all the kit certainly fits the bill – being aimed squarely at the beginner.
Â
Buy this for your grandkids and get them started!
Â
Â
Â
*All registered trademarks are the property of their respective brands.
Â
