RoR Review 20101019 – Monogram 1/24 scale 56 Chevy Bel Air #85-0881

RoR Review 20101019 – MonogramTM 1/24 scale 56 Cheverolet Bel AirTM # 85-0881
Review and Photos by Tony and Martha Gibson

This is a full build and review of the MonogramTM 1/24 scale ‘56 Cheverolet BelairTM Classic Cruiser #85-0881. There are 98 pieces including tires, basic decal sheet with 2 optional license plates at Skill level 2. For the hobbyist there are three flavors of foil trim used, grill blackout techniques, after market wheels and tires and adjustments to the grill are examined in detail in this Step-by-Step review.

Figure 1
Before starting the assembly the front grill was given a little detail. TestorsTM flat black bottle paint was thinned down and brushed over the grill. A little goes a long way on this. The paint should not be water thin, just thin enough to get into the nooks and crannies
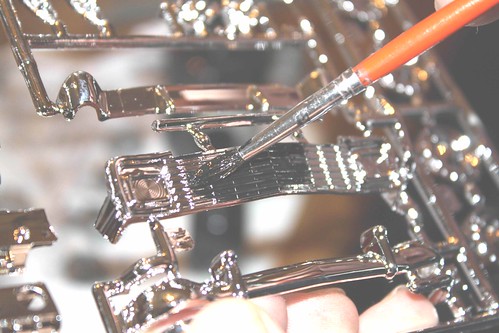
Figure 2
Immediately after putting on the thinned paint, wipe the part off with a soft cloth. Use a light touch and be careful not to rub paint over any part that should remain clean.

Figure 3
When done, the paint should remain on the recessed areas of the chrome. Let this dry completely before proceeding. This is a good time to detail the running lights if wanted. Paint them carefully or use the correct color SharpieTM marker to color them in. The marker over chrome will make it look almost clear.

Figure 4
The engine block was painted blue with brush paint, allowed to dry completely, then the 2 pieces glued together. This kit gives 2 options for the motor, stock or custom. This kit was built using mostly stock parts except for the parts #84 & #58 (exhaust headers) #18 (fan belt) and #20 (alternator). This was a builder’s preference; any parts can be interchanged as desired. This was chosen to give the motor a little spice for that street rod effect.Â
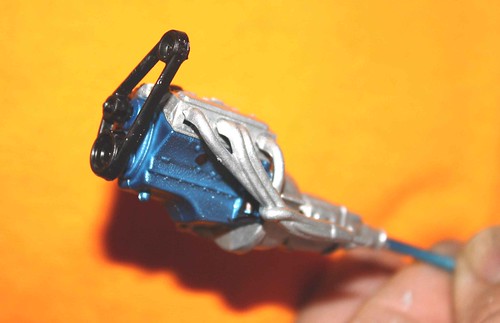
Figure 5
A little thinned black paint was washed over the exhaust header and chrome valve covers following the same procedure used for the grill. The air cleaner was covered with gold Bare Metal FoilTM for a custom effect.
The engine was a straight forward build per the directions with no problems. There are lots of options with this kit. Test fit everything before putting it together. Remember to scrape chrome or paint off any gluing areas before applying the glue for a proper bond.

Figure 6
There was quite a bit of clean up to be done on the body before painting. There was flashing around the windows, die lines at the top of the fenders by the windshield posts, the top of the fenders were a little sharp and around the tail lights needed to be cleaned up. Most of these were just from the dies and required a light sanding with a fine emery board and 400 grit sandpaper. A sharp ExactoTM knife may also be needed to clean up some of the edges.
When showing these issues on the sample model, a SharpieTM marker was used to point them out. If you mark these areas the same way to indicate where clean up is needed make sure ALL the marker is removed before painting or it will bleed through during the painting process..
A light sanding with 1000 grit sand paper, wash with dish soap and warm water, dry completely, wipe down with a clean cloth and the model is ready for paint.


Figure 7 & Figure 8
KrylonTM paint products were used for this model. Two light, even coats of white primer were applied first with 15-20 minutes of drying time between coats. Apply the primer carefully. If you get runs in the primer, wait for it to dry completely then wet sand with 1000 grit sandpaper lightly. Try not to sand all the way through the primer or you will have to re-prime. If you do not get any runs or sags in the primer, a light wipe with a bit of t-shirt material will be all you need. The fabric has enough texture to wipe away any dirt nibs or dust and leave a smooth surface.
The model was painted with three light, even coats of KrylonTM Ocean Blue. Allow at least 15 minutes of dry time between coats. After the paint was completely dry, two light coats of DuplicolorTM Crystal Clear was used for a gloss sealer. Normally, it is suggested to use the same brand of products all the way through. The builder has found, however, that this combination works just fine.
After the clear coat has dried completely (at least 24 hours) a fine, non-abrasive polish was used to shine it up. In this case, MothersTM  brand polish was used.
A short note about the crazy looking paint stand seen in the pictures. It’s made from a couple pieces of 2×4 and a wire hanger. This is proof that something does not have to be fancy to work well.Â

Figure 9
There were two options for the chassis rear end assemblies, custom and stock. On this build the stock version was used. The custom version seemed to be just a little too tall. Again, this is a builder’s preference. One unfortunate part of this kit is that the muffler and exhaust pipes are molded into the chassis instead of being separate. It would have been nice to see separate parts for these. The engine and chassis assembly went nicely, everything lined up well to the molded parts and no adjustments were needed.

Figure 10
The interior also had a couple options for stock or custom, including bucket or bench seats and a stock or custom steering wheel. There is also a roll bar for the custom version. Again, any parts can be interchanged as desired. For this build, the bench seat and stock steering wheel were used. The dash panel was painted with bottle paints; there were no decals for the dash. The steering wheel was painted to simulate wood. Fine line black and brown SharpieTM markers were used to accent the wood.

Figure 11
The seats were painted with a semi-gloss spray paint then given a light wash of reduced flat gray paint (brush on then dab with a paper towel). The black area on the seats was painted with a semi-gloss brush paint. This is a good place to experiment to get the look you want.

Figure 12
Assemble the interior pan and chassis. Everything fits well here and there were no problems. The wheels and tires included in this kit were not used for the build. Instead, the front wheels and tires from a MonogramTM 57 ChevyTM kit, the rear wheels chosen were after market five slot steel wheel, and the rear tires were after market “cheater slicks”. This was just a preference and gave it more of an old school street racing look.


Figure 13 & 14
The underside of the wheel wells and hood were painted with flat black brush paint. This is not necessary, but gives a more finished look.

Figure 15
After the body was painted and polished, three types of Bare Metal FoilTM were used on the features. Chrome foil was used around the windshield and rear window frames. Aluminum Bare Metal FoilTM was used around the side window frames. Gold chrome Bare Metal FoilTM was used for the drip rails and side body moldings. The colors were a personal preference. These parts could be painted if you have a steady hand, good eyes and a good brush. The effect will not be the same though.
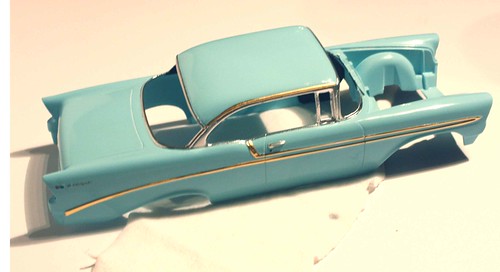
Figure 16
Before putting the bumpers on, the body was test fit onto the chassis. On this kit, there were no problems with the fit and no adjustments needed to be made. Putting the front grill was the trickiest part since there were four parts. The fit was a bit of a challenge, so the inside of the grill needed a little sanding to get the parts to fit better. Also, the inside of the bumper needed to be sanded a bit to fit around the grill. These parts were mocked up several times before they were actually glued into place.
The rear bumper/tail light assemblies went together easily and without issue. Remember; always scrape chrome off the gluing areas for a better bond. This cannot be stated enough.

Figure 17
This was a very nice kit with lots of optional parts, choices and styles. The parts not used can go into the spare parts box we all seem to have. One of the nicest things about this kit was that everything seemed to be straight and fit well, very few adjustments needed to be made. The grill was the hardest challenge. One thing that would have been nice to offer was the wheel/tire combination that came with the kit. Stock wheels would have been nice along with white wall tires.

Figure 20
This kit was marked as a skill level 2 and that is right on the money. While the car looks great out of the box, a lot of cool things could be done to detail it.

Figure 19
Have fun
“Keep the glue off the windshield”
Tony Gibson
