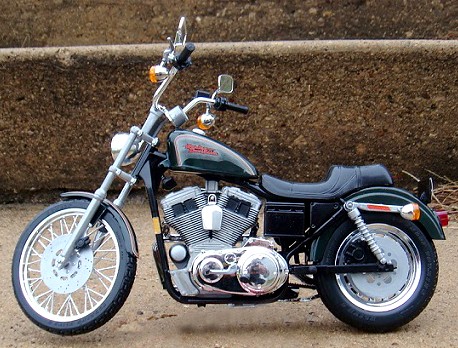
Harley Davidson XL 1200 Sportster Custom 1:8 Scale Model Revell Kit 85-7310 Review

2013 December 12
by Doug

Right On Replicas, LLC Step-by-Step Review 20131212*
Harley XL 1200 Sportster Custom 1:8 Model Revell Kit #85-7310 Review
000

Review and Photos by James Yeager James Yaeger II Thumbnail

The Harley Sportster was a hit from the start but the 1200 Custom raised the bar for power and elegance.  The 1200 was the most powerful model in the Sportster series and one twist of the throttle will convince you that you’re in for some fun. The Custom was fitted with a wider front end and tires along with a lower profile fuel tank.

For The Modeler: This is a Revell kit 7310, Harley Davidson XL 1200c Sportster 1200 Custom. Released in 1997 and longer in production, these kits are still readily available at online auctions and garage sales at a reasonable price. It is a 1:8 scale kit and is a Skill Level 2 kit with 75 pieces. The pieces are molded in; chrome, metallic red, grey, clear amber, clear red, clear, black vinyl tires, and waterslide decals. Here is an eye grabber a replica of a Harley Davidson 1200 XL Sportster from Revell. This Sportster has the 1200cc Evolution Engine. Revell describes the XL 1200 as a “lowered suspension, custom seat, and 21” laced front wheel with floating disc; slotted disc rear wheel; cloisonné tank emblem.  And a handle bar treatment that’s like nothing else…”  Revell’s description is right on the money, this Sportster is for “those with a bottomless appetite for Sportster styling.” The finished dimensions are; Length 10.75”, Width 4.125”, Height 7.125”.

Covered in this Review:  If you want to perfect your build; basic construction; preparing parts for better finishing; alternate assembly sequence suggestions for fit and ease of finishing; complete paint and adhesive selections and applications; engine assembly and detailing; test fitting; frame detailing; correcting instruction errors; where to avoid glue; how to remove unwanted chrome plating for authenticity; adhesives to use for transparent parts; identifying and removing excess flash; dry brushing to add realism; repairing seams; installing directional tires; how to avoid decal fogging; decal preparation and applications, are all fully examined in this pictorial 14 page, full-color Step-by-Step review in PDF format. The instructions are also available with this review.


100% money back guarantee!

Click the Buy Now link below to purchase the full Step-by-Step review for $4.95 USD.


Important – You MUST click on the “Return to Right on Replicas, LLC” link after you’ve made your purchase to download your review!


Right On Replicas, LLC ©2013 All rights reserved.

*All registered trademarks are the property of their respective brands.

MiG-29 Fulcrum 1:48 Scale Revell Model Kit #85-5865 Review

2013 December 11
by Doug

Right On Replicas, LLC SnapShot Review 20131211*
MiG-29 Fulcrum 1:48 Scale Revell Model Kit #85-5865 Review

GEDSC DIGITAL CAMERA  

Review and Photos by John Orenski John Orenski Thumbnail

 The MiG-29 was first revealed to the west in the early 1980’s at Farnborough and was immediately given a huge amount of attention by NATO air forces. It was a departure from traditional Russian designs using twin tails and engines as well as a new way of using the airframe as a lifting body and providing supplemental lift. It also fielded a new type of radar and missile systems. The Fulcrum is in use with several different air forces and is being constantly updated. The latest versions are considered some of the fighters in the world today and will see service for a long time.

 For the Modeler: The Revell 1/48 MiG-29 Fulcrum is a re-boxing of the Monogram kit first pressed in the mid-1980’s. When the kit first came out it was considered state of the art mostly because not much was known about the actual aircraft. It was also the only kit in this scale at the time. The model is molded in light gray and clear. Markings for two airframes are included with decals for a Polish, or Russian bird in traditional dark/light gray camo. Fully detailed cockpit and landing gear are also highlights of the kit. The fit is good minus a few places like the intakes but overall an excellent value and a good kit. It’s very impressive on the display shelf.

The overall build was a pleasant experience with only a few exceptions. The intakes are split in half lengthwise and terminate at a natural panel line on the airframe. The problem is you get a huge step at the tunnel side if you assemble them as per the instructions. I got around this by gluing each intake half to the fuselage and then to each other down the center. I was then able to deal with the center seam. The only other serious flaw I found was that the canopy cannot be closed as the seat sits too high. Also the provided heads-up display HUD doesn’t fit under the windscreen. I fixed this by leaving out the heads-up display and posing the canopy open.

 Overall: The MiG also comes fully armed with 4 air to air missiles and a centerline drop tank. I used all the missiles provided as well as the center line fuel tank. The missiles come mostly in one piece. You must add a set GEDSC DIGITAL CAMERAof fins to the larger AA-10 Alamos and unfortunately in my sample one fin per set was broken in half. I used thin plastic sheet to replace them.  There are two sets of markings included in the kit. One in Russian and one in Polish. I chose the Russian example as I like my MiGs in red stars. The decals themselves went on well but were a bit thick and needed setting solution to make them really stick.  At the time this model was pressed the US was only getting its first look at the real MiG-29. Monogram’s offering was considered state of the art then. Modern offerings are much more detailed. This kit is impressive however, it still builds easily, has a good cockpit and weapons, and gives one a chance to practice your skills.


Right On Replicas, LLC ©2013 All rights reserved.

*All registered trademarks are the property of their respective brands.

1967 Corvette Convertible 1:25 Scale Revell Model Kit #85-4087 Review

2013 December 9
by Doug

Right On Replicas, LLC Step-by-Step Review 20131209*
1967 Corvette Convertible 1:25 Scale Revell Model Kit #85-4087 Review
fig 000
 

Review and Photos by Will Emerson Will Emerson Thumbnail

1967 was to be the unveiling of the third generation “MAKO” styling. However design problems showed the “new” Vette wasn’t ready, so it was decided there would be one final Stingray for 1967. With very few modifications from 1966 the 1967 was born. The two biggest changes were the addition of a 435 HP 427 cubic inch engine that featured a tri-power [3×2 barrel carbs] intake and a special new big block hood featuring a unique hood scoop. With looks and performance [0-60 in 5.5 seconds and a 13.8 second 1/4 mile] the 67 Corvette really stood out. It also remained a favorite at race tracks, drag strips and stop lights. This Revell kit features all those options and more!

For the Modeler: This is the Revell 1967 Corvette Convertible 2n1 kit #85-4087.  It is a 1:25 scale, Skill Level 3 kit with 156 parts molded in White, Chrome, Clear, and transparent red with soft vinyl tires. This is a modified reissue of Revell/Monogram #85-2968 tooling and finally [and best of all] the modification was making it a 2n1 kit. The kit now features a racing version to go along with the stock version and at 156 pieces it is very detailed.  I decided to do the race version of the kit for my build, but it should be noted that it also builds as a great stock replica. This kit features a choice of two hoods and two different wheel styles, plus a separate plated windshield frame. The finished dimensions are; Length 6.75”, Width 2.875”, Height 2.0”.

Covered in this Review:  If you want to perfect your build; basic construction; preparing parts for better finishing; alternate assembly sequence suggestions for fit and ease of finishing; complete paint and adhesive selections and applications; engine assembly and detailing; test fitting; chassis detailing and construction; correcting instruction errors; dashboard decal detailing; interior detailing and color selection; suspension detailing; decal preparation and applications; correcting axle detail errors; version part considerations; adding realism to the center console; shifter decal orientation; a gauge location map; seam identification; bumper mount considerations; hood modifications for fit; using metalizers for correct wheel finishes; wheel pin modifications; scratch building a radio mast for realism; window installation methods; adding black washes for realistic intakes; detailed racing stripe installation instructions, are all fully examined in this pictorial 11 page, full-color Step-by-Step review in PDF format.


100% money back guarantee!

Click the Buy Now link below to purchase the full Step-by-Step review for $2.95 USD.


Important – You MUST click on the “Return to Right on Replicas, LLC” link after you’ve made your purchase to download your review!


Right On Replicas, LLC ©2013 All rights reserved.

*All registered trademarks are the property of their respective brands.