RoR Step-by-Step Review 20131025*Â
Fireball Roberts ’57 Ford 1:25 Scale Revell Model Kit #85-4024 ReviewÂ
Review and Photos by Tony Gibson 
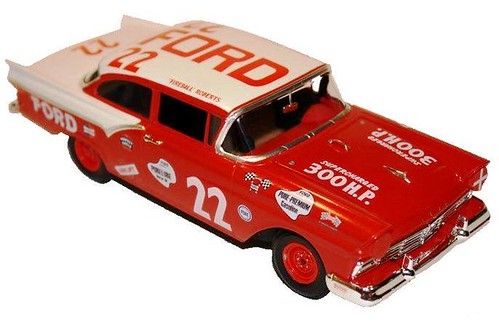
Before Edward Glenn Roberts started driving race cars, he was a baseball player, where he earned his nickname “Fireballâ€. When he started racing, the name stuck. He started racing full time on dirt tracks and with NASCAR. This ’57 Ford was one of his most famous cars and numbers during his career with the â€Thunderbird Special†supercharged 312 c.i.d. V8. Before his death in a 1964 racing accident, Fireball was voted most popular driver and won a total of 33 NASCAR races in only 206 starts. He also won the Daytona race in 1962. Roberts has been inducted into the Motor Sports Hall of Fame.
For the Modeler: This is the Revell “Fireball†Roberts 1957 Ford race car 1:25 Scale Model Kit #85-4024. It is a Skill Level 3 kit. The pieces are molded in; white, chrome and clear plastic with four vinyl no-logo street tires and waterslide decals. This kit includes 171 parts and two different designs to choose from including gauges and many extras. It has a nicely laid out direction sheet and the tooling for this kit is awesome. The body is super clean and has only minimal die marks, making cleanup easy. The parts on the tree are sharp, clean and highly detailed. There are also several fine detailing parts to make things more realistic. There is a split bench seat for racing, roll bars, and a rear seat pan filling the rear cockpit. The chrome is bright and really clean. The glass is very clear and polished. The decals are beautiful and colorful with crisp and clear designs. Finished dimensions 7¾“ long, 2¾“ wide, 2¼“ high. Keep the glue off the windshield, Tony
Covered in this Review:Â If you want to perfect your build; basic construction; preparing parts for better finishing; alternate assembly sequence suggestions for fit and ease of finishing; paint and adhesive selections and applications; chassis construction and detailing; masking techniques for tutone paint; testing for paint compatibility; modifying the exhaust system for racing; adding foil highlights; small part handling; waxing the finish; test fitting; suspension construction and detailing; detailing realistic head/tail light treatments; making a realistic racing interior; how to adhere clear parts; and decal application and setting solutions; are all fully examined in this pictorial 12 page, full-color Step-by-Step review in PDF format.
100% money back guarantee!
Click the Buy Now link below to purchase the full Step-by-Step review for $2.95 USD.
Â
Â
Â
Important – You MUST click on the “Return to Right on Replicas, LLC” link after you’ve made your purchase to download your review in PDF format.
Â
 Â
Right On Replicas, LLC ©2013 All rights reserved.
*All registered trademarks are the property of their respective brands.
RoR Step-by-Step Review 20131023*Â
Harley-Davidson FXSTC Softail Custom 1:8 Scale Revell Model Kit #85-7309 Review
Â
Review and Photos by James Yeager 
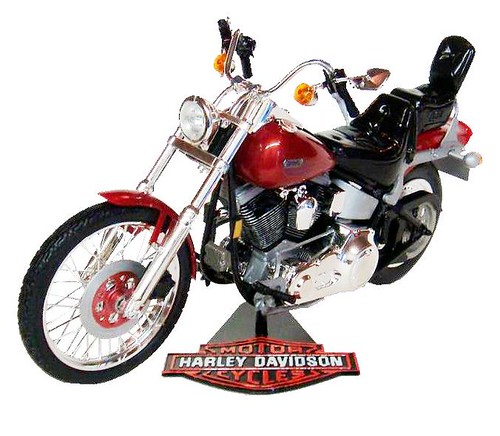
This Harley Davidson motorcycle used the Evolution V-Twin engine and definitely turned a lot of heads when it rolled past. Featuring magnificent power and torque along with a Softail frame for comfort this bike is ready to go – anywhere. Utilizing styling cues from the classic chopper look and the reliable FX frame/forks this model supports a larger rear tire for additional comfort and a king and queen seat for passengers.
For the Modeler: This is a Revell SnapTite #85-7309 Harley Davidson FXSTC Softail Custom kit. It is a 1:8 scale, a Skill Level 2 and 67 pieces. The pieces are molded in; metallic red, chrome, clear, orange clear, and clear red with black vinyl tires and waterslide decals. This kit was released in 1996 and is still a lot of fun to build almost twenty years later. Even though the kit is out-of-production they are still readily available at online auctions and garage sales for a reasonable price. The finished dimensions are; 11½ L, x 4½†W x 6â€H. Here is another reproduction from Revell of a highly admired motorcycle produced by Harley Davidson.
Covered in this Review:Â If you want to perfect your build; basic construction; preparing parts for better finishing; alternate assembly sequence suggestions for fit and ease of finishing; complete paint and adhesive selections and applications; engine detailing; test fitting; suspension construction and detailing; making and using circular masks to detail the brake discs; dealing with bad decals and decal application; using the bare plastic as a color coat; assembly tips using hand tools; directional tread instructions; detailing the instrument cluster/console, are all fully examined in this pictorial 13 page, full-color Step-by-Step review in PDF format. The instructions are also included with this review.
 Â
100% money back guarantee!
Click the Buy Now link below to purchase the full Step-by-Step review for $4.95 USD.
Â
Â
Important – You MUST click on the “Return to Right on Replicas, LLC” link after you’ve made your purchase to download your review in PDF format.
 Â
Â
Right On Replicas, LLC ©2013 All rights reserved.
*All registered trademarks are the property of their respective brands.
RoR Step-by-Step Review 20131021*Â
U2-C Spyplane 1:48 Scale Testors Model Kit #516 Review
Â
Review and Photos by John Orenski 
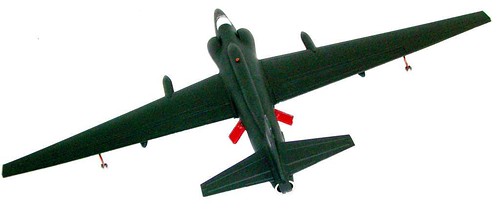
The Lockheed U-2 nicknamed “Dragon Lady” was designed in 1954 by Kelly Johnson in a division called the Skunk Works. This was Lockheed’s top secret aircraft facility that also created the legendary SR-71 Blackbird and F-104 Starfighter. Made specifically for high altitude reconnaissance the aircraft has served the USAF, CIA, NASA, FEMA, and a few foreign air forces since the late 50’s. The long, slender wings created excellent lift at low speeds allowing the aircraft to soar at extremely high altitudes. Over the years the U-2 has been re-configured for a myriad different missions such as air sampling, camera orientation for satellites, and of course photography. In its current state the aircraft has gained several feet in length through the use of fuselage “plugs” to accommodate more advanced surveillance equipment and fuel as well as huge under wing pods that provide space for more of the same. With all of this weight and the wing configuration the challenge to the pilot in flight is great. The aircraft must fly inside what is referred to as the coffin corner. This is a roughly 10 knot window at its optimal airspeed. Too fast and the wings will rip off the aircraft. Too slow and the aircraft will enter into an uncontrollable spin. Not much is known about the missions the U-2 flies today; but it will have a place in our air arsenal for many years to come.
For the Modeler: Still available at online auctions and garage sales everywhere this kit is a 1:48 Scale U2-C Spyplane Testors Model Kit #516 “Made in the USA†re-release of the venerable Hawk kit and as such has been around for quite some time. The copyright on this package is 2002, but I remember the kit being around many years before that. The kit consists of approximately 65 parts molded in a “soft†black plastic. This kit features an excellent selection of markings for a USAF version in dark and light gray camo, a CIA bird in all black, and a NASA example in white and blue. The markings are clear and in register with little carrier film. The kit also comes with a nice airframe dolly is included which will save the very awkward landing gear from having to support the weight of the finished model. It also comes with a standing pilot figure. Finished dimension are: L=12.5â€Â H (on cart)=4.5â€Â Wingspan=20â€.
Covered in this Review:Â If you want to perfect your build; basic construction; preparing parts for better finishing; optional parts considerations; alternate assembly sequence suggestions for fit and ease of finishing; paint and adhesive selections and applications; detailing the cockpit tub: decal preparation and application; dealing with the extensive flash of old kits; finishing the glue joints on large assemblies; construction and finishing of the dolly; filling fuselage and wing gaps; canopy masking and finishing; adding a realistic finish to the landing gear; detailing the air brakes are all fully examined in this pictorial 12 page, full-color Step-by-Step review in PDF format.
 Â
100% money back guarantee!
Click the Buy Now link below to purchase the full Step-by-Step review for $3.95 USD.
Â
Â
 Important – You MUST click on the “Return to Right on Replicas, LLC” link after you’ve made your purchase to download your review in PDF format!
Â
Â
Right On Replicas, LLC ©2013 All rights reserved.
*All registered trademarks are the property of their respective brands.

