HMS Campbeltown 4 Stack British Destroyer 1/240 scale Revell 85-3016

2012 May 11
by Doug

RoR Step-by-Step Review 20120511*
HMS Campbeltown 4 Stack British Destroyer 1/240 scale Revell Kit #85-3016 Review
Click here to buy this kit through Amazon.com

000


Click the Buy Now link below to purchase the Step-by-Step review by Lonny Dyer Lonny Dyer Thumbnail

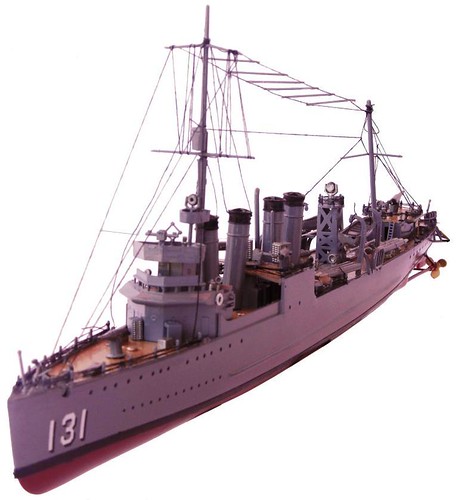
Launched 2 January 1919 as the U.S.S. Buchanan, she was active for 20yrs, being decommissioned in 1939. On 3 February 1940 she was transferred to the British Royal Navy, and renamed as the HMS Campbeltown. In January 1942, she was selected for a “special “ mission, she was to be modified to look like a German torpedo boat, sailed in to the harbor of St Nazair, France, and rammed into the only European Dry-dock on the Atlantic Ocean big enough to service and repair the German Battleship Tirpitz, The biggest threat to shipping in the Atlantic. She was stripped down and loaded with 4-1/2 tons of explosives, loaded with British commandos and sailed to France where they rammed the gates of the dry dock. 611 commandos and sailors jumped off and attacked the port. 163 died during the fight, 220 escaped in escort vessels and 125 were captured. The attack seemed to have failed. Just before noon on 28 March 1942, while the Germans were examining their captured ship, the 4.5 tons of explosives detonated. The explosion killed 250 Germans and French workers. It also damaged the dry dock to the extent that it was unusable for the rest of the war

For the Modeler: This is a 1/240 scale HMS Campbeltown/4 Stack British Destroyer Plastic Model Kit from Revell Kit #85-3016. At skill level 2 it has 128 pieces molded in light gray with a detailed bridge, deck, four stacks, antennas, life boats and depth charge racks. Armament: includes four 4″ guns, one 3″ gun and twelve 21″ torpedo tubes. I hope you enjoy this review; the ship was a pleasure to build.

Covered in this Review: If you want to perfect your build; basic construction; detailed rigging construction; preparing parts for better finishing; adhesive selections and applications; ship history; construction strategies; aligning sub-assemblies; test fitting parts; hull assembly; identifying and repairing seams; porthole repair; torpedo tube orientation; alternate assembly sequences; railing construction techniques; making a realistic searchlight ladder; davit construction; and paint selections, are all fully examined in this 14 page, full-color Step-by-Step review.

Important! – You MUST click on the “Return to Right on Replicas, LLC” link after you’ve made your purchase to download your review!


To get your copy of the full review – just select one of the payment methods above for $4.99 USD.

Right On Replicas, LLC ©2012 All rights reserved.
*All registered trademarks are the property of their respective brands.

Decals by Lucas (Bud King 1952 Hudson #RL-51953) Review 1/25 scale

2012 May 7
by Doug

RoR AfterMarket Review 20120507* – Decals by Lucas (Bud King 1952 Hudson #RL-51953) Review 1/25 scale
hudson00
 

See the AfterMarket Review and Photos by Tony Gibson Tony Gibson

For the donor kit a 1952 Hudson model (#2012) by Model King was used.  This review is for the aftermarket decal conversion from Decals by Lucas (item #RL-51953).  The markings are for the 1952 Bud King Hudson stock car racer. A review on the donor model has already been done by Mike Garrett (click here to see that review) so the attention in this review will be to the decals only.

The decals are very nicely done.  The colors were bright and the fonts were correct.  Some of the edges were a little grainy around the White’s Sales and Service and around other logos, but they were still pretty clear.

For the Modeler: Overall, these decals were pretty good.  The material itself is pretty strong so tearing shouldn’t be an issue if they are soaked properly.  They laid into place very well and a little help from the MicroSet just helped them etch in better on the surface of the body.  The only trouble was the transparency of the white over a colored paint and the color of the trim showing through the red decals.  After all the decals dried a while, they did look better. These decals would be good for a novice builder.  With some minor work they could be good for a show built model.

*All Registered trademarks are the property of their respective brands.


Green Hornet Roadster Monogram PC61 Review

2012 April 25
by Doug

RoR Step-by-Step Review 20120425* – Green Hornet Roadster Mgrm  PC61 ReviewGreen Hornet 000

See the Step-by-Step Review by Marty and Stephanie Oberman Stephanie and Marty Oberman

Monogram’s Green Hornet kit is considered to be among the earliest all-plastic model kits mass-produced for public consumption. Originally issued in 1960 under the kit  number of PC-61, it was later re-issued in 1996 with the number 85-0061. The original box art (and kit number) remained the same, however there were a few discrepancies between the box art description and instruction sheet.

For the Modeler: This review takes a look at one of the early models that made the fledgling kit industry a success. Although it is an old design, it was well done, and the kit has been reissued a couple times (1996, 2003) since. This no-frills easy builder kit is perfect for the novice and sports a lot of chrome making for a great display piece.


*All Registered trademarks are the property of their respective brands.


Â