1937 Ford Panel Delivery Truck 1:25 Scale Revell Model Kit #85-4930 Review

2014 August 5
by Doug

Right On Replicas, LLC SnapShot Review 20140805*
1937 Ford Panel Delivery Truck 1:25 Scale Revell Model Kit #85-4930 Review
Mike Kreuger Ford 1


Review and Photos by Michael Krueger Mike Krueger Thumbnail

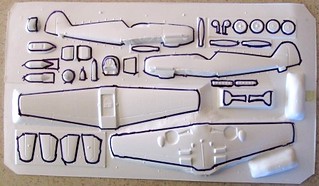
When given the chance to build and review the 1937 Ford Panel Truck, I jumped at the chance because I have always wanted to build that kit.  All of the pieces to the Panel Truck upon inspection were all very nicely molded and clean and free of any scale.  I thought because of that the panel truck was going to be an easy build.  I was half right, because the motor, chassis, and body all went together without any problems at all.  It wasn’t until the final assembly that I ran into any problems. When assembling the chassis to the to the body portion of the panel truck, I found out that there was a major fit problem between the firewall/floor and the motor. .Mike Kreuger Ford 2 
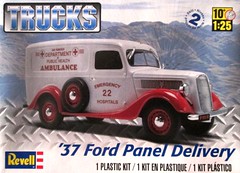
I found this to be very troubling because I followed the instructions to the tee.  Upon inspection, I found is that the engine was sitting too high in order for the body to fit down on the frame.  To make sure the chassis and the body portions would fit properly, I cut the top half of the transmission off all the way to back of the engine block. After doing the engine modifications, the model continued to go together without any further problems.  Because of this, I would highly recommend fitting all pieces before final assembly.


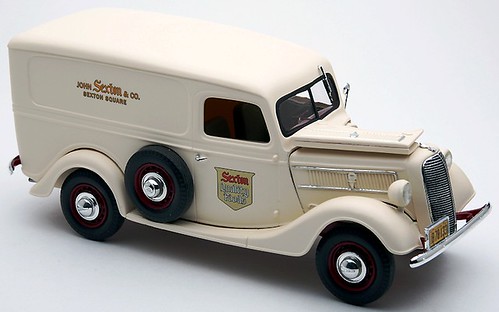
If you’re wondering about the paint, I choose to use Krylon paints.  The main color is Ivory, the chassis and rim color is maroon.  I then sealed in the ivory and maroon with matte finish.  This is the first time in a very long time that I haven’t used automotive paints on a model kit, but found that using Krylon paints isn’t so bad and a lot cheaper. After final assembly, I decaled the panel truck with the decals supplied in the kit. Mike Kreuger Ford 3 
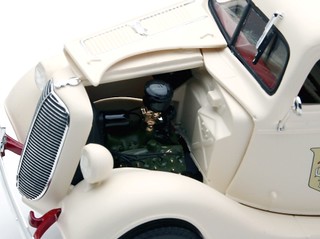
The decals are very nice and extremely easy to work with.  I choose the Chicago family business decals because they offset the colors that I used on the panel truck.


Overall: Like I stated above, the panel truck went together without and major issues except for the firewall and motor and just because of that issue.  Don’t let that keep you from building the panel truck kit.  Just do a mock-up/pre-assembly and you should be able to avoid that issue all together.  I would recommend this model kit to builders that have five or more years’ experience because of the potential fit issue though. Happy Modeling – Michael Krueger


Right On Replicas, LLC ©2014 All rights reserved.

*All registered trademarks are the property of their respective brands.


How to Build a Vacuform (vacuum-formed) Scale Model

2014 July 30
by Doug

Right On Replicas, LLC Step-by-Step Review 20140730*
How to Build a Vacuform (vacuum-formed) Scale Model
000

Review and Photos by Doug Cole  Doug

If you’ve been building models for a while you’ve probably heard the term “vacuform kit.” As opposed to the usual injection molded kits that are so common these . days, the vacuum molded kit is formed when a heated sheet of plastic is lowered onto a relief die and the air is vacuumed out to pull the plastic onto the die plate. The plastic then cools and conforms to the die plate.  The result is a single sheet model kit that looks like this. The parts have been outlined in marker here to show them clearly.


Most people shy away from these kits as they clearly involve more work than just cutting the pieces off of the tree as you do with injection molded kits but there are some good reasons why you might want to consider building one.  First off – it’s really not that hard to turn that plastic sheet into a really nice looking model (like the Messerschmitt Bf 109-E above). And secondly, there are quite a few models marketed as vacuform that the injection molders never made. Quite often odd or unusual models are found in the vacuform offerings that the main stream model companies would never consider producing. While they used to be quite common the only good source for vacuform kits is online as most of the mainline hobby stores only deal with high volume kits. A search for vacuform kits at online auction site will turn up a large number of these kits and you might just find one that would make a unique and unusual model for your display shelf.


For the Modeler: This review is based on the Falcon Industries 1:48 Scale Messerschmitt Bf 109-E model kit although the techniques shown in this review can generally be applied to any vacuform model.  This “kit” consists of one white plastic sheet of parts, two clear cellulose canopies, and a set of pictorial instructions. Details such as panel lines might not be as crisp as injection molds but they’re acceptable. Some scratch building is required on the part of the builder.  In this kit, simple parts such as the main wheel struts, tailplane struts, and aerial are not included and will have to be made or sourced from another kit by the builder. Another thing you’ll have to do is find or make decals for your model. Most of these kits were produced prior to the days of the color printer. Fortunately, there are a lot of aftermarket sources online nowadays for both accessory parts and decals to provide professional results for your vacuform model. Overall completed dimensions are Length: 7″, Width: 8″, Height: 2″.


Covered in this Review: If you want to perfect your build; basic construction; preparing parts for better finishing; extensive paint and finishing information; adhesive selections and applications; seam and sink identification and repair methods; decal selection, preparation, and application; how to use setting solutions for great looking decals; detailing and construction options; detailing the instrument panel; construction sequence deviations for fit and finish; contest finishing considerations are discussed;  version considerations; installing windows with white glue; scratch building minor components; using aftermarket and kit bashed parts, are all fully examined in this pictorial 14 page, full-color Step-by-Step review.


100% money back guarantee!


Click the Buy Now link below to purchase the full Step-by-Step review for  $2.95 USD.


Important – You MUST click on the “Return to Right on Replicas, LLC” link after you’ve made your purchase to download your review!


Right On Replicas, LLC ©2014 All rights reserved.

*All registered trademarks are the property of their respective brands.


Ed Roth ’57 Chevy Bel Air 1:25 Scale Revell Model Kit #85-4306 Review

2014 July 25
by Doug

Right On Replicas, LLC Step-by-Step Review 20140725*
Ed Roth ’57 Chevy Bel Air 1:25 Scale Revell Model Kit #85-4306 Review
000

Review and Photos by Alan Mann Alan Mann (Thumbnail)

The 1957 Chevy was introduced by the Chevrolet division of General Motors in September 1956. It was available in three series models: the upscale “Bel Air”, the mid-range “Two-Ten”, and the “One-Fifty”. A two-door station wagon, the Nomad was produced as a Bel Air model. An upscale trim option called the “Delray” was available for two-ten 2-door sedans. It is a popular and sought after classic car. These vehicles are often restored to their original condition and sometimes modified. In 1957 Ed Roth painted a new ’57 Chevy in a custom paint scheme to help promote his California pin striping shop. It was the perfect ride to blazon his name down the side in flaming letters. For 1957, the New Bel Air model was equipped with a fresh 283ci V-8. Additionally, Bel Air had reached the peak of refined retro elegance. Their fins and headlamps were stylish and the interior was spacious, comfortable and elegant.


For the Modeler: This review is based on the Ed Roth ’57 Chevy Bel Air 1:25 Scale Revell Model Kit #85-4306. Revell rates this as a Skill Level 3 for a more advanced builder. The kit includes 185 parts molded in White, Clear and Chrome and Rubber tires. Copyright dates on the chassis and parts date this kit to 1973, making this a Re-Issue or REPOP. That being said it looks like this is a straight re-release of the old 3n1 kit that has been around forever but with Roth decals now. The molding is thicker on the parts not the usual thin parts seen in new kits; also there is some flash to deal with and mold lines. The motor is quite detailed and has 3 different intake options, Roth (Custom), Street or Drag. This motor lends itself to easy aftermarket details! The chassis is straight forward and clean. One note is this kit deletes the Drag tire options and you only get one set of tires. The interior is nicely detailed and a multi-part design due to the trunk and doors opening. The body is nice but all the trim is molded on to it meaning lots of Bare Metal Foil work or Silver Paint Details. Decals include a Roth Flame Job or some basic Drag decals.  Overall completed dimensions are Length: 8-1/8″, Width: 3″, Height: 2-1/4″.


Covered in this Review: If you want to perfect your build; basic construction; preparing parts for better finishing; extensive paint and finishing information; adhesive selections and applications; seam and sink identification and repair methods; engine detailing; decal selection, preparation, and application; how to use setting solutions for great looking decals; detailing and construction options; detailing the dashboard; construction sequence deviations for fit and finish; contest finishing considerations are discussed; finishing the tires for realism; adding engine compartment details for authenticity; version considerations; removing unwanted scripts; instruction errors and omissions; customizing the interior; complete interior detailing; using foil for chrome accents; where “not” to use glue; installing windows with white glue, installing the door, trunk and hood hinges for maximum strength; detailing the windows with black edging; using foil for realistic trim; are all fully examined in this pictorial 20 page, full-color Step-by-Step review.


100% money back guarantee!


Click the Buy Now link below to purchase the full Step-by-Step review for  $2.95 USD.

Important – You MUST click on the “Return to Right on Replicas, LLC” link after you’ve made your purchase to download your review!


Right On Replicas, LLC ©2014 All rights reserved.

*All registered trademarks are the property of their respective brands.