1969 COPO Camaro ZL-1 1:25 Scale Revell Model Kit #85-4056 Review

RoR SnapShot Review 20130923*Â
1969 COPO Camaro ZL-1 1-25 Scale Revell Model Kit #85-4056 Review

 Review and Photos by Jim Olson 
The Chevrolet Camaro was a breakthrough for GM in the pony-car race. Aside from mechanical similarities, the body lines of the 1969 model were very different from the previous two years with an added sleekness. I owned one back in 1980 and it was a very fun car. There were many drivetrain options in 1969, from a six cylinder engine to a fire-breathing big block and transmissions ranging from the two speed PowerGlide to a tough-as-nails Turbo-Hydromatic 400 3 speed automatic and a handful of three and four speed manual transmissions to select from.
For the Modeler: This is the 1969 Camaro ZL-1 1-25 Scale Revell Model Kit #85-4056. It is a skill level 2 kit molded in 105 white, clear, chrome and transparent red pieces. The kit includes instructions and a set of waterslide decals. The latest release of this kit portrays the “COPOâ€, or “Central Office Production Orderâ€, something the average Joe on the street normally couldn’t get his hands on. The limited production of 69 total vehicles were made to allow for sanctioned racing competition (minimum production allowed for public purchase was 50 vehicles) while remaining street legal. Several features that are essential to this version of the Camaro were added to this kit; an aluminum ZL-1 427cid engine, 4 speed manual transmission and a 12 bolt rear differential.
Body: As usual, there are mold lines on the rear fenders at the beginning of the “C†pillar. One would think with the technology available today model makers would figure out how to eliminate these which would make builders very happy. Use some care here when sanding these down, the white plastic is soft and easy to scratch. Flash is minimal on the body and chassis which helps cut down on prep time. The firewall detail is nice and one could use the Testors marking pens to highlight wiring with good results. Two grilles are included, one chromed and one not. The un-chromed grille is the correct one for the COPO Camaro while the chromed grille sports hidden headlights and an SS emblem. One nice thing that was included is a set of door handles on the chrome tree. Had I noticed these before I painted the body I would have sanded off the molded in handles and used these.
Chassis: Because this is a 1990 tool, there isn’t a lot of detail but it’s still passable and reflects the original design well. One nice feature is the front cross-member top section with highly detailed upper control arms with upper shock mount elements
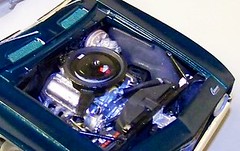
Engine: The engine is a decent rendition of the 427 big block Chevy but the carburetor that comes with the kit is a two-piece item and is very poor. I replaced it with a resin “Holley” carb with much better detail as shown. When painting the engine, take note of the correct color scheme. The engine block, heads, intake, timing cover and water pump should be aluminum in color and the oil pan should be black.
Interior: The COPO Camaro was given a very sparse, utilitarian interior with no creature comforts. Simple vinyl covering on the seats and door panels, a floor shifter along with an in-dash tachometer were all the racer needed. The engraving on this kit however, is pretty good with raised door and window handles and armrests. The headliner is also done fairly well. The “glass†is in two pieces, front and rear which is far nicer than the old one-piece design with strips going across the headliner.
Decals: The water-slide decals are very nice. I sanded the molded in side marker lights and “Chevrolet†scripts so I can use the decals in their place and the dash gauge decals are very nice and a huge time-saver. They will need trimming and some decal set solution so they lay down well. However, the 427 and crossed flags air cleaner decal (no. 6 on the decal sheet) is missing and the only air cleaner decal is a tiny “rear†decal that goes on the back of the upper lid.
Build details: I tried installing the engine with the headers on but had to remove the center section of the transmission cross-member to make it work. Even then it wasn’t a good fit so I took the headers off and glued the engine in place. It’s a very tight fit with the upper control arms, steering box and as I found out later, the driver’s side inner tie rod end is too close to the header when installed. You might be able to put the headers in from the top if you leave the upper control arms off and glue them on later. In this case, I inserted the headers into place from underneath and used superglue to make sure they didn’t move.
As nice as the hubcaps are, the tree intrudes on the back of the hubcap making it impossible to put them on without grinding the sprue out of the backs. I stripped the chrome with oven cleaner, then painted them aluminum and the indents with flat black.
To be as true to the original vehicle as I am capable of, the window trim and rocker panel moldings are the only places I used Bare-Metal chrome foil. I could have put it on the wheel openings but some of the reference pictures I found didn’t have the chrome moldings so I left it off there.
Overall: this is a fantastic kit to build with very little extra work needed.
 Right On Replicas, LLC ©2013 All rights reserved.
*All registered trademarks are the property of their respective brands.
Â
Â
Â
