Lockheed PV-1 1:48 Scale Revell Model Kit #85-5531 Review

Right On Replicas Step-by-Step Review 20140527*
Lockheed PV-1 Â 1:48 Scale Revell Model Kit #85-5531 Review
Review and Photos by Kevin Lawton 
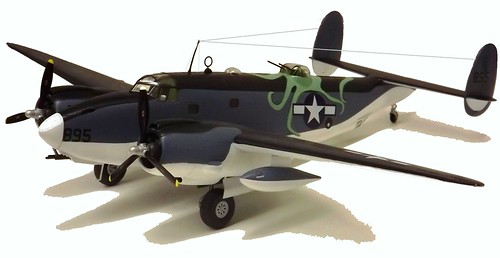
The PV-1 Ventura, was built for the U.S. Navy by the Vega Aircraft Company division of Lockheed (hence the “V” Navy manufacturer’s letter that later replaced the “O” for Lockheed). The PV-1 Ventura actually began life as the B-34 Lexington, a medium bomber for the U.S. Army Air Forces. However, during the early months of 1942, the primary responsibility for anti-submarine warfare in the United States was shouldered by the Army Air Force. This irked the Navy, as it considered this region of battle its burden. A deal was struck between the Army and Navy when the Army needed the Navy’s Renton Washington plant to build its new B-29 Superfortress. One clause in the deal stated that the Army would cease production of its B-34’s and B-37’s and that these resources would be used to build a Navy version of the B-34 – the PV-1 Ventura
For the Modeler: This review is based on the Lockheed PV-1, 1:48 Scale Revell Model Kit #85-5531. It is a skill level kit and contains 143 parts molded in light gray and clear “glass†pieces. This kit features recessed panel line detail, an optional “chin gun”, a movable bomb bay compartment with full load, separate wing tanks and decals for three versions: 1. U.S. Navy PV-1, BuNo. 48895, Patrol Bombing Squadron VP-133, Iwo Jima, 1945; 2. U.S. Navy PV-1, BuNo. 48891, Pilot Lt. “Butch” Mason, Patrol Bombing Squadron VP-135, Attu, Alaska, 1943 and R.C.A.F. Ventura of No. 149 Squadron, Prince Rupert, British Columbia, 1943.. Finished dimensions are: Wingspan: 16-1/4″, Length: 12-13/16″, Height: 3-1/4″. Here we have a bit of a discrepancy with the Revell kit as the kit is titled a PV-1, but if you build and decal the version (like I did) of “U.S. Navy PV-1, BuNo. 48895, Patrol Bombing Squadron VP-133, Iwo Jima, 1945â€, I believe you are actually building a PV-2. The PV-2 was armed with five 50 caliber (12.7 mm) machine guns in the nose, two in the upper nose decking and three in a chin pod; two 50 caliber machine guns in the Martin dorsal turret; and two 50 caliber machine guns in the ventral turret.[i]  I may be confused here, but based on the armament and the info complied at the web site (footnoted) I’d say it’s a PV-2 and PV-2’s were referred to as PV-2 Neptunes1. OK, enough with the nit-picking let’s get on with the build.
Covered in this Review: If you want to perfect your build; basic construction; preparing parts for better finishing; alternate assembly sequence suggestions for fit and ease of finishing; complete paint and adhesive selections and applications; test fitting; contest considerations are discussed throughout; sink, tab and mold seam identification; version considerations and determinations; using an aftermarket mask for the canopy detailing; cockpit construction and detailing; using sprue as a construction aid; using Future to prevent decal silvering; scratch building gauge dials; adding detail to engine the nacelles; detailing the props; highlighting the fuselage wiring; engine detailing; authentic ordinance detailing; machine gun detailing; using a liquid mask to complete the canopy masking; masking with Blu-Tac; masking and painting the fuselage for a multi-color scheme; scratch building some of the machine guns for added detail; scratch building the rudder masks; using decal setting solution; working with large decals; antennae rigging;  correcting instruction errors; decal preparation and application; are all fully examined in this expanded  19 page, full-color Step-by-Step review in PDF format.
Click the Buy Now link below to purchase the full Step-by-Step review for  $4.95 USD.
Important – You MUST click on the “Return to Right on Replicas, LLC” link after you’ve made your purchase to download your review!
Right On Replicas, LLC ©2014 All rights reserved.
*All registered trademarks are the property of their respective brands.
