Go-Mad Nomad by Dave Deal Revell Model Kit #85-4310 Review

RoR SnapShot Review 20140820*
Go-Mad Nomad by Dave Deal Revell Model Kit #85-4310 Review
Review and Photos by Doug Cole 
Dave Deal’s cartoons graced the likes of CARtoons magazine regularly back in the seventies and did some work on the original Disney Cars movie. Dave lived large and his nickname “Big Deal†seemed a very appropriate match for his hobbies and talents. He was credited with being the first person to race a Baja Bug 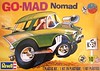 back in 1968 and set an off-road racing record in 1973. In addition to this he was also an accomplished pilot with thousands of hours in the air. His love of cars and planes combined with his talent for drawing were a natural fusion of his passions so he put them all together and designed dozens of model kits for Revell. With just a little effort you can build this custom contraption and display it proudly at home or in the office. This kit features a “far out” model with massive tires and a radically sculpted driver figure.†Dave passed away in 2008 but his legacy lives on in our hearts. Have you ever been in a place where they sell models and saw a kit on the shelf that looked like fun but you thought, “I don’t have time for thatâ€. Well, you should give it a try, it won’t take much and this “Made in America†kit is the perfect way to help rejuvenate those modeling desires.
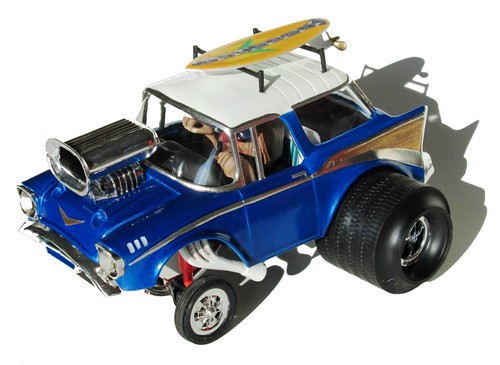
For the Modeler: This is a re-issue of the Go-Mad Nomad Revell Model Kit #85-4310, part of the Deal’s Wheels model series. This Skill Level 2 kit consists of 57 plastic pieces molded in white, clear and chrome with four black vinyl tires. Finished dimensions: Length: 5-1/2″,  Width: 4-5/16″, and Height: 3-1/16″. Construction is pretty 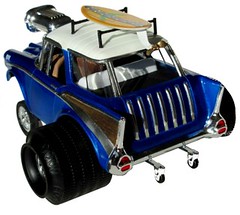 straight-forward. The body and chassis are one piece each with a pair of rear leaf springs and a couple plastic axles connect that connect the “giganticus rear tires and skinnies up front.† The rear tires are a bit of a challenge because they are assembled in two pieces.  I simply let some household contact cement get tacky then put them together.  The headers are two-piece units with one of the collector tubes coming in halves.  The assembly then glues onto the bottom of the front fender well in foolproof places provided for them. The window glass is among the best I’ve seen for a car model. It is clear and mounts on some positive tabs in the front. I used a little five minute epoxy and placed it on the two mounting tabs of the frame letting the glue get tacky and pushed the frame into place/ Hold for a minute or two and you should be fine. Everything else goes together without issue.  Finishing off the crazy driver figure is up to you but it is well designed to hide the seam and the model would not be the same without ‘Rinconâ€.  The driver figure actually comes in four pieces with the head in two parts and the arms being separate. You need to assemble and finish those off before attaching them to the interior plate. I added some simple gauge circles and a seat pattern to add some interest in the passenger compartment. To finish the sunglasses I used a black sharpie marker and a thinned blue tint for the back of the lenses.
Overall – this is a great weekend project kit that will bring back some of those crazy memories from the sixties with some good clean fun! To really dress it up a generous amount of foil is needed for the brightwork and I scratch built a car top carrier for the Surfboard just like the old days. All the parts fit onto positive locations and if detailed, it makes a great display for your shelf. On the downside – you’ll find a lot of flash and pin marks to deal with but you’ll have so much fun putting it together you won’t mind at all!  -Righton
Right On Replicas, LLC ©2014 All rights reserved.
*All registered trademarks are the property of their respective brands.
