Little Joe 2 1:72 Scale RealSpace Models Kit Review

Right On Replicas, LLC SnapShot Review 20141114*
Little Joe 2 Â 1:72 Â Scale RealSpace Models Kit Review
Review and Photos by Robert Byrnes
The Little Joe 2 was a test vehicle for the Mercury space capsule. It carried the Rhesus monkey Sam (Macaca mulatta) close to the edge of space. He was sent to test the space equipment and the adverse effects of space on humans. The flight was launched December 4, 1959, at  11:15 a.m. ET from Wallops Island, Virginia, United States. Little Joe 2 flew 55 miles (88 km) into space. It was recovered, with the monkey intact, in the Atlantic Ocean by USS Borie. Sam was one of a series of monkeys in space. Sam, from the School of Aviation Medicine in San Antonio, Texas, received his name as an acronym of the facility. The flight time was 11 minutes, 6 seconds, with a payload of 1,007 kg. The boilerplate Mercury spacecraft used in the Little Joe 2 mission is currently displayed at Airpower Park and Museum, Hampton, Virginia.
 The Kit:
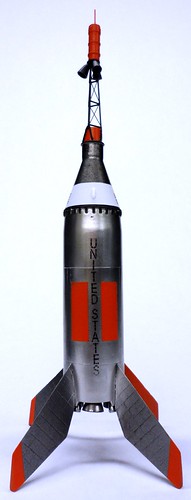
Kit Includes 15 Resin parts, 1 Photoetch Brass part, and Decals. RealSpace provides 2 Capsules. The boiler Plate and the Production Mercury Capsule. You can build any one of the Little Joe Rockets. I built this in about a week. Fairly simple, easy to work with resin parts that are cleanly molded and required little work prior to paining.
All parts were washed with a soap and water to remove mold release that was applied when the resin parts were cast.
I carefully bent the Photoetch Escape Tower into shape, then painted it with Testors Acryl Flat Black. The Escape Tower Rocket Housing resin part was primed with Tamiya Gray Primer then painted with Testors Acryl International Orange. This Rocket Housing was then glued onto the Escape Tower using thick super glue.
The Capsule is resin and was primed with Tamiya Gray Primer, followed by a coat of Alclad Gloss Black, then Alclad Airframe Aluminum. 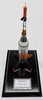
The lower part of the Capsule was painted with Tamiya White Primer, and the very top with Testors Acryl International Orange.
The Rocket and Fins are also resin and were painted with Tamiya Gray Primer, followed by Alclad Gloss Black, then Alclad Chrome. The Identifiers were masked and painted with Testors Acryl International Orange. Panel Lines were sprayed with Alclad Airframe Aluminum. The top ring was hand painted with Testors Acryl Flat Black. Decals were applied per instructions.
The resin Rockets were painted with Tamiya Gray Primer, followed by Alclad Gloss Black, then Alclad Stainless Steel.
Everything was held together using thick Super Glue. I made the display base from a wood plaque that I filled with light weight spackle and primed with Tamiya Primer followed by a coat of Alclad Gloss Black. The Label was printed on my printer.
Right On Replicas, LLC ©2014 All rights reserved. *All registered trademarks are the property of their respective brands. When using products mentioned here follow the manufacturer’s safety guidelines.
