Tim Flock’s 1956 Chrysler 300B 1:25 Scale Moebius Model Kit #1212 Review

Right On Replicas, LLC Step-by-Step Review 20150618*
Tim Flock’s 1956 Chrysler 300B 1:25 Scale Moebius Model Kit #1212 Review
Review and Photos by Alan Mann 
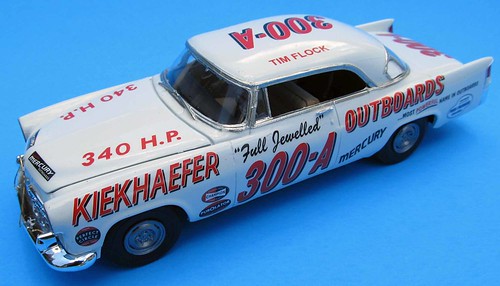
 The Chrysler 300 “letter series” were limited production, high-performance luxury cars built by Chrysler from 1955–1965. Each year’s model used a new letter of the alphabet as a suffix, except for “I”, reaching 300L by 1965, after which the model was dropped. The 300 “letter series” cars were among the performance based vehicles built by U.S. manufacturers after World War II, and thus can be considered one of the earlier muscle cars, though much more expensive and exclusive. Due to their power and performance they became a favorite of NASCAR drivers. After receiving Stock 300B’s from Chrysler the teams would do many race modifications that would enhance the safety and performance. Some body modifications were: Add bungee cords and fasteners to prevent the hood and trunk from flying open, replace the headlight housings and headlights with flat sheet metal to improve aerodynamics, remove the tail light assemblies, remove side stainless trim and fasteners for safety, bolt the passenger side door shut, rig a dead-bolt assembly to the driver’s side door with an actuating lever on the outside of the driver’s door just below the belt line to allow the driver to dead-bolt lock the door from inside the car and others to unlock it if necessary. Julius “Tim” Flock had a rather short but very successful career as a NASCAR driver in the 1950’s. Tim won 21% of the 189 races he ran. Tim captured the NASCAR season point’s championship in ’52 and ’55 and won 40 races in a career that ended in 1962. Tim was considered the best beach course racer. Tim passed away on March 31, 1998 a short time after being named one of NASCAR’s 50 greatest drivers.
Â
For the Modeler: This review covers the Moebius Models Chrysler Tim Flock 300B from 1956. This is a Skill Level 3 kit in 1/25 scale. Moebius recommends builders over 15 for this Skill Level. The kit is molded in Off White, Chrome, Clear and Clear Red with Vinyl  tires. There are 15 sprue trees with over 130 highly detailed parts. The motor assembles to create a very detailed Hemi. The chassis is multiple parts and again has a lot of details. The interior is a multiple part tub with the dash details as decals. The body is crisply molded with only minor mold lines on the C-pillars. There is a decal sheet included with necessary scripts and race decals. This kit even includes PHOTOETCH details! The instructions are VERY DIFFERENT than the usual US kit on the market today. The Instructions are an 8.5X11 book with full color! The front page is the box art in color with prerequisite warnings. The interior part has the construction sequences with written step by step build instructions. One full page shows built up areas that include the interior, engine compartment, chassis underside, dashboard, engine out of the car and a front and rear three quarter view. Page 9 of the instructions is a table that shows what parts of the car are painted what color. All of them are referenced to Testors paint by name. For the exterior colors it does reference Testors paints, but recommends buying more closely matching lacquers from an aftermarket paint company. Overall built dimensions are: Length: 8-3/4â€, Width: 3â€, Height: 2-3/4â€.
Â
Covered in this Review: If you want to perfect your build; basic construction; preparing parts for better finishing; alternate assembly sequence suggestions for fit and ease of finishing; complete paint and adhesive selections and applications; test fitting; chassis assembly and detailing; complete engine and construction and detailing; dashboard detailing; correcting the gauge decals; handling extra injection and mold tabs; using decal setting solutions for that “painted on†look; repairing a damaged figure; tire and wheel construction; installing the roll bar; correcting the dashboard for racing specifications; removing body exterior trim; identifying and removing the body mold lines; decal preparation and application; making crystal clear windows with floor polish; photo etch part issues and installation; complete engine bay construction and detailing; chassis installation; making realistic looking tires; making the trim standout with foil; using “clear†glue for the windows; front and rear suspension construction and detailing; are all fully examined in this 18 page, full-color Step-by-Step review in PDF format.
Click the Buy Now link below to purchase the full Step-by-Step review for $2.95 USD.
Important – You MUST click on the “Return to Right on Replicas, LLC” link after you’ve made your purchase to download your review!
Right On Replicas, LLC ©2015 All rights reserved. *All registered trademarks are the property of their respective brands. Follow the manufacturer’s safety recommendations for any product mentioned here.
