Time Machine Mark III (Back To The Future III) 1:25 Scale Polar Lights Model Kit #POL926 Review

Right On Replicas, LLC Step-by-Step Review 20160115*
Time Machine Mark III (Back To The Future III) 1:25 Scale Polar Lights Model Kit #POL926 Review

Review and Photos by Alan Mann 
Marty: “Wait a minute. Wait a minute. Doc, uh… Are you telling me that you built a time machine… out of a DeLorean?”
Doc: “Yes, the way I see it, if you’re gonna build a time machine into a car, why not do it with some style?
The DeLorean time machine is a fictional automobile-based time travel device featured in the Back to the Future trilogy. In the feature film series, Dr. Emmett Brown builds a time machine from a DeLorean DMC-12 with the intent of gaining insights into history and the future but instead winds up using it to travel across 130 years of Hill Valley history (from 1885 to 2015) with Marty McFly, undoing the negative effects of time travel. In the first film, the 1.21 gigawatts are supplied by a plutonium-powered nuclear reactor. At the end of the first film, and for the remainder of the trilogy, the plutonium nuclear reactor is replaced by a “Mr. Fusion†Home Energy Reactor. The “Mr. Fusion” device apparently converts household waste into electrical power.
Doc: “Great Scott. It’s me! Then, it “is†true. All of it. It is me who goes back there and gets shot.â€
Marty: “It’s not gonna happen, Doc. After you fix the time circuits and put new tires on the DeLorean, I’m gonna go back to 1885 and I’m bringing you home.â€
In the third film we find the DeLorean was hidden in an old mine in 1885 waiting for the 1955 Doc and Marty to get it. But the Time Circuits are blown and there are no replacements in 1955, so to get the Time Machine to work yet another conversion is made to the car. Using tubes and TV parts Doc builds a Time Circuit and replaces the rotten tires with ones from 1955.
Â
For the Modeler: This review covers the Snap-It kit # POL926 from Polar Lights/Round2 of the Time Machine Mark III from the Back to the Future III movie. The kit is 1/25 scale and listed as a Skill Level 2 although it is a Snap Together kit, but, the kit requires 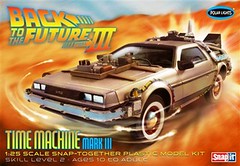 paint. The model includes about 60 parts molded in Gray, Clear, and Chrome, Brushed Steel and Metal axles. This is a Re-Release (Re-Pop), SORT-OF, as it was released in the original movie version earlier and now as seen in the final movie. Polar Lights has updated the moldings to include a “Brushed Steel†looking body that more accurately depicts the Stainless Steel body. As with the previous versions this one includes the original Plutonium Reactor as well as the Lightening Rod and “Mr. Fusionâ€. So in effect you can replicate multiple versions of the car with this one kit. The 1955 tires are all that is included but a simple tire swap for other styles can be done. The build is simplistic but painting is very tedious and detail specific. Go to the internet and download reference photos to give you a better idea as to how to properly paint it. The only decals are the license plates in the OUTATIME and BAR CODE versions. There are both decals and stickers of these in the kit. Overall dimensions are: Length: 7â€, Width: 3â€, Height: 2-1/4â€.
Â
Covered in this Review: If you want to perfect your build; basic construction; preparing parts for better finishing; alternate assembly sequence suggestions for fit and ease of finishing; complete paint and adhesive selections and applications; test fitting; complete rear panel detailing; chassis detailing; adding and detailing the external wiring harnesses; making realistic wheels; constructing the wheels and axles; dashboard detailing and sourcing; front and rear suspension build sequence; chassis installation; detailing the back panel, interior and time circuit electronics; building and detailing the Mr. Fusion power plant; correct power plant version choice; removing unwanted copyright script; using “clear†glue for the windows and glass; using floor polish to make crystal clear windows; using optional “clock story†props; comparative kit history; detailing the exhaust stacks; identifying and removing mold lines; license plate decal or sticker application; improvising dash gauges; are all fully examined in this extensive 15 page, full-color Step-by-Step review in PDF format.
Click the Buy Now link below to purchase the full Step-by-Step review for $2.95 USD.
Important – You MUST click on the “Return to Right on Replicas, LLC” link after you’ve made your purchase to download your review!
Right On Replicas, LLC ©2016 All rights reserved. *All registered trademarks are the property of their respective brands. Follow the manufacturer’s safety recommendations for any product mentioned here.
