Jawbreaker Wild Rail Dragster 1:25 Scale MPC Model Kit #821 Review
Right On Replicas, LLC Step-by-Step Review 20160125*
Jawbreaker Wild Rail Dragster 1:25 Scale MPC Model Kit #821 Review

Review and Photos by Alan Mann 
The front engine dragster is a type of race car built for drag racing in the 60’s. Commonly known as a “rail”, “digger”, or “slingshot”, it is now considered obsolete, and is used only in nostalgia drag racing. Models ranged in wheelbase length from 150 to 225 inches. They did not use any form of active suspension. Because of this, these types of vehicles were prone to becoming unstable at high speed. This is due to their making 2,000–3,000 horsepower, and having poor tire technology, short wheelbases, and very light weight.  The “Jawbreaker†is a creation by the MPC model company using the original chassis and nose from the Ramcharger Rail kit and mating it to a 32 Ford body shell for the cockpit. While not an actual car seen on the track it would be typical of what could have been seen on the track during the 60’s and 70’s.
Â
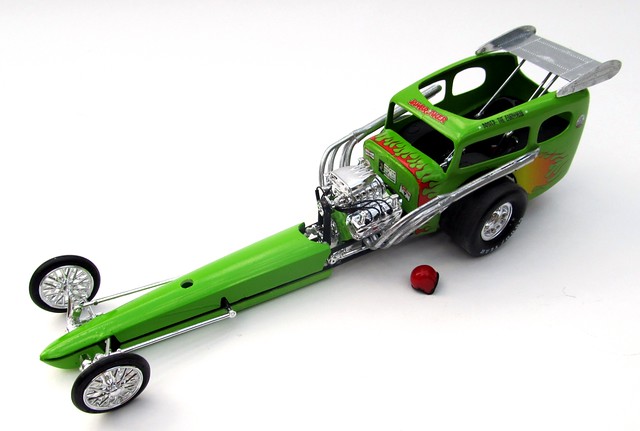
For the Modeler: This review covers the Round2 re-release (Re-Pop) of the Jawbreaker Wild Rail Dragster in 1/25 scale. This is Kit # MPC821 and is branded under the MPC line in the current Round2 catalog. The kit has seen multiple releases over the years and this  release has the original parts with new decals. The overall kit quality is typical of the 70’s with few parts and simplistic detail. You get 90 pieces molded in White and Chrome with Tampo printed soft vinyl tires. The motor is a majority of the build and is mostly chrome plated. With some wiring the motor does look good. The frame consists of multiple parts and fits well, my sample was straight with no issues. The rear drive system is simplistic and fits properly but the motor has no positive attachment to the transmission. The front suspension is all chrome and can be touchy, so take your time. The worst part is the body, it is also multiple parts and needs putty and repair to fit properly and look good. Round2 includes a really nice set of Tampo-print slicks. Final assembly size is: Length: 8â€, Width: 3â€, height: 2-1/5â€.
Covered in this Review: If you want to perfect your build; basic construction; preparing parts for better finishing; complete paint and adhesive selections and applications; test fitting; detailing the engine; front suspension build sequence; kit extra items described; complete engine construction and finishing; mold seam and sink mark identification and repair; assembly and finishing the body halves; correct header orientation and installation; chassis installation; using a homemade wired distributor; engine wiring details; clamping methods; using decal setting solutions for that “painted on†look; cockpit detailing; using Gravity Colors paints; making realistic tires; frame construction; modifying the nose cover for fit; finishing and installing the rear wing; modifying the body halves for strength; decal preparation and application; using decal setting solution for that “painted on†look; suspension construction and detailing; are all fully examined in this 14 page, full-color Step-by-Step review in PDF format.
Click the Buy Now link below to purchase the full Step-by-Step review for $2.95 USD.
Important – You MUST click on the “Return to Right on Replicas, LLC” link after you’ve made your purchase to download your review!
Â
Right On Replicas, LLC ©2016 All rights reserved. *All registered trademarks are the property of their respective brands. Follow the manufacturer’s safety recommendations for any product mentioned here.


