Click the Buy Now link below to purchase the Step-by-Step review by Robert Byrnes
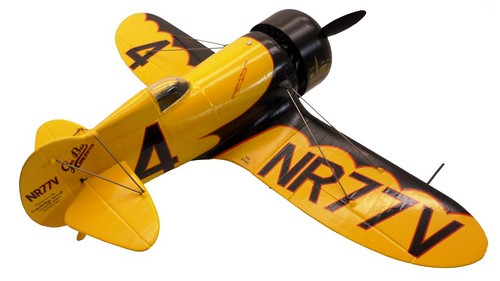
The Gee Bee “Z” was constructed during 1931 by Bob Hall and the Granville brothers as the first in a series of aircraft specifically intended for racing. It was powered by a 535 horsepower Wasp junior radial engine on loan by Pratt & Whitney. Because of its corpulent configuration and unique color scheme, the craft resembled a giant bumblebee and was the subject of considerable controversy among aviation enthusiasts.
The Gee Bee Z was entered in the 1931 Cleveland National Air Races winning five 1st place trophies. Later, its engine was replaced with a Wasp Senior model of 750 horsepower enclosed in a larger diameter cowling, in preparation for an assault on the world’s landplane speed record. During a series of attempts, one run resulted in a speed of 314 mph, but various technical difficulties prevented completion of the four runs required by the regulations. On December 5, 1931, another try was arranged, and while pilot Lowell Bayles was making a high-speed pass, tragedy struck when a catastrophic wing failure rolled the tiny craft into the ground.Â
For the Modeler: This kit went together very well. The hardest part of the build was the paint job. I can’t wait to build her big sister Gee Bee R. Although this is a nice kit with good moldings there are some things you’ll need to know before you build it to perfect this model! Sink marks are identified; engine paint color, weathering and finishing techniques; the use of metal parts to enhance engine realism; how to mount small parts for paint; masking methods; replacing interior parts with real wood for realism; tire loading techniques; repairing seams; using the decal templates for exterior paint; part clamping methods; canopy clarity techniques; adhesive selections and applications; decal applications and the use of setting solution; and rigging materials are fully discussed in this full-color 18 page tutorial review. Â
Important! – You MUST click on the “Return to Right on Replicas, LLC” link after you’ve made your purchase to download your review!
To see the full build and review – just select one of the payment methods above for $4.99 USD.
The other day I had a chance, and a free hour, to introduce my son to the world of “old school†model kits. He’s always showed an interest in cars and ships but I thought that I’d show him some of the basics of building aircraft. After making a couple snap kits he was ready to give it a try and the results turned out pretty good as you can see. Don’t be fooled though – the model looks a lot better in the photo than in person. The reason for that is because it was not built for looks but merely for training purposes.
The object was to show a youngster how to use glue, paint and decals to build on his own. It’s not something that they just know how to do. You either learn it by making several years worth of glue bombs or someone has to show you how it’s done. That is the point of this post – show the youngsters how it’s done. The biggest reason why they give up on modeling is because they don’t know building basics and they can’t complete the kit they wanted to make. It’s critical to help them through the process and have that model to show and play with.
Even a complicated kit can be an easy build if you don’t worry about the details. This plane is showing every seam and the decals aren’t exactly great quality, but what you end up with is something they are proud to have helped in the making because it was completed in a couple hours and “looks†like the real thing. You can show them how to fill seams and replace panel lines when they are ready. One more thing that helps make this happens is that you have to look for low cost kits. I found this in the bargain box at Dean’s Hobby Stop in Flushing, MI. You can typically find heavily discounted kits at local shops and garage sales. With a bag full of these cheap kits you don’t have to worry about how they turn out – just relish the great time you had with your youngster teaching him how to build on his own and boosting their confidence. If you don’t have youngsters around the house, the Boy’s and Girls Clubs, Scouts, local hobby store, and schools would love to have you show up with a box of kits and good attitude. Local modeling clubs are also a great outlet for Make-N-Takes as well. You get the idea. If we don’t make it happen the hobby will die out with us and “our†generation!
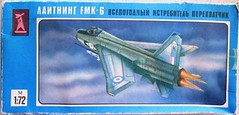
For the Modeler: This kit was made in USSR probably in the mid 70’s. It has raised panel lines and the parts fit reasonably well together and there was the usual cleanup needed. The canopy was such a poor fit I displayed it as an open cockpit. I glued a small piece of rod stock on the back and inside of the canopy and painted it flat back and then drilled a hole in the fuselage where the canopy hinge would be. I glued it into place there and it looks reasonably good. The pilot figure was missing from the kit anyway but for $2 it was a bargain and it still looks like it’s waiting for a scramble on the tarmac. The decals were not very sharp and it’s always best to spray them with some clear coat and cut them out before applying them. It’s airbrushed with Tamiya Chrome Silver (X-11) and the nose cone with Tamiya Olive Drab (X-62). The rest of the appointments were hand brushed with Flat Black.
Click the Buy Now link below to purchase the Step-by-Step review by Dave Lawniczak
The Orange Crate is based on a chopped 1932 Ford drag car that was also popular as a show car in the early 60’s. In the early 1960’s Revell released a scale model kit of this popular car and this re-issue is based on that original kit, now close to 50 years old.
For the modeler: With the level of detail in this kit there are plenty of opportunities for paint detailing and just that one thing will add greatly to the visual impact of this model once it is completed. So follow along as we build Revell’s iconic Orange Crate kit. With careful attention to detail and armed with the things I discovered reviewing this kit you too can perfect this build. To that end negotiating the chrome trees; removing flash, pin mark locations; decal selection and preparation; assembly sequence alterations for paint and fit; engine detailing; correcting instruction errors; special frame handling requirements; modifying suspension parts for fit; squaring up the four wheels to sit flat; mock-up techniques; detailing the dash; proper door operation techniques; window adjustments; hood considerations; lift device modifications are all fully examined in this 10 page, full-color Step-by-Step review.
Important! – You MUST click on the “Return to Right on Replicas, LLC” link after you’ve made your purchase to download your review!
To see the full build and review – just select one of the payment methods above for $2.99 USD.