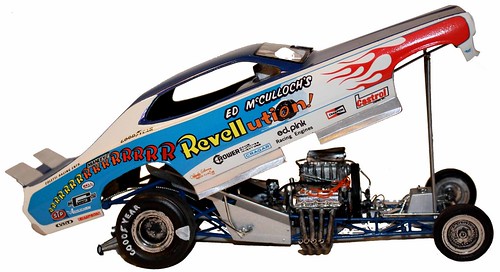
RoR Step-by-Step Review 20111201* – Revellution Funny Car Revell 1:25 Kit # 85-7355 Review
Â
See the Step-by-Step Review by Tony & Martha Gibson 
Back in the early 70s, drag racing was at its best with new technologies and factory backing, and some of the biggest names in auto racing. Ed McCulloch was with no doubt one of the kings of funny car. Even after retirement, his name lives on in record books and with fans. He gained the nickname Ed “the Ace†McCulloch. Model car and toy companies entered sponsorships with motorsport, and drag racing was one of their biggest supporters.
For the Modeler – It would be a shame just to “throw one of these togetherâ€. They are awesome kits and will add a lot to your collection if given a little time, patience and detail.  These kits can usually be found at online auction sites or model car swap meets and might be a little pricey, so shop around. Some experience is needed to put it together correctly so it’s not a great starter kit for kids but with patience this is an outstanding display item. Extensive scratch building, sequence and construction modifications, decal application, drag racing research notes and some kit bashing are all fully explained in this comprehensive Step-by-Step review.
Keep the glue off the windshield!
Tony
Donations Humbly Accepted
*All Registered trademarks are the property of their respective brands.
RoR Step-by-Step Review 20111127* – 1958 Ford Thunderbird Convertible Monogram Kit # 85-4280 Review Click Here to Buy This Kit

Â
Â
See the Step-by-Step Review by Stephanie and Marty Oberman 
The Revell ’58 Thunderbird 2n1 kit is actually a re-issue of the original Monogram kit in 1/24th scale introduced in 1987, although the copyright info inscribed on the latest re-issue dates it to 1964. I think ’87 is more accurate. An “Elvira” ‘Bird was also included in this series.
I was issued a challenge to build not only this latest issue (left above), but the ’87 issue (right above) as well…kind of like a “comparo review”. I eagerly accepted the challenge. I could build the new issue as a custom and the older one as a stock vehicle, or, as I soon decided, build them together stock as a “His-n-Hers” duo. Since I’m not a big fan of customs, I chose the latter of the two options.
For the Modeler: Even though this is an older kit that has had some upgrades there are still some fit and assembly issues that need to be addressed before settling on this one for your next contest entry. If you want to get a top notch model from these T-Birds you’ll need to heed the advice offered in this review.
Donations Humbly Accepted
*All Registered trademarks are the property of their respective brands.
RoR SnapShot Review 20111124* – 1994 GMC Sonoma SLS AMT #8128 Review
 Click Here to Buy This Kit

A SnapShot Review by Nathan Perrine 
Here’s my build up of this amazing little workhorse, in its day it was used for everything from a farm truck to a shop truck, to full-on custom. The build was awesome, If you follow the instructions, the model goes together perfectly. The engine went together nicely with the exception of the serpentine belts, they fought me all the way, I finally got them on the engine after honing out the hole in the front of the engine block so they would fit better. The front end went together nicely also, I really like the front spindles, AMT/ERTL made them go only one way, by making the ends of the spindles different on each end so that they would fit in the upper and lower front suspension nicely, they cannot be posed, only set for straight ahead posing. The rear end assembly went as illustrated in the instruction and when I test fit it to the truck itself, it looked great.
Â


My choice for colors for this truck were two of my favorite, Tamiya color Park Green and contrasting Light Green. I first painted the entire truck in Park Green, then I painted the ground effects and the unique custom grill (the top of he grill was painted Park Green, then I masked off the top and painted the bottom Light Green ) along with the aforementioned parts all were painted Light Green. Then I glued the ground effects and grille to the truck and set aside to dry.
All that was left was the interior, the two-piece custom bucket seats (the back and bottom of the seats were painted Park Green, the seats were painted Light Green) the interior tub was painted Park Green, the door panels were light green and the dash board was painted Park Green with the dash panel detailed with a clear cover over the instruments. Then I glued the windshield and back window in place, and inserted the interior tub in, but not before inserting the separate firewall (note here it is near impossible to insert the interior without putting the firewall in first), the interior is a tight fit and requires pulling the body apart to get the tub in, once in all that is needed is to apply glue to 4 or 5 spots on the chassis and set the completed body on the frame. Everything went together perfectly, this was a nice kit and I give it a 8 rating on assembly.
Happy Thanksgiving,
Nathan Perrine – CCM
Donations Humbly Accepted
*All Registered trademarks are the property of their respective brands.

