EF-111A Raven 1:72 Scale Revell Model Kit #85-5480 Review

2015 September 17
by Doug

Right On Replicas, LLC Step-by-Step Review 20150917*
EF-111A Raven 1:72 Scale Revell Model Kit #85-5480 Review
000

Review and Photos by Doug Bartley Doug Bartley Thumbnail

The General Dynamics/Grumman EF-111A Raven was an electronic warfare aircraft designed to replace the B-66 Destroyer in the United States Air Force. Its crews and maintainers often called it the “Spark-Vark”, a play on the F-111’s “Aardvark” nickname. The Raven has the combined agility of a fighter, the payload of a bomber, and the electronic counter-measures (ECM) equipment of a jammer. It is equipped with an ALQ-99E electronic jamming system which has the ability to pickup, identify, and neutralize hostile radars over a wide range of frequencies. The USAF contracted with Grumman in 1974 to convert some existing General Dynamics F-111As into electronic warfare/electronic countermeasures (ECM) aircraft.[N 1] The USAF had considered the Navy/Marine Corps Grumman EA-6B Prowler, but was reluctant to adopt a Navy aircraft. The EF-111 entered service in 1983 and served until it was retired in 1998. Afterwards, the Air Force began depending on Navy and Marine Corps EA-6Bs for electronic warfare support.


For the Modeler: This review covers the This Skill Level 2 for the intermediate builder EF-111A Raven 1:72 Scale Revell Model Kit #85-5480. It consists of 64 parts on three sprues (molded in Light Gray plastic) and a 1 piece canopy (molded in clear plastic). Pic 1 
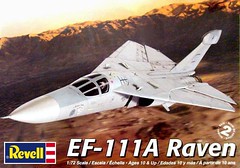
The kit provides a detailed cockpit and landing gear. It has the unique option of movable swing-wings that can be put in either the deployed or retracted position. It has decals for either of two aircraft. 1.) EF-111A, 66-0044 “Straight Flush” 27th Fighter Wing, Cannon AFB, New Mexico or 2.) EF-111A, 66-0013 “Yankee Air Pirate” 27th Fighter Wing, Cannon AFB, New Mexico. The 12 page instruction booklet provides easy to follow line drawings with painting guides for the parts throughout the construction steps and the final overall finish of the exterior with the Federal Standard paint codes where appropriate. The completed dimensions are: Length 12”, Wing Span (extended) 10½”.


Covered in this Review: If you want to perfect your build; basic construction; preparing parts for better finishing; extensive paint and finishing information; adhesive selections and applications; cockpit construction and detailing; decal preparation and application; cockpit and instrument panel detailing; nose weight consideration and implementation; using clear coats for decal application; landing gear and tire finishing; identification of the copyright script; historical information; advanced literature reference; interior panel finishing; clamping methods; complete exhaust area painting technique; canopy detailing; decal selection, preparation, and application, and repairs; instruction errors explained; detailing the landing gear bays; instruction clarifications; using setting solutions for great looking decals; over-coating with clear flat spray; filling gaps; clamping methods; masking methods explained; intake detailing; adding black washes for realism; positionable wing modifications for functionality; extensive landing gear construction and detailing; are all fully examined in this pictorial 26 page, full-color Step-by-Step review.


100% money back guarantee!

Click the Buy Now link below to purchase the full Step-by-Step review for $3.95 USD.


Important – You MUST click on the “Return to Right on Replicas, LLC” link after you’ve made your purchase to download your review!


Right On Replicas, LLC ©2015 All rights reserved. *All registered trademarks are the property of their respective brands. Follow the manufacturer’s safety recommendations for any product mentioned here.

Mack Fire Pumper 1:32 Scale Revell Model Kit #85-1945 Review

2015 September 15
by Doug

Right On Replicas, LLC Step-by-Step Review 20150915*
Mack Fire Pumper 1:32 Scale Revell Model Kit #85-1945 Review000

Review and Photos by Mark Silver Mark Silver

The Mack CF600 Pumper is a familiar fire truck that is still widely used in firehouses through the United States.  These lifesaving specialty vehicles are custom built to suit the demanding needs of each fire department.  This Mack fire truck does what it does best, and that’s pump water at high pressure with its powerful internal centrifugal pump that is available in capacities that can pump water up to 15,000 gallons per minute.


For the Modeler:  This review covers the Revell re-release of the 1:32 scale Mack Fire Pumper. The kit number is 85-1945. This is a Re-release (Re-Pop) and Re-Box of the Backdraft movie kit. This is a ‘SNAP-TITE’ kit made as a skill level 1 for the beginning builder. It is molded in red styrene and you’ll need several different colors of paint to 000b finish it properly. No glue is needed for assembly. There are 60 parts molded in red, clear and chrome. It includes plastic tires and plastic axles. No engine is supplied. The chassis is a flat base with the frame work attached. The body is solid with the interior attached and the cab is solid as well.  Included are hose reels, sirens, emergency lights and a pump control panel. It features an optional cab-mounted water cannon that turns, or flood lights plus removable ladders. This is a beginner’s kit and includes Colorful Peel ‘n Stick graphics.  It does not have waterslide decals. This would be considered a CURBSIDE kit and makes for a great introduction to model building for the novice builder. On the other hand, as you can see in the full review, a little extra detailing can make this kit a real nice shelf display model. Overall the dimensions are: Length: 9 7/8”, Width: 3”, Height: 3”.


Covered in this Review:  If you want to perfect your build; basic construction; preparing parts for better finishing; alternate assembly sequence suggestions for fit and ease of finishing; abrasive choices; complete paint and adhesive selections and applications; test fitting; suspension construction; chassis construction and detailing; mounting the body to the chassis; identifying and removing the copyright script; interior color selection and detailing; priming the parts; combining instruction steps for better finishing; tire construction sequence; detailing the running lights and turn signals; where to add a touch of glue for positive assembly; detailing the on-board axe and pick; how to paint your model in a tutone scheme; how to preserve detail when successive coats of paint are required; masking the body for paint; options discussed; detailing the pump controls and gauge panel; fire hose identification detailing and assembly order; graphics/sticker application techniques; are all fully examined in this 16 page, full-color Step-by-Step review in PDF format.


100% money back guarantee!

Click the Buy Now link below to purchase the full Step-by-Step review for $2.95 USD.


Important – You MUST click on the “Return to Right on Replicas, LLC” link after you’ve made your purchase to download your review!


Right On Replicas, LLC ©2015 All rights reserved. *All registered trademarks are the property of their respective brands. Follow the manufacturer’s safety recommendations for any product mentioned here.

Drag-U-La (Grandpa Munster’s) with Surf Slab 1:25 Scale AMT Model Kit #657 Review

2015 September 8
by Doug

Right On Replicas, LLC Step-by-Step Review 20150908*
Drag-U-La (Grandpa Munster’s) with Surf Slab 1:25 Scale AMT Model Kit #657 Review
000

Review and Photos by Alan Mann Alan Mann (Thumbnail)

Grandpa Munster had his own special dragster: Drag-u-la! A wild ride with a coffin shaped body, “organ pipe” exhaust pipes and a bubble canopy. DRAG-U-LA, along with the Munster Koach, was one of two cars designed by Tom Daniel while working for George Barris and Barris Kustom Industries for the television show The Munsters. The fiberglass body of DRAG-U-LA was built from a real fiberglass coffin. It featured a 289 Ford V-8 engine, with a four-speed stick shift. The rear tires were 10.50-inch Firestone racing slicks, mounted on custom 10-inch Rader aluminum and steel wheels. The front tires were 4-inch Italian tires on Speedsport English buggy wire wheels. To extend the Gothic motif further, Barris installed four Zoomie style organ pipes on each side of the car in lieu of a standard exhaust pipe, and mounted antique lamps on the front and rear. The front of the vehicle sported a marble gravestone — supposedly Grandpa Munster’s license plate “from the Old Country” — with the inscription: “Born 1367, Died?”.  A “hidden” radiator was topped with a small golden casket. The driver sat in the rear of the vehicle behind the engine, under a plastic bubble.


For the Modeler: This review covers the Round2 re-release (Re-Pop) of the AMT kit Drag-u-la from The Munsters TV show. It is in 1/25 Scale. This is kit number AMT657 in the current catalog and was released in this box art in October of 2011. The kit is Skill 1 Level 2 for the Moderate builder. AMT has released this kit numerous times over the years and it has seen multiple box arts, this time being a reproduction of the original. There are 61 parts that are molded in Black, Chrome and Clear and includes a metal axle. The decals have both the original kit and screen accurate replica style options. You get a fairly nicely detailed motor. The chassis is a simple rail. There is no interior other than a seat and wheel. The body is a one piece “coffin”. The kit has plastic tires instead of vinyl. This is a quick remedy that will help your overall look. The instructions are done in two steps for the car and one for the additional surf board. The bonus “Surf Slab” surf board is also included as it was seen in one episode. The Munsters fans will be treated to a bonus full-color cardboard display base with backdrop. The Drag-U-La backdrop coordinates with the Munster Koach backdrop (available separately) to make a complete scene. Overall build of the car is: Length: 5-1/2”, Width: 1-3/4”, Height: 1-1/5”.


Covered in this Review: If you want to perfect your build; basic construction; preparing parts for better finishing; alternate assembly sequence suggestions for fit and ease of finishing; abrasive choices; complete paint and adhesive selections and applications; test fitting; suspension construction; detailing the tires for realism; chassis construction and detailing; mounting the body to the chassis; Surf Slab construction; using the custom cardboard display; finishing the engine; interior color selection; engine construction and detailing, detailing the instrument panel; combining instruction steps for better finishing; original vehicle history; making custom plates for your model; where “NOT” to use glue; optional Surf Slab installation considerations; using floor wax to make crystal clear window glass; decal preparation and application; using decal setting solutions for that “painted on” look; are all fully examined in this 15 page, full-color Step-by-Step review in PDF format.


100% money back guarantee!

Click the Buy Now link below to purchase the full Step-by-Step review for $2.95 USD.


Important – You MUST click on the “Return to Right on Replicas, LLC” link after you’ve made your purchase to download your review!


Right On Replicas, LLC ©2015 All rights reserved. *All registered trademarks are the property of their respective brands. Follow the manufacturer’s safety recommendations for any product mentioned here.