Miami Vice Daytona Spyder 1:24 Scale Revell Model Kit #85-4917 Review

2013 September 13
by Doug

RoR Step-by-Step Review 20130913* 
Miami Vice Daytona Spyder 1:24 Scale Revell Model Kit #85-4917 Review
DSC00999
  

Review and Photos by James Yeager James Yaeger II Thumbnail

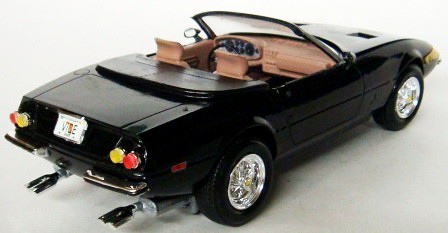
The car that started off the hit T.V. show Miami Vice was this beautiful Daytona Spyder. This was the car Sonny Crockett and Ricardo Tubbs used for the first three seasons. This model kit is a must have for anyone and especially for T.V. and movie enthusiasts. The real surprise was that this was not a Ferrari, but rather, a kit car body on a Chevrolet Corvette frame. Ferrari sued and supplied the studio with a replacement after a couple episodes into the third season.

For the Modeler: This is the Miami Vice Daytona Spyder Revell Model Kit #85-4917. It is a 1:24 scale kit that has a skill level 2 rating. The 78 pieces are molded in; white, chrome, clear, black vinyl tires and waterslide decals. Finished dimensions are: Length: 7 7/16″ inches, Width: 3”  Height 2¼“ with the top up and 2” with the top down. This model features a detailed High Performance Chevy V-8 with dual exhaust and the option to build convertible top in the up or down position.

Covered in this Review:  If you want to perfect your build; basic construction; preparing parts for better finishing; alternate assembly sequence suggestions for fit and ease of finishing; paint and adhesive selections and applications; engine detailing; test fitting; suspension construction and detailing; contest model considerations; detailing realistic turn signals; adding highlights to the interior; identifying and repairing seam lines and decal preparation and application; are all fully examined in this pictorial 12 page, full-color Step-by-Step review


100% money back guarantee!

Click the Buy Now link below to purchase the full Step-by-Step review for $2.95 USD.


 Important – You MUST click on the “Return to Right on Replicas, LLC” link after you’ve made your purchase to download your review!


Right On Replicas, LLC ©2013 All rights reserved.
*All registered trademarks are the property of their respective brands.


F-16 Air Team 1:48 Scale Revell Model Kit #85-5326 Review

2013 September 12
by Doug

RoR Step-by-Step Review 20130912* 
F-16 Air Team 1:48 Scale Revell Model Kit #85-5326 Review
100_0000
 

Review and Photos by John Orenski John Orenski Thumbnail

The General Dynamics (now Lockheed Martin) F-16 Fighting Falcon was originally conceived as a light-weight supplement to the then-new F-15 Eagle. It is considered today to be an excellent all around fighter and ground attack platform.  With over four thousand in production serving twenty four air forces it will see service for a long time to come.  The aircraft uses a unique fly by wire control system making it very easy to fly, however without this system the basic shape of the aircraft would be uncontrollable. The fighter is also extremely maneuverable and can carry a devastating amount of ordinance to the battlefield. It is because of these excellent flight characteristics that in 1983 the USAF Thunderbirds aerial demonstration team fielded it as its primary show bird. Sporting a beautiful red white and blue paint scheme the team performs thousands of shows all over the world.

For the Modeler: This is the F-16 Air Team 1:48 Scale Revell Model Kit #85-5326. It is a skill level 2 kit molded in 77 white plastic and a clear plastic canopy pieces. The kit includes instructions and an excellent set of colorful waterslide decals. Revell’s F-16 was originally pressed in the early 90’s. It was released as an ADF variant with a pair of AIM-7 Sparrow air to air missiles, a pair of AIM-9 Sidewinders, and a centerline drop tank. This boxing replaces the Sparrows with a pair of AGM-88 HARM anti-radiation missiles along with the Sidewinders. Finished dimensions are: Length: 11-3/4″, Height: 8-1/8″, Wingspan: 8-1/8″


Covered in this Review:  If you want to perfect your build; basic construction; preparing parts for better finishing; version option considerations; alternate assembly sequence suggestions for fit and ease of construction; paint and adhesive selections and application; identifying and repairing seam lines; cockpit  detailing; the importance of test fitting; expanded 1:1 history of the aircraft; instrument panel suggestions;  masking the airframe for painting; metalizer techniques; decal preparation, application and special handling; detailing the landing gear; sealing decals with floor polish; sequential construction of the fuselage halves to ensure fitment; masking methods; techniques for making a standout canopy; alignment of stabilizers, decals, and frames; using decal solvents to facilitate conformance; touchup methods for matching paint to decals; making realistic exhaust with metalizers, dry brushing, and weathering powders;  are all fully examined in this pictorial 16 page, full-color Step-by-Step review.


100% money back guarantee!

Click the Buy Now link below to purchase the full Step-by-Step review for $2.95 USD.


Important – You MUST click on the “Return to Right on Replicas, LLC” link after you’ve made your purchase to download your review!


Right On Replicas, LLC ©2013 All rights reserved.
*All registered trademarks are the property of their respective brands.

Seversky P-35/S2 Air Racer 1:32 Scale Wms. Bros. Model Kit #32135 & #32535 Review

2013 September 10
by Doug

RoR Step-by-Step Review 20130910*
Seversky P-35/S2 Air Racer 1:32 Scale Wms. Bros. Model Kit 32135 & 32535 Review
Fig 000

Review and Photos by Robert Byrnes Robert Byrnes P47 Thumbnail

The Seversky P-35/S2 aircraft evolved during the 1930’s by Alexander P. deSeversky and his chief designer, Alexander Kartveli, the P-35 with its retractable landing gear, enclosed cockpit and comprehensive instrumentation was considered one of the most advanced pursuit planes in the U.S. Army Air Corps. Variations of the same basic design were produced by a number of foreign governments, including Columbia, Japan, Russia and Sweden.  Racing versions set transcontinental speed records and participated in Bendix and Thompson Trophy races. The P-35 was also a forerunner of the famous Republic P-47 Thunderbolt “Jug” of World War II. It had a wing span of 36 feet and a Pratt & Whitney Twin Wasp Engine with a top speed rating of: (P-35) 281 mph (S2) 300 mph.


For the Modeler: This is a skill level 2 Williams Brothers Seversky P-35/S2 Air Racer in 1:32 Scale kit. This kit (#32135) contains ~45 pieces, is molded in grey plastic with clear canopy and landing light pieces. It also includes illustrated directions and waterslide decals. Finished dimensions are: Length: 9.25″, Wingspan: 13.5″, Top Speed = As long as it takes to fall from the bench to the floor; Engine = Williams Brothers 0.0 hp; Prop = Fixed Pitch Free Spinning. Keep learning and have fun. This kit may be completed to represent P-35 PA69, the Squadron Commander’s aircraft of the 27th Pursuit Squadron, 1st Pursuit Group, based at Selfridge Field, Michigan.  Attention was focused upon this particular machine, since it was used for a short time by Charles A Lindbergh, who according to author John Underwood, much preferred Curtis products! Alternately, the kit model may be finished as the civilian SEV-S2 racer which was owned by Frank Fuller, of the Fuller Paint Company which was my focus for this build. This kit has recently been re-released as kit 32535 and is available at online hobby stores.


Covered in this Review:  If you want to perfect your build; basic construction; preparing parts for better finishing; extensive paint and finishing information; adhesive selections and applications; cockpit  construction and detailing; decal preparation and application; how to use Alclad paint to replicate metal finishes; seam and sink identification and repair methods; scratch building counterweight details for the engine, constructing a brass stock pitot tube, and exhaust stacks; engine detailing and weathering; wiring the engine; making the glass look real; canopy masking and finishing techniques (inside and out); version option considerations; how to remove unwanted body panels; eliminating ejection pin marks; decal selection,  preparation, and application; making authentic scratch built seat belts; clamping methods; modifying putty for effectiveness; dihedral modifications for version authenticity; repairing and creating panel lines and making an aerial with stretched sprue; masking for paint processes; using aluminum foil for realistic decking; methods for weighting the tires; modifying the exhaust ports for scratch built parts; how to use setting solutions for great looking decals; modifying the engine cylinders for fit; and expanded history of the real aircraft are all fully examined in this pictorial 30 page, full-color Step-by-Step review.


100% money back guarantee!

Click the Buy Now link below to purchase the full Step-by-Step review for $4.95 USD.


Important – You MUST click on the “Return to Right on Replicas, LLC” link after you’ve made your purchase to download your review!


Right On Replicas, LLC ©2013 All rights reserved.
*All registered trademarks are the property of their respective brands.