Click the Buy Nowlink below to purchase the 12 page Step-by-Step review by Will Emerson
 Gran Turismo Omologato! Three words that bring to mind only one thing: performance! Ever since the first Ferrari 250 GTO was released in 1962 they were made to be driven fast. The 599 GTO is made with those same things in mind. The 599 GTO tops out at 335 km/h [208 mph ], that’s over 93 m [300 feet] per second. It’s 5999 cc [366 cu in] V-12 engine provides 661 horsepower which is more than enough to bring the GTO from 0 to 60 mph in just 3.3 seconds! However with Ferrari limiting production to just 599 cars this is indeed a rare performer.
For the Modeler: This is the 1:24 scale skill level 3 Revell Ferrari 599 GTO Kit #85-4034. Upon opening the kit you immediately realize a few things: one this kit builds only as the 599 GTO, two this is a skill 3 kit  for the intermediate modeler and at one hundred and twenty-nine pieces this kit is very detailed. This kit consists of 129 pieces molded in white plastic with chrome and clear parts and soft vinyl tires and waterslide decals. Lastly some good news for all of us there is no flash to be found anywhere on this kit. This 1/24 scale kit features a detailed V-12 GTO engine, six-speed transmission, open side and hood louvers and movable tires. The finished model’s dimensions are Length: 7-1/2″, Width: 3-1/2″, Height: 2-1/8″.
Covered in this Review: If you want to perfect your build; basic construction; preparing parts for better finishing; adhesive selections and applications; altered assembly sequence suggestions; seam identification and repair techniques; paint selection and application; repairing flash; engine construction, painting, and detailing; decal application; removing unwanted chrome plating; drivetrain alignment; tie rod flaring; detailed suspension construction; installing directional tires; interior/dash detailing; using markers for window framing; Â Â Â are all fully examined in this 12 page, full-color Step-by-Step review.
Important! – You MUST click on the “Return to Right on Replicas, LLC” link after you’ve made your purchase to download your review!
Â
To get your copy of the full review – just select one of the payment methods above for $3.99 USD.
Click the Buy Now link below to purchase the 27 page Step-by-Step review by Robert Byrnes
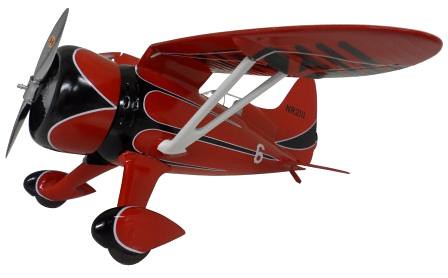
 Robert L. Hall joined the Granville Brothers in 1929 and was highly influential in several of their designs, including many of the Gee Bee aircraft. Hall left the group later and started a Springfield Aviation Corporation to design his own aircraft. His second design was a small single place, gull winged airplane to fly in the 1932 Cleveland National Air Races and the Thompson Race. The Gull wing feature of the “Bulldog†became a problem in directional control stability, and several modifications were needed. In qualifying, for the Thompson Trophy Race, the Bulldog turned a good speed of 243.717 mph. But, in the race, with a brief top speed of 270 mph, only a disappointing 251.57 was achieved, landing it in 6th place. Given a bit more time to work out the bugs, the Bulldog would probably have been a top contender. Considered the most beautiful racer of all time, it certainly made enough of an impact to earn its place in the history of aviation!
For the Modeler: This is a Williams Brother’s 1/32nd scale Hall’s Bulldog Air Racer model kit #32532. The kit consists of ~66 parts molded in grey, and one clear canopy with waterslide decals. Finished dimensions are; Wing Span = 9.75â€, Length = 7.13â€; Top Speed = As long as it takes to fall from the bench to the floor; Engine = Williams Brothers 0.0 hp; Prop = Fixed Pitch Free Spinning. While the kit is pretty easy to build this is more for the intermediate level modeler due to the paint scheme and intricate decals. Keep learning and have fun.
Covered in this Review: If you want to perfect your build, basic construction; preparing parts for better finishing; making the canopy brighter with floor polish; using damp paper paint templates; using Alclad for metal surfaces; paint and adhesive selections and applications; detailing the cockpit; detailing and black washing the engine; identifying and dealing with seams and sinks; masking and finishing the canopy;  painting and masking techniques; scratch building vents for realism; replacing the pushrod  tubes with brass; using Black-It for detailing brass parts; modifying the engine for fit; scratch building plug wires; using decal setting solutions for realism; decal application procedures; small part handling made easy; correct interior colors; clamping techniques; rebuilding seams; using floor polish to seal decals; undercarriage detailing, are all fully examined in this extensive 27 page, full-color Step-by-Step review.
Important! – You MUST click on the “Return to Right on Replicas, LLC” link after you’ve made your purchase to download your review!
Â
To get your copy of the full review – just select one of the payment methods above for $4.99 USD.
 Click the Buy Now link below to purchase the 21 page, full-color Step-by-Step review by Tony GibsonÂ
This is what happens when you combine a dragster with an exceptionally ornate hearse. The beautiful wood lines and ornamentation of a carriage merge with the sheer power of a fuel-injected engine to create the fastest hearse out there. This kit was one of the more famous Tom Daniel releases back in the 70’s and now its back. Building this re-released kit was a must for me.
For the Modeler: This is a Monogram 1/24th scale Boot Hill Express skill level 2 model kit. The kit consist of 93 parts molded in white, clear and chrome; 4 vinyl tires; 2 front narrow drag tires; and 2 rear drag slicks with white wall inserts. Also comes with a bonus skeleton figure and BHE tombstone and features a single piece frame with spring suspension and full engine with injection system. I had a blast building the Boot Hill Express and I was very happy with the end result. The total build took about 50 hours, a good deal of that time was taken up by the paint effects. There are no decals with this kit. Finished dimensions are; Length: 6-1/4″, Width: 3-1/4″, Height: 3-1/2″. Have fun and “keep the glue off the windshield!†– Tony Gibson
Covered in this Review: If you want to perfect your build; basic construction; preparing parts for better finishing; adhesive selections and applications; alternate assembly sequence suggestions for fit and ease of finishing; seam identification and repairs; paint selection and application; repairing flash; making realistic slicks and front spoke tires; detailing the skeleton; painting the chassis; removing chrome for adhesion; fitting the injector stacks through the hearse; suspension construction; using black wash for detailing; engine construction, painting, and detailing; locating the steering column; working with fragile parts; Realistic wood grain finishing and techniques; using a Sharpie for realistic taillights; using craft paint for interior detailing; window installation methods, are all fully examined in this 21 page, full-color Step-by-Step review.
 Important! – You MUST click on the “Return to Right on Replicas, LLC” link after you’ve made your purchase to download your review!
Â
To get your copy of the full review – just select one of the payment methods above for $2.99 USD.