Click the Buy Now link below to purchase the Step-by-Step review by Marty & Stephanie Oberman  Â
As was the case with the previously released Moebius ’53 Hornet hardtop, I thoroughly enjoyed building this kit. I was also prepared for most of the issues (and minor issues at that) I encountered with the hardtop, since both versions’ tooling is practically identical, with few exceptions. Fit and finish were impeccable, with the interior being the only exception. I would highly recommend this kit to any experienced modeler, with the key word being “experienced”. This kit, as is the case with practically any Moebius kit, is certainly not for the beginner. But then again, Moebius tends to base its kits on the experienced modeler looking for rare subject matter. With the ’52 Hornet convertible, they hit the mark. Despite the issues I encountered during the build, I would still give this kit a 9-star rating out of a possible 10 stars. It’s that good, and I hope Moebius continues their well-deserved success of producing kit subjects that we hungry modelers crave. Â
For the Modeler: Color scheme selection; alternate assembly sequences required for proper engine and exhaust system sub-assembly alignment; engine fit corrections; sway bar modifications for fitment; interior detailing; radio mast warning; and incorrect instructions are all fully examined in this Step-by-Step review.
To see the full build and review – just select one of the payment methods below for $2.99 USD.
Â
Â
Important! – You MUST click on the “Return to Right on Replicas, LLC” link after you’ve made your purchase to download your review!
Click the Buy Now link below to purchase the Step-by-Step review by Mike Krueger.
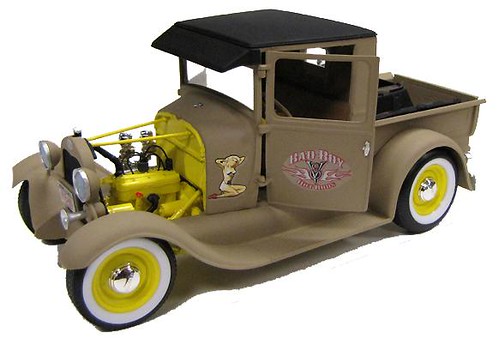
The popularity of Rat Rods has increased greatly in the past few years. There are almost always a few on display at local car shows across the country and they come in all shapes and sizes. Usually sporting monster V-8’s, they emphasize speed over looks but a careful examination will uncover some crafty work in the area of aesthetics as well. You will often find the interiors decked out in memorabilia or carrying a theme like sports or racing. This “bad boy†embraces a softer theme as evidenced by the pinup on the side body but if you look closely you’ll notice that the bed is full of rusty parts so it’s not just for show.
For the Modeler: Don’t be fooled by the soft look of this ’29 Rat Rod. It’s a great showpiece but it is a skill level 3 kit and someone with little modeling experience will have difficulty putting it together. However, with some patience it turns out to be a great looking kit. I found that the kit was very fragile and the chrome was easily wiped from the parts. To help you perfect this kit spring height modifications; alternatives to working with the chromed parts; alternate wheel assembly; assembly sequence modifications; adding scratch built parts; staging subassembly modules; paint choices; making the truck bed look realistic; fitting the door glass; and adding weathered cargo parts for realism are all fully examined in this Step-by-Step review.
To see the full build and review – just select one of the payment methods below for $2.99 USD.
Â
Important! – You MUST click on the “Return to Right on Replicas, LLC” link after you’ve made your purchase to download your review!
 When the light flashes green on this bad boy the next thing you’ll see is red – taillights that is! These were the guys to beat back in the day and Revell brings them to life in a Special Edition kit. You should know that it is basically the same as the previous ’68 and ’69 releases, but made with better tooling and additional parts. The instruction booklet is the same as the previous 1969 Charger that was released, but with added sections for the optional race equipment that comes in this kit.
For the Modeler: Most of the parts went together well. There was a mix of smaller and larger parts that didn’t quite fit together all the way. One example is the engine and the mounts on the frame. They don’t quite reach each other. Another thing was the exhaust manifolds and the actual h-pipe not lining up properly. But they fit together when the h-pipe is glued to where it’s supposed to rest.
This kit was made with better tooling and the only thing that was left on this kit from a previous one was two small spots on the C-pillar, near the side windows, that were left over from the vinyl top. They were almost like dents in the body. Nothing some putty and sanding can’t fix!
The other thing that didn’t quite fit together was the front portion of the frame and the body. They didn’t really come together and this causes the front end to sit up higher than usual. This issue is somewhat visible when the kit is complete. But you wouldn’t really notice it if you used the extra risers for the rear end to raise it up. These were pretty much the only issues I had with the kit. It wasn’t that difficult to put together I just thought it took a little more cement than usual, but that’s okay.
About the Builder: Joe started early building models and by age 16 has won first, second and third place awards at several IPMS National contests in the juniors automotive category.


 Â Â