Star Wars T-47 Snowspeeder Revell Kit 85-8340 Review

2012 August 2
by Doug

RoR SnapShot Review 20120802* – Star Wars T-47 Snowspeeder Revell Kit 85-8340 Review

 
Click Here to Buy This Kit at Amazon.com
000

A SnapShot review by Doug Cole Doug

Revell has scored another gold medal in their efforts to bring youngsters into the world of model building with this recent release of the ever-popular Star Wars kits. There are six kits to choose from that your son or daughter will love. The reason is because they are small and durable enough to play with after they have built their own model. Listed as a skill level 1 for kids 8+ these kits can be assembled by younger children with an adult helping to follow the clearly illustrated instructions. Also included in this series are Luke Skywalker’s X-Wing Fighter, Darth Vader’s Tie Fighter, Anakin’s Jedi Starfighter, Tie Interceptor, and Hans Solo’s Millennium Falcon.

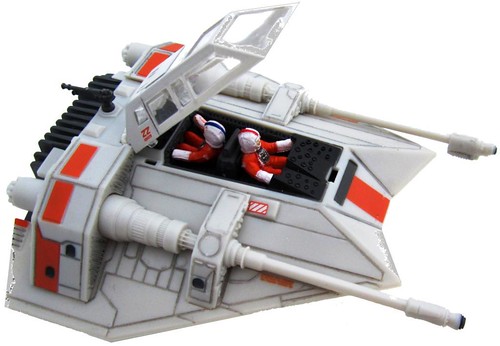
As the Revell site states, “Flown by Luke Skywalker* and his Rebel pilot pals during the Battle of Hoth, the Snowspeeder is a specially modified vehicle used for flying in cold conditions. It can carry up to two passengers. When the Snowspeeder’s laser cannons proved ineffective against Imperial AT-ATs, the harpoon and tow cable allowed Rebel pilots to trip them and then shoot them down.” Who could forget or fail to enjoy the moment when that first behemoth slowly crashed to the ground during the Battle of Hoth!

 999

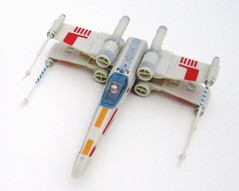
 My 8 year old son completed his Star Wars Luke Skywalker’s T-65 X-Wing Fighter kit #85-8337 (at left) in about 15 minutes and in less than a half hour we were chasing down the Imperial soldiers and their dreaded war machines.


For the Modeler: This kit features easy snap-together assembly and 23 painted plastic parts. No paint or glue is required although a touch of adhesive here and there helps hide the seams and adds strength to the construction. The parts are not attached to a sprue so pay close attention to the bubble pack container because that is where you’ll find the part numbers for assembly. There is virtually no flash so the pieces fit together flawlessly but there are some sprue stems that you’ll need to trim off with a sandpaper stick. The finished model is just under 4” long and 3½” wide. For this kit there is one note – separate the upper and lower body halves then place the cockpit assembly into the upper body half at step 3. It is shown there in the upside down position so it’s hard to spot. Use the back end of a small paintbrush to seat the crew into position. I added a little accent with sharp pencil in the panel lines but other than that it’s a snap to build this kit in about 20 minutes. 


Right On Replicas, LLC ©2012 All rights reserved.

*All registered trademarks are the property of their respective brands.

RoR Step-by-Step Review 20120730 – Curtis SB2C-4 Helldiver 85-5983 Revell Pro-Modeler 1/48 Review

2012 July 30
by Doug

RoR Step-by-Step Review 20120730 – Curtis SB2C-4 Helldiver 85-5983 Revell Pro-Modeler 1/48 Review       Click Here to Buy This Kit from Amazon.com

Figure 000

Click on the Buy Now button below for the Step-by-Step Review by Robert Byrnes Robert Byrnes P47 Thumbnail


The Curtiss SB2C Helldiver was a carrier-based dive bomber aircraft produced for the United States Navy during World War II. It replaced the Douglas SBD Dauntless in US Navy service. Despite its size, the SB2C was much faster than the SBD it replaced.

Crew nicknames for the aircraft included the Big-Tailed Beast (or just the derogatory Beast), Two-Cee and SOB 2nd Class (after its designation and partly because of its reputation for having difficult handling characteristics).  Neither pilots nor aircraft carrier skippers seemed to like it.

For the Modeler: What a great model!  I would recommend this kit to anyone looking to try photo etch for the first time, or the experienced builder looking to add a beautiful Hell Diver to their collection.  Heck, I may build another one! This is a skill level 3 kit with 115 pieces molded in light gray, clear and photo-etch pieces. Adding, handling, cementing and finishing photo-etch parts; sea plane paint selection; advanced interior and exterior weathering techniques; pilot figure finishing; instrument panel detailing; decal preparation and handling; canopy masking and gluing and scratch removal; Bare Metal Foil applications; appropriate adhesive applications; weapons finishing realistic wheel and landing gear finishing methods; use of metalizer finishes; prop finishing methods; painting jig construction; and making the antennae from stretched sprue are all fully explored in this extensive review..

To see the full build and review – just select one of these payment methods for $3.99 USD.


Important! – You MUST click on the “Return to Right on Replicas, LLC” link after you’ve made your purchase to download your review!


Right On Replicas, LLC ©2012 All rights reserved.

*All registered trademarks are the property of their respective brands.


1953 Ford Convertible Scale 1:25 Lindberg #72321 Review

2012 July 20
by Doug

RoR Step-by-Step Review 20120719* – 1953 Ford Cnvrt 1:25 Lindberg 72321 Review
Click Here to Buy This Kit
53 Ford 000


Click on the Buy Now button below to purchase the Step-by-Step Review by Stephanie and Marty Oberman Stephanie and Marty Oberman

In 1952, Ford Motor Company was in danger of going belly-up. Their ’49-’51 car line proved to be leaky, squeaky, and under-insulated. That all changed in ’52 with the newer, re-skinned model car line. Improvements to practically all aspects of their cars saved the company, as production and sales boomed like never before. The ’52-’54 Fords were tighter, more solid and insulated, and therefore saved the company from eventual ruin, and the ’53 model year in particular marked the last hurrah of the venerable Ford V-8 flathead engine. 1954 ushered in the new “Y-block” V-8, which would serve Ford well for some years to come.

This was actually the Lindberg ’53 Ford Convertible Pace Car kit that I converted to a formal daily driver version.

For the Modeler: At first I was loathe to build this kit, since the last time I did, it was such a frustrating experience I ended up throwing it against a wall. Learning a valuable lesson from my previous encounter with this kit, I decided to take my time, use some patience (definitely not my forte), and make sure the build was successful. The inner fenders were the reason for the previous catastrophe, but careful planning and a “thinking outside the box” approach made it a success. It actually turned out better than I expected. However, this kit is most definitely NOT for the beginning modeler, and intermediate modelers (like myself) may encounter issues that may or may not be overcome, depending on one’s experience. Advanced modelers shouldn’t have any problems with the kit, and most likely already have plans to chop/channel/pancake, etc. and are simply using it as a donor. Engine detailing, scratch building a dipstick, corrections to the instruction sheet, engine build sequence modifications, the use of buffing metalizers for realistic suspension finishes, authentic interior, exterior and chassis finishes, A-arm modifications, creating poseable wheels, part swapping, wheel retainer issues, steering column correction, fender fit issues, and a scratch built antennae are all fully examined in the Step-by-Step review.

To see the full build and review – just select one of these payment methods for $2.99 USD.


Important! – You MUST click on the “Return to Right on Replicas, LLC” link after you’ve made your purchase to download your review!

Right On Replicas, LLC ©2012 All rights reserved.

*All registered trademarks are the property of their respective brands.