RoR Step-by-Step Project PC1982* – “From so-so to wow!†Converting a 1:25 promo model into a 1982 Indy 500 Pace Car

See the Step-by-Step Project by Doug Cole 
If you’ve followed this site for a while you’ve noticed that I love Indy 500 Pace Car models. I guess you could say it’s my thing. The problem is – they tend to be expensive, so when I decided to get a model of the 1982 version I was seeing the MPC kits going for three figures in sealed condition.
Â

I opted for a partial kit to cut the cost and in my search I noticed quite a few “promo†models of the 1982 Chevy Camaro. They are pretty cheap so I bought one online for $10 and a set of Fred Cady decals for $6. With the help of a $4 aftermarket rooftop light bar accessory and some Ultramarine Blue paint, I was able to build this gorgeous curbside version for about $25 and so can you. You may need some stuff from the parts box but with a little patience you can put one of these on your shelf!
*All Registered trademarks are the property of their respective brands.
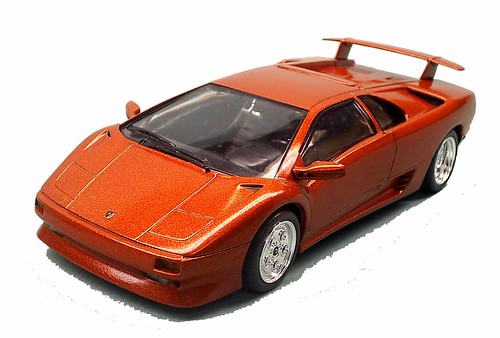
RoR Step-by-Step Review 20120228* – Lamborghini Diablo VT  85-0889 Revell 1:24 Review
Click Here to Buy This Kit
See the Step-by-Step Review by Marty and Stephanie Oberman 
Italians are famous for many things: great food, red wine, expensive silk suits, incurable passion and romanticism, and last but not least, sleek and fast supercars. The Lamborghini Diablo VT is no exception to this last category, and the 492h.p. V-12 engine is truly a testament to the outstanding design and engineering from my brethren from the “boot country”.
For the Modeler: I discovered as I began this build, and this was verified later, that this kit’s tooling started life as a snap kit, before being re-issued as a Level 2 glue kit. The snap kit has been excellently reviewed already in this forum, and I used many helpful notes from it while building this kit. Throughout the build, I reamed out contact point holes and tabs after painting them in order to enable me to test fit many parts before committing to their placement with glue. I highly recommend that the builder do the same.
The more I worked on this kit the more impressed I was with its design and engineering in terms of parts fit and finish. Even though this particular subject matter is really not my cup of tea, I enjoyed it more and more as I went along with the assembly process. The only “major” issue with the kit itself was the rear bumper, and that ended up being a relatively easy fix. Any other issues were minor and not really worth mentioning, simply because there were so few of them. I do however HIGHLY recommend both this kit and its “snap” sister kit for both beginning and intermediate modelers, and in fact, this kit would make an excellent build for the beginner wishing to branch out into the world of glue kits. For all the above reasons I believe this kit merits a solid four stars out of five. And as we Italians would say…”manga!” (enjoy!)
*All Registered trademarks are the property of their respective brands.
RoR Step-by-Step Review 2012022* – Star Wars Tie Fighter Revell kit 85-1875 Review
Click Here to Buy This Kit

See the Step-by-Step Review by Doug Cole
My eight year old son recently spotted a Star Wars kit in my stash and enthusiastically asked if he could build it. It’s a SnapTite kit so I happily agreed. This kit has been out for a while but has recently been re-released by Revell so I decided to chronicle the build as a consultant/observer. I must say that I was pleasantly surprised at the ease of construction and the good overall quality of this kit. My son was easily able to follow the instructions and assemble the kit by himself. The best part was that he was pleased with the results and gained more confidence as a model builder even when I tossed in some intermediate finishing techniques to try out. For any youngster – this is a great kit for them to build.
For the Modeler: Some attention to removing sprues and some minor flash are about all the added work needed to make this a kit that a youngster can be proud of. The addition of some blackwash for bringing out the detail and adding a little “battle-tested†appearance just helped to bolster the aura of this model. There’s a couple spots that don’t snap together just right so keep a little glue handy straighten that out along the way. For the Star Wars fans – this would be a nice addition to your collection.
*All Registered trademarks are the property of their respective brands.
Â

