Stearman Aerobatic Biplane 1:48 Scale Revell Model Kit #85-5269 Review

Right On Replicas, LLC Step-by-Step Review 20160328*
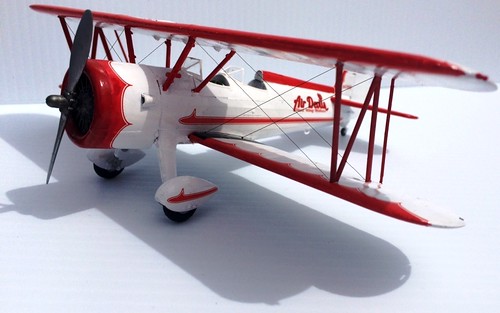
Stearman Aerobatic Biplane 1:48 Scale Revell Model Kit #85-5269 Review
Review and Photos by Steven Hardwick 
Built in 1930 as a trainer aircraft with over 8000+ built before and during the war, after the war there were plenty left over. Someone decided it would make a great aerobatic plane, with its slow speed and great flight characteristics. Adorned with wild paint jobs this once trainer is now a slow flying aerobatic wonder which started things such as “Wing Walking†where men would actually climb on the top wing secured by a brace staying there in only a stunt suit as the plane was put through difficult maneuvers. To this day some are still being used as stunt aerobatic planes and also things like flying billboards and such. This little gem was also known as a Stearman or Kadet (so named by the RCAF) most of the Stearman’s were sold off in the civilian market!
 Â
For the Modeler: This review covers the Stearman Aerobatic Biplane 1:48 Scale Revell Model Kit #85-5269. This is a reissue of the kit # 85-5264. It is recommended for ages 12 and up, it has a piece count of 67. This kit’s contents are; two bags of sprues, two  sprues with one each side of the fuselage, one bag with clear parts, a vibrant decal sheet, and a six page easily read instruction sheet front and back. Revell has produced a very nice kit with a beautiful decal sheet, easy to follow instructions, engine detail and superb part fit. The engine is nicely molded with six pieces. Even though there isn’t an extensive part count, what you get for the price is quite amazing. A novice builder can have fun and so can an advanced builder.  However, this was mostly an out-of-the-box review. I did notice the leading edge on the wing is VERY nice and thin so no sanding was needed there. The final dimensions are 6-1\8â€L  X  4†H wheel to top wing. The wing span is 8-3\16â€. It comes molded in gray.
Covered in this Review: If you want to perfect your build; basic construction; preparing parts for better finishing; alternate assembly sequence suggestions for fit and ease of finishing; motor/cowl construction sequence and detailing; copyright script identification and repair discussed; dry-brushing techniques explained; instrument panel installation; cowl and fuselage seam identification and repair; cockpit frame and alignment; using decal setting solution for that “painted on†look; masking method for paint; temporary part attachment techniques for fitment; modified rudder controls assembly sequence; complete paint and adhesive selections and applications; test fitting; wheel pant construction and detailing; Strut and wing alignment; wind visor frame painting; cockpit detailing and finishing; proper engine mounting frame orientation; gluing contact points identified; inner frame construction and detailing; homemade rigging material is discussed, are all fully examined in this pictorial 26 page, full-color Step-by-Step tutorial review in PDF format.
Click the Buy Now link below to purchase the full Step-by-Step review for $2.95 USD.
Important – You MUST click on the “Return to Right on Replicas, LLC” link after you’ve made your purchase to download your review!Â
Right On Replicas, LLC ©2016 All rights reserved. *All registered trademarks are the property of their respective brands. Follow the manufacturer’s safety recommendations for any product mentioned here.