Right On Replicas, LLC Step-by-Step Review 20160111*
Mack DM600 Tractor 1:25 Scale MPC Model Kit #819 Review

Review and Photos by Alan Mann 
Mack Trucks, Inc., is an American truck–manufacturing company and a former manufacturer of buses and trolley buses. Founded in 1900 as the Mack Brothers Company, it manufactured its first truck in 1907 and adopted its present name in 1922. Mack Trucks is a subsidiary of AB Volvo which purchased Mack along with Renault Trucks in 2000. Mack started to produce the R, RW, and U models in 1966 for highway use, and the RD, DM, and all-wheel drive RM and DMM Models for construction use. The lightweight RL model followed in 1967, the RW Superliner with a large, rectangular hood and grill in 1977, and the setback front axle RB in the 1990s. All these models featured the same cab; the U, DM, and DMM had the cab offset to the left. In the 1990s, the R, RW, and U Models were discontinued and the RB was introduced, mostly for severe-duty applications. The hood was modified slightly for the model RB. 2004 was the last year for the RD, and 2006 for the RB and DM. The DM was the last model to use this cab style, and was the last model of this family to be produced.
For the modeler: This review covers the Re-release (Re-Pop) of the Mack DM600 Tractor by Round2 under the MPC brand. This is a Skill Level 3 kit and is in 1/25 scale. The kit contains over 275 parts molded in White, Black, Chrome, Clear and Clear Red. There are Vinyl tires and tubing. The kit itself has seen multiple releases since the original 1960’s initial release. In fact this is the base kit 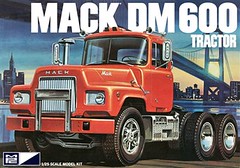 used for the famous “Rubber Duck†kit although it is the wrong cab entirely as the real cab was an R series cab. (No Rubber Duck parts exist in this release). The DM series was a Construction use tractor and not an Over-the-road rig. Round2 included decals for Roadway Transportation but that company used U and R series trucks not DM, so the decals are incorrect. The overall construction is straight forward and the build goes together well. Take your time and test fit parts and part locations. The build starts with the chassis and works up the rig from the bottom. The motor is nicely detailed but has many Chrome parts that need to be stripped and painted instead. Interior assembly is simple and as a day-cab only has just seats and a dash with the shifters. The cab is a one piece unit with a separate hood which helps in painting and all the Chrome parts go on after cab assembly which helps them to stay in place. You do get some options and this will build up to a nice construction truck. I removed much of the Chrome to replicate a more correct cheaper level rig as a Fleet vehicle would be lower end without all of the “Blingâ€. Overall Dimensions: Length: 10-1/4â€, Width: 4â€, Height: 5â€.

Aftermarket Tires Provided by Double Take Replicas
Covered in this Review: If you want to perfect your build; basic construction; preparing parts for better finishing; alternate assembly sequence suggestions for fit and ease of finishing; abrasive choices; complete paint and adhesive selections and applications; test fitting; using white glue for the window glass; suspension construction; fifth wheel detailing; shock and torsion bar placement; detailing the tires for realism; chassis construction and detailing; engine construction and detailing; fuel tank notes; interior detailing; optional finishing ideas are explained; duallie installation; making a set of period correct decals; detailing the turn signals and roof lights; adding blackwash detailing to the grill; detailing the dashboard with homemade decals; installing the driveshaft; using aftermarket tires; removing unwanted chrome plating; mounting the fuel tanks; U-joint orientation; optional kit parts; detailing the interior; attaching delicate parts; sequence notes for installing the frame horns and hood pins; combining instruction steps into sub-assemblies for better finishing; trunnions mods for fit; leftover parts; using floor wax to make crystal clear window glass; decal preparation and application; using decal setting solutions for that “painted on†look; are all fully examined in this 23 page, full-color Step-by-Step review in PDF format.
Click the Buy Now link below to purchase the full Step-by-Step review for $3.95 USD.
Important – You MUST click on the “Return to Right on Replicas, LLC” link after you’ve made your purchase to download your review!
Right On Replicas, LLC ©2016 All rights reserved. *All registered trademarks are the property of their respective brands. Follow the manufacturer’s safety recommendations for any product mentioned here.