RoR Step-by-Step Review 20130408* Schoenfeldt Firecracker Air Racer 1:32 Scale Williams Brothers Kit #32118
 Click the Buy Now link below to purchase the Step-by-Step review by Robert Byrnes
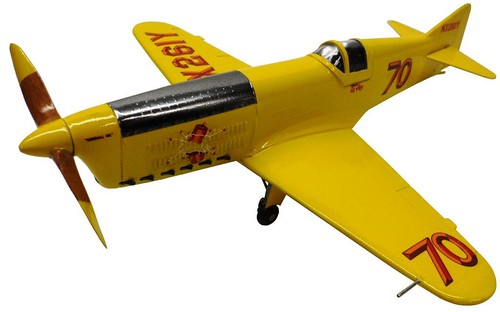
In the early 1930’s, many designers began looking at the new four and six cylinder Menasco engines to install in the small racing planes. One of these designers was Keith Rider, an Aeronautical Engineer since 1915. Keith Rider built 5 aircraft. The R-4 and R-5 both flew in the 1936 National Air Races. William “Bill†Schoenfeldt attended the 1936 air races and became interested in air racing. Being a wealthy man, he purchased Keith Riders R-4 and began modifications, to the extent it became potentially the fastest racer of all. For the 1938 national races (this model represents that time period) overhaul of the engine and fuel leak repairs were made. Upon arrival at Cleveland, Schoenfeldt told Tony to “see how fast the Firecracker can goâ€. After several mild passes near 300 mph, Tony applied full throttle for a pass that topped 330 mph. However a new “special racing fuel†burned a hole in the top of a piston during a pass. A complete overhaul was required before Tony qualified the following day at 260 mph.
For the Modeler: This 1:32 scale Williams Brothers kit #32118 is long out of production but you can still find these kits easily at online auctions and garage sales. At a piece count around thirty there’s not a lot to this kit, but detailing it for a standout shelf display is still an option for the patient modeler. The finished dimensions are; 6.75†wing span and a length of 7.3â€. Keep learning and have fun!
Covered in this Review: If you want to perfect your build, basic construction; preparing parts for better finishing; opening up the wheel wells; making the canopy brighter with floor polish; removing the yellowing from aged decals; using Alclad for metal surfaces; realistic wood techniques; paint and adhesive selections and applications; detailing the cockpit; choosing the correct version parts for your build; detailing and black washing the engine; identifying and dealing with seams and sinks; masking and finishing the canopy; using aftermarket methods to detailing the oil cooler; painting techniques; scratch building vents for realism; replacing the exhaust tubes with brass; using decal setting solutions for realism; decal application procedures; undercarriage assembly and detailing, are all fully examined in this extensive 21 page, full-color Step-by-Step review.Â
Important! – You MUST click on the “Return to Right on Replicas, LLC” link after you’ve made your purchase to download your review!
Â
To get your copy of the full review – just select one of the payment methods above for $4.99 USD.
RoR Step-by-Step Review 20130404* Harley-Davidson FLSTC Heritage Softail Classic 1:8 Scale Revell SnapTite Kit 7302
 Â
Click the Buy Nowlink below to purchase the Step-by-Step review by James Yeager II
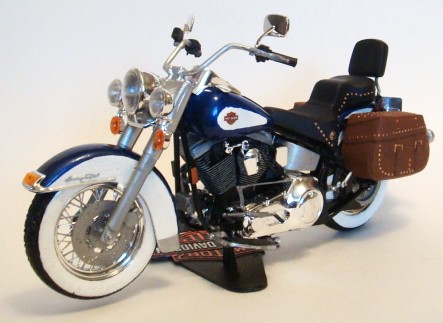
Harley-Davidson is known for making some very beautiful motorcycles and in my opinion Revell has done them justice with this model kit. Even though this kit was produced in the nineties, almost twenty years later it was still fun and entertaining to build. I found while building this kit myself going back to my childhood days listening to that sweet rumble sound of my father’s Harley Davidson.
For the Modeler: This 1:8 scale Revell skill level 2 Harley-Davidson FLSTC Heritage Softail Classic SnapTite kit #7302 is long out of production but you can still find these kits easily at online auctions and garage sales. This kit was molded in black, grey, chrome, clear, red, and amber. To add a realistic touch the tires and the spark plugs with wires are also rubber giving them the curves they would have on the actual motorcycle. This kit was missing was the windshield and decal set but that shouldn’t stop you from building it. To build this kit no special tools are needed since it is a snap together, but with some tools and a little imagination; you can do wonders with this kit. Dimensions are 12†long, 6 3/8†high and 3 5/8†wide.
Covered in this Review: If you want to perfect your build, basic construction; mold lines and sinks are identified and repaired; removing unwanted chrome plating and realistic refinishing; fork mods to remove the windshield; use of adhesives on a SnapTite kit; making realistic side markers; engine detailing; dealing with missing posts in the engine; use of clamps to ensure a good fit; small part painting techniques; how to stretch the plug wires for fit; tire repairs for fit; adding wide whitewalls for realism; detailing the drivetrain; methods for adding a tutone paint scheme; masking for paint effects; saddle bag detailing; makeshift decals; script and fender detailing; a full list of needed paint and supplies; adhesive selections and applications, are all fully examined in this extensive 20 page, full-color Step-by-Step review. Instructions are also included in the review.
Important! – You MUST click on the “Return to Right on Replicas, LLC” link after you’ve made your purchase to download your review!
Â
To get your copy of the full review – just select one of the payment methods above for $4.99 USD.
Click the Buy Now link below to purchase the Step-by-Step review by Lonny Dyer
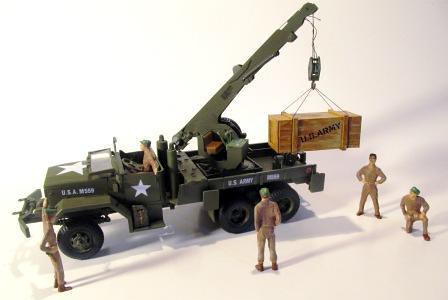
The military wrecker was a vital asset because of its ability to carry mechanics to a broken-down vehicle, but also it could tow vehicles back to a maintenance site if field repairs cannot be affected. The Boom assists in raising vehicles to work on them; it can also be used to lift the power packs (engine/transmission assemblies) from tanks and other armored vehicles. The wrecker also served in the supply yard unloading cargo because a shortage of forklifts. The only other way was having soldiers unload trucks by hand.
By matching body design features and then crane design features I found this kit is actually an M62 5-ton wrecker circa 1951-1959. The M62 5-ton wrecker was introduced in 1951 as the replacement for the WWII era vehicles in the military’s inventory. With its 6-wheel drive 5-ton chassis this class of vehicle had better off-road capabilities than any other vehicle (except a tank) in existence. Add a hydraulic crane with 360 degrees of rotation and a 20,000 pound lift capability and you got a solid workhorse for the postwar Army. The diesel engine just sweetened the pot. These trucks maintained the Army and the Marine Corps into the Vietnam War when they were replaced by the powerful M816 series of wreckers.
For the Modeler: This Revell skill level 2 Military Wrecker Truck kit #85-7816 was originally released as a Renwal Blueprint Model. It is 1:32 scale and consists of 156 plastic pieces molded in gray with five crew members and a shipping crate. Revell has given us a very nice combat support vehicle for our collections. This kit is a very realistic depiction of an important vehicle in the Army’s inventory. The finished kit’s dimensions are L-11″, W-4.5″ H-4.75″
Covered in this Review: If you want to perfect your build, basic construction; repairing sinks and finishing methods for the crew members; crew member paint selection; altered assembly sequence for fit and finish considerations; realistic engine detailing; critical part orientation tips; flash area identification; glue avoidance areas; chassis and undercarriage paint selection; drive shaft and fuel tank repairs; realistic wheel/tire finishing; squaring up the duallies; cab construction alignment; grill repairs; overall paint selection and application guide list; realistic operator bucket and crane finishing; crane rigging; realistic winch detailing; bed and stabilizer construction sequence; clamping methods for a sure fit; attachment points are identified; decal preparation, placement, and authenticity declarations; realistic shipping crate finishing techniques; using setting solutions for decal realism, Â are all fully examined in this extensive 20 page, full-color Step-by-Step review.Â
 Important! – You MUST click on the “Return to Right on Replicas, LLC” link after you’ve made your purchase to download your review!
Â
To get your copy of the full review – just select one of the payment methods above for $4.99 USD.