North American B-25 Mitchell Airfix A04005 1:72 Review

2012 March 30
by Doug

RoR Step-by-Step Review 20120330*
North American B-25 Mitchell 1:72 Scale Airfix Kit # A04005 Review
Click here to buy this kit through Amazon.com

Fig 000

Click the Buy Now link below to purchase the Step-by-Step review by Robert Byrnes Robert Byrnes P47 Thumbnail

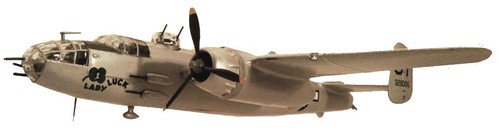
Named after William Mitchell, the leading exponent of American air power between the wars, the B-25 became famous for the Tokyo raid of 1942 when 16 Mitchells led by “Jimmy” Doolittle flew from the carrier USS Hornet. The first production B-25 flew in August 1940, and on December 24th, 1941, a Mitchell became the first American medium bomber to sink a Japanese submarine. The armament of 75mm cannon, fourteen 0.5 in machine guns and 3,000 lbs of bombs made the B-25H one of the most heavily armed aircraft in the world. The last version of the Mitchell to be produced was the B-25J – of the 10,000 Mitchell’s built, over 4,000 were J versions. Some of these were modified in the field to accept a solid nose with eight machine guns, giving a grand total of eighteen. The B-25J was powered by two 1,850 hp Wright Cyclone engines, giving a maximum speed of 280 mph and a range of 1,275 miles. The B-25J had a wingspan 67 ft, 6 in, length 52 ft 11 in.

For the Modeler: This is a skill level 4 (out of 25), 1:72 scale, Airfix Military Aircraft Classic Kit Series model kit molded in 118 gray and clear resin pieces with crew members. I plan on modeling my B-25 right out of the box (OOB) in flight mode configuration using the included decals to replicate 328096 “Lady Luck” of USAFF, 1944-45.

Covered in this Review: If you want to perfect your build; basic construction; preparing parts for better finishing; adhesive selections and applications; kit history; version selection; clamping methods; paint selections and applications; color cross-reference information; repairing large gate divots; making crystal clear canopies with floor polish; removing ejector pin marks from clear resin parts; landing gear up/down considerations; identifying and repairing large gaps and seams; color selections for the crew members; highlighting with pastels; aligning the machine guns; using capillary action for adhesives; correcting a negative dihedral; using superglue and accelerants to fill gaps; tool selection and application; layering fillers in different colors for identification; re-scribing door panels with Dymo tape; masking methods for the canopies; using metalizer paints and sealers; prop finishing methods; decal preparation and setting procedures; using floor polish as a sealer; are all fully examined in this extensive 29 page, full-color Step-by-Step review.


Important! – You MUST click on the “Return to Right on Replicas, LLC” link after you’ve made your purchase to download your review!


To get your copy of the full review – just select one of the payment methods above for $4.99 USD.

Right On Replicas, LLC ©2013 All rights reserved.
*All registered trademarks are the property of their respective brands.

2002 Camaro Monogram 2n1 kit #85-4273 in 1/25 scale Review

2012 March 29
by Doug

RoR Step-by-Step Review 20120329* – 2002 Camaro Monogram 2n1 kit #85-4273 in 1/25 scale Review
Click Here to Buy This Kit
fig 00
 

See the Step-by-Step Review by Tom Schaefer Tom Schaefer

One night at a church function, a very nice lady from our congregation commented how us “car guys” hadn’t asked to test drive her new ’02 SS Camaro. Well…needless to say, I got the hint. After taking the keys, I pulled onto the main road and waited at the first stoplight. Turning on the traction control and giving it a healthy bit of gas, the light turned and that car launched like nothing I had ever driven before! Wow! Upon receiving Revell’s reissued 2002 Camaro 2 in 1, I was excited that I could build a replica of the car I drove that night.

 For the Modeler: – Opening the box I noticed right away that there was a really nice level of detail, a decent parts count (90 pieces), and the options of building a SS, Z28, or a 35th Anniversary edition (so technically a 3 in 1 kit). When you’ve finished the kit it looks great on the shelf but there are some issues that must be addressed to get to that point. Straightening out the chassis, fascia modifications and decal adjustments are all examined in the full review.  

 *All Registered trademarks are the property of their respective brands.


B-17G Flying Fortress 1:72 Revell 85-5861 Review

2012 March 27
by Doug

RoR Step-by-Step Review 20120327*
B-17G Flying Fortress 1-72 Revell 85-5861Kit Review
Click here to buy this kit through Amazon.com

B17 Build [14-MAR-12]_000

Click the Buy Now link below to purchase the Step-by-Step review by Jim Church Jim Church


The Revell Pro Modeler Series has created a very well detailed 1/72 version of the Boeing B-17G Bomber. The kit covers one of the truly iconic aircraft of WW II. By most aviation experts evaluation the B 17G is rated in the top three heavy bombers of all time. The B-17 series came into being in 1934 and continued to evolve and improve through 1945. These rugged planes truly helped bring Nazi Germany to the surrender table in May of 1945.

For the Modeler: The Pro Modeler kit was brought out in 2011. I was very pleased to have a chance to tackle this exciting model. I had not built a multi-engine plane in more the 15 years so I knew this would a challenge to my rusty skills! The kit contains 187 very well detailed parts as well as a great set of decals. The decals may be used to recreate one of four aircraft. I choose to do “Little Miss Mischief”, which is actually two damaged planes that were put together to form a healthy bomber. The “Waterloo Mark II” had had its front severely damaged and “Little Miss Mischief” had taken a direct Flack hit in her radio compartment. So the mechanics at The Bassington Airbase patched the two together, which made for a very interesting paint scheme! This is the plane that I decided to complete.

Covered in this Review: This is a well designed kit but If you want to perfect your build, basic construction; seam identification and repair methods; adhesive selection and application; modular assembly techniques; altered assembly sequence for easier finishing; using metalizer paints; tail gunner modifications; paint selection and application; masking methods; using metalizer sealers; decal preparation and application; using decal setting agents; weathering methods with black washes and chalks; are all fully examined in this extensive 13 page, full-color Step-by-Step review.

Important! – You MUST click on the “Return to Right on Replicas, LLC” link after you’ve made your purchase to download your review!


To get your copy of the full review – just select one of the payment methods above for $4.99 USD.

 
Right On Replicas, LLC ©2012 All rights reserved.
*All registered trademarks are the property of their respective brands.